audi Workshop Repair Guides

Audi Workshop Service and Repair Manuals

Injectors > < High-pressure pump - exploded view
Removing and installing high-pressure pump
Removing
  Note
t  The high-pressure fuel pump should only be removed and installed when the engine is cold.
t  When installing the high-pressure fuel pump, it is essential to ensure that no dirt enters the fuel system.
t  Use a cloth to catch escaping fuel.
t  The O-ring must always be renewed.
t  Always ensure that the high-pressure fuel pipe is free of tension when tightening the connections.
  WARNING
Fuel system operates under high pressure. Always dissipate fuel pressure prior to opening fuel system. For procedure, refer to → Chapter.
–  Remove engine cover panel.
–  Remove intake connecting pipe together with regulating flap control unit -J808- → Chapter.
   
–  Remove union nuts -arrows- at high-pressure pipe, remove bolt -1- from bracket and detach high-pressure pipe.
  Note
t  Do NOT bend open bracket for fuel line.
t  If bracket has been bent open or fuel line has to be renewed, bracket must also be renewed.
  A24-10959
–  Detach connector and fuel supply line -arrows- from high-pressure pump.
  Note
Use a cloth to catch escaping fuel.
  N15-10479
–  Unscrew securing bolts -arrows- evenly.
  N24-10534
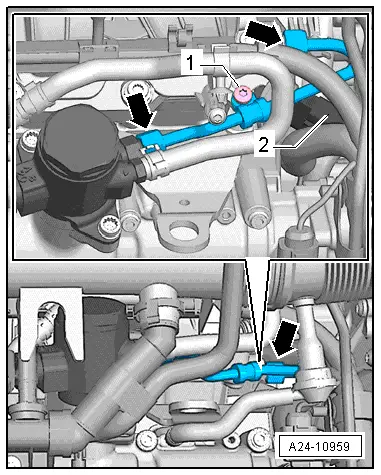
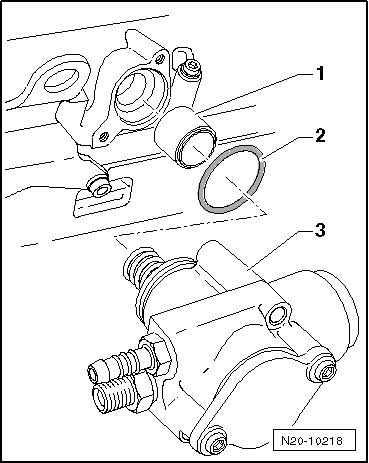
–  Pull high-pressure pump -3- and roller tappet -1- out of camshaft housing.
  Caution
When removing or installing the high-pressure pump, take hold of it only by the housing.
If the piston spring assembly of the high-pressure pump comes loose, the high-pressure pump will leak and must be renewed.
Installing
  Note
Renew O-ring for high-pressure pump.
–  Check roller tappet for damage and renew if necessary.
–  Lubricate roller tappet -1- with clean engine oil.
–  Insert lubricated roller tappet -1- into camshaft housing.
  N20-10218
–  Turn crankshaft in direction of engine rotation until roller tappet is positioned at lowest point.
–  Renew connecting piece for high-pressure pipe at high-pressure pump.
–  Insert a new, oiled O-ring -2- into groove -3- on high-pressure pump.
–  Carefully insert high-pressure pump -3-.
–  Press high-pressure pump down by hand as far as possible onto stop.
  N20-10218
–  At the same time, tighten securing bolts -arrows- by hand.
–  Then tighten securing bolts -arrows- alternately to 5 Nm (do not tilt high-pressure pump).
–  Now tighten securing bolts -arrows- alternately to final torque.
l  Tightening torque: refer to exploded view of high-pressure pump → Chapter.
Fitting instructions for high-pressure pipe: (install free of stress)
–  Screw in union nuts on high-pressure pipe (two threads by hand).
–  Tighten both union nuts on high-pressure pipe as far as stop.
–  Tighten bolt for bracket to 8 Nm.
–  Tighten both union nuts on high-pressure pipe to specified torque.
  N24-10534
–  Re-connect fuel supply line -right arrow- to high-pressure pump (make sure it is securely fitted).
–  Plug electrical connector -left arrow- in again at fuel pressure regulating valve -N276-.
–  Install intake connecting pipe together with regulating flap control unit -J808- → Chapter.
  Note
Check fuel system for leaks.
  N15-10479

Injectors > < High-pressure pump - exploded view