audi Workshop Repair Guides

Audi Workshop Service and Repair Manuals

Adjusting handbrake > < Handbrake lever - exploded view
Brake System
Removing and installing handbrake lever

Spare parts, special tools and workshop equipment required

Removing

  • ‒ Remove centre console.

=> General Body Assembly, Interior; Repair group 68; Storage compartments, covers and trims; Removing and installing centre console.

 
A46-0236
  • ‒ Loosen the hexagon nut -2- until the handbrake is slackened.
  • ‒ Pull the retainer -2- out of the pin -1-
 
A46-0235
  • ‒ Pull the pin -1- out of the lever arm -3-

 
A46-0238
  • ‒ → Release and unplug connector -1-.
  • ‒ Pull out clip with cable guide.
 
A46-0239
  • ‒ → Detach cable tie -1-.
  • ‒ Unscrew hexagon bolts -2-.

 
A46-0237
  • ‒ → Press handbrake lever cover -1- together in direction of arrow and remove.
 
A46-0241
  • ‒ → Press in direction of arrow with screwdriver -1- and pull out operating button.

Installing

 
A46-0242

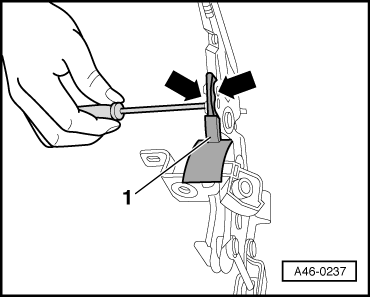
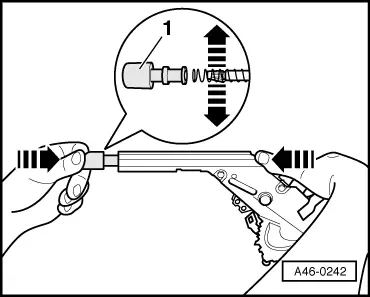
Install operating button in new handbrake lever.

  • ‒ → Insert operating knob -1- in direction of arrow, counterhold push rod until the expanding clips engage.
 
A46-0239
  • ‒ → Screw in hexagon bolts -2-.
    Tightening torque 23 Nm.
  • ‒ Fasten wiring for handbrake switch using cable tie.

 
A46-0240
  • ‒ → Insert handbrake cable -1- using pointed pliers and install pin -3-.
  • ‒ Fit retainer clip.
  • ‒ Remove centre console.

=> General Body Assembly, Interior; Repair group 68; Storage compartments, covers and trims; Removing and installing centre console.

Adjusting handbrake > < Handbrake lever - exploded view