audi Workshop Repair Guides

Audi Workshop Service and Repair Manuals

Checking fuel system for leaks > < Removing and installing fuel filter on vehicles from 05.2002 onwards
Removing and installing fuel change-over valve
Special tools and workshop equipment required
t  Drip tray
  Note
The fuel change-over valve which was fitted on vehicles built up to 10.2001 prevents the fuel in the fuel return pipe from returning to the fuel tank if the fuel temperature reaches a temperature in excess of approx. 72 °C. This is to prevent it from damaging the fuel tank. The fuel return then flows directly to the fuel supply.
   
Removing
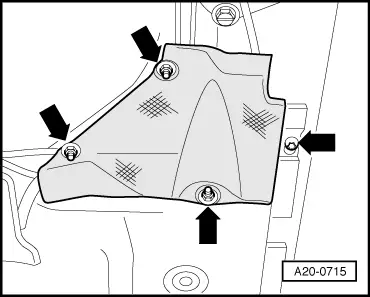
–  Remove heat shield at front right of fuel tank-arrows-.
  A20-0715
–  Place drip tray below change-over valve.
  WARNING
t  In extreme cases the fuel lines and the fuel can reach a temperature of 100 °C on vehicles with unit injector engine. Allow the fuel to cool down before disconnecting the lines - danger of scalding.
t  Wear protective gloves.
t  Wear safety goggles.
–  Mark fuel pipes and then detach pipes by pressing release tabs.
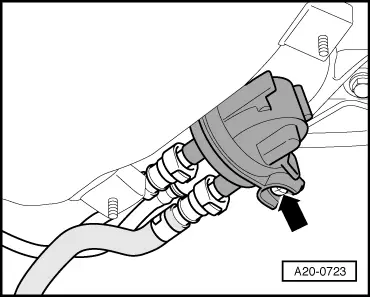
–  Remove bolt -arrow-.
–  Detach change-over valve.
  A20-0723
Installing
Installation is carried out in the reverse order; note the following:
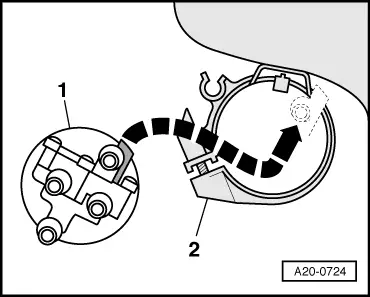
–  Bolt change-over valve on in such a way that lug on valve -1- makes contact with retaining clip -2- as shown in illustration.
  A20-0724
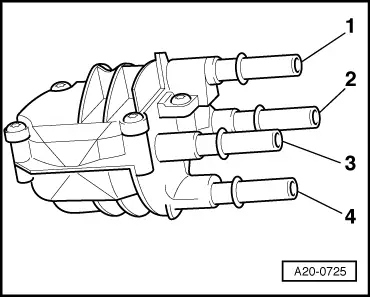
–  Connect fuel pipes as follows:
1 - Supply pipe going to engine
2 - Fuel supply pipe from fuel tank
3 - Fuel return pipe (blue) going to fuel tank
4 - Fuel return line from fuel cooler
Tightening torque
  A20-0725
ComponentNm
Retaining clip for change-over valve3


Checking fuel system for leaks > < Removing and installing fuel filter on vehicles from 05.2002 onwards