audi Workshop Repair Guides

Audi Workshop Service and Repair Manuals

Servicing electrical additional heater - Vehicles with TDI engine > < Removing and installing heater
Heating, Air Conditioner
Removing and installing heater
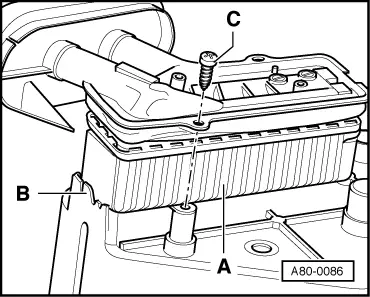
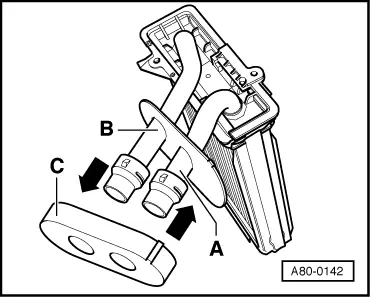
Removing and installing heating system heat exchanger
 
A80-0086
  • ‒ → Remove heater .
  • ‒ Press back catches -B- and remove the heat exchanger -A- from the heater.

Notes:

  • ◆ Secure the installed heat exchanger in the heater flap unit using 2 suitable screws -C- (e.g. 3.2 x 20 mm self-tapping screws).
  • ◆ The heat exchanger is installed in the heater flap unit without an all-round seal (vehicles without map-controlled cooling).
  • ◆ The refrigerant hoses are to be connected on the correct side. Different connection and flow direction of the refrigerant dependent on the type of heat exchanger => Page 80-41.
 
A80-0142
  • ◆ The heat exchanger has been installed in vehicles with map-controlled cooling (to be introduced gradually as of model year 1999 vehicles with 1.6 l engine) which has been adapted to the different usage conditions. The following must be noted for this heat exchanger:
  • ‒ → The flow direction of the refrigerant in the heat exchanger is not marked at the refrigerant connections (observe feed and return flow).
  • ‒ The heat exchanger components carrying refrigerant are produced entirely from metal due to the higher feed refrigerant temperature.

=> Parts List

Servicing electrical additional heater - Vehicles with TDI engine > < Removing and installing heater