audi Workshop Repair Guides

Audi Workshop Service and Repair Manuals

Replacing air conditioner compressor pulley ("Sanden" make) > < Replacing air conditioner compressor pulley ("Zexel / Valeo" make)
Detaching pulley from air conditioner compressor/re-attaching („Zexel/Valeo“ make)
  Note
t  Heed the notes on removal of the pulley for the „Denso“ air conditioner compressor of type „1“. These also apply to this compressor → Chapter.
t  Perform the preparatory work as described for detaching the pulley with the „Denso“ air conditioner compressor of type „1“ → Chapter.
t  The logo of the compressor manufacturer „Zexel“ affixed to the air conditioner compressor was switched as of year of production 2006 (when the manufacturer's name changed) from „Zexel“ to the new name „Valeo“.
Removing drive plate
  Note
t  On air conditioner compressors with part number 1K0 820 803 as of index „N“, the splines of the drive plate are bonded to the splines of the compressor shaft.
t  On air conditioner compressors with part number 1K0 820 803 up to index „L“, the splines of the drive plate are not bonded to the splines of the compressor shaft. With such air conditioner compressors, the drive plate splines may become worn and the compressor may no longer be driven. In this case, check the freedom of movement of the air conditioner compressor and replace the drive plate if necessary using the repair set 1K0 898 814 → Electronic parts catalogue.
   
–  Hold the pulley -A- in position with a commercially available strap wrench (with fabric strap) and slacken off the bolt -B-.
  Note
t  If the overload safeguard of the drive plate -D- has been tripped, the pulley just free-wheels without driving the air conditioner compressor. Check the freedom of movement of the air conditioner compressor by turning the bolt -B-. If stiff, replace the compressor and the pulley. If the air conditioner compressor moves freely, remove the bolts -C- and detach the drive plate. Then hold the drive plate hub in position with pliers to slacken off the bolt -B-.
  A87-10246
t  If the pulley splines have become worn, the bolt -B- cannot be slackened off (the compressor shaft turns with the bolt). In this case, remove the bolts -C- and clamp the drive plate to the air conditioner compressor shaft with the washer -A- (flat side facing outwards), the packing plates -B- and the bolts -C- (contained in the repair set 1K0 898 814 → Electronic parts catalogue).
–  Then remove the bolt -D-.
–  Detach the washer -A- and the drive plate -A-.
  Note
  A87-10247
t  
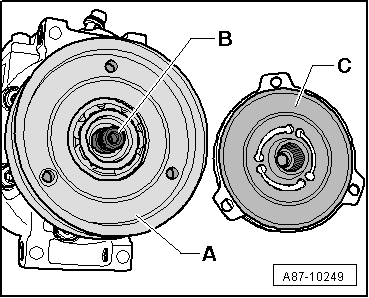
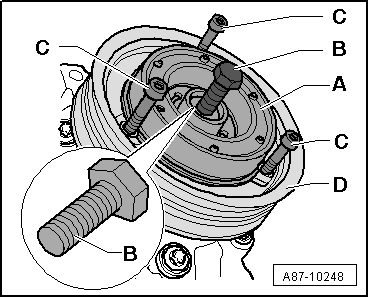
If the drive plate -A- is bonded to the air conditioner compressor shaft, insert three long bolts -C- through the holes of the drive plate -A- into the pulley -D- and then use a commercially available bolt -B- (bolt with M8 thread, flat at front, strength class at least 10.9) to press off the drive plate -A-. When doing so, hold the pulley -D- in position using a commercially available strap wrench (with fabric strap).
t  If the drive plate -A- has already been replaced as part of service work and bonded on using the sealant D 154 102 A1, it may be so firmly attached to the air conditioner compressor shaft that it can no longer be pressed off. In this case the entire compressor must be replaced.
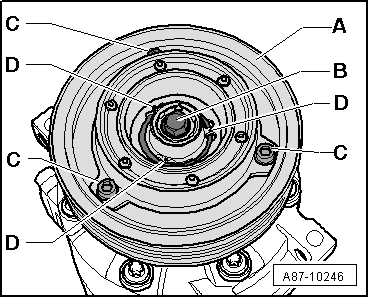
–  If the pulley is to be replaced, remove the circlip and detach the pulley → Chapter.
–  Clean and check the splines of the air conditioner compressor shaft. Replace the air conditioner compressor if the splines show signs of wear.
  Caution
Do not use compressed air when cleaning. Blowing out could cause dirt particles to settle on and damage the air conditioner compressor shaft seal.
Attaching drive plate
  Caution
Do not use compressed air when cleaning. Blowing out could cause dirt particles to settle on and damage the air conditioner compressor shaft seal.
  A87-10248
–  Use a commercially available cleaning agent to remove rust, abrasion, old adhesive and other particles from the splines of the air conditioner compressor shaft -B-, the pulley -A- and the splines of the drive plate -C-.
–  Use a thread cutter for example to remove old locking fluid from the thread in the shaft of the air conditioner compressor -B- and the three threads in the pulley -A-.
–  Check the splines of the air conditioner compressor shaft -B-. Replace the compressor if the splines show signs of wear.
–  Check the splines of the drive plate -C- and replace the drive plate if the splines show signs of wear.
–  If applicable, fit the pulley and the corresponding circlip → Chapter.
–  Moisten the splines of the air conditioner compressor shaft -B- and the drive plate -C- with sealant „D 154 102 A1“ → Electronic parts catalogue.
  Note
t  Apply the sealant sparingly. Make sure sealant does not come into contact with the seal of the air conditioner compressor shaft -B- (in the compressor).
t  The sealant is also an adhesive. After setting, the drive plate can no longer be detached.
  A87-10249
t  The sealant sets within a certain period of time. The drive plate is therefore to be fitted within 5 minutes after moistening the splines with the sealant. The bolts -C- and -B- are also to be tightened to the specified torque within this time → Chapter.
–  Re-install the other components removed in reverse order.
–  Wait one hour (as of fitting the drive plate) before starting the engine.
  Note
The sealant requires roughly one hour to attain the necessary strength.
  A87-10246

Replacing air conditioner compressor pulley ("Sanden" make) > < Replacing air conditioner compressor pulley ("Zexel / Valeo" make)