
A3 Mk2
| Sump, oil pump - exploded view |

| 1 - | Oil level and oil temperature sender -G266- |
| q | Removing and installing → Chapter |
| 2 - | Seal |
| q | Renew |
| 3 - | Sump |
| q | Removing and installing → Chapter |
| q | Apply sealant when installing; refer to → Electronic parts catalogue |
| 4 - | Bolt |
| q | Renew |
| q | 14 Nm + 90° further |
| 5 - | Drive chain sprocket |
| q | For oil pump |
| q | Sprocket can only be fitted on oil pump shaft in one position. |
| q | Counterhold using counterhold tool -T10172- |
| 6 - | Bolt |
| q | Renew |
| q | 20 Nm + 90° further |
| 7 - | Cover |
| q | For chain sprocket |
| q | Clipped onto oil pump |
| 8 - | Drive chain |
| q | For oil pump |
| q | Before removing, mark running direction with paint |
| q | Check for wear |
| q | Removing and installing → Chapter |
| 9 - | Dowel sleeves |
| 10 - | Chain sprocket |
| q | For drive chain for oil pump |
| q | On crankshaft |
| 11 - | Oil pump |
| q | With pressure relief valve |
| q | Removing and installing → Chapter |
| q | Before installing, check that the two dowel sleeves for centring oil pump/cylinder block are fitted |
| 12 - | O-ring |
| q | Renew |
| 13 - | Bolt |
| q | 8 Nm |
| 14 - | Suction pipe |
| q | Clean strainer if dirty |
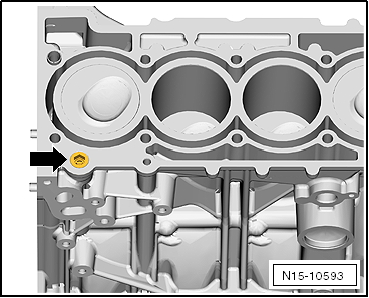
| 15 - | Bolt |
| q | Renew |
| q | Tightening torque and sequence → Fig. |
| q | When loosening and tightening the bolts on the gearbox end, use Allen key, long reach -T10058- |
| 16 - | Seal |
| q | Renew |
| 17 - | Oil drain plug |
| q | 30 Nm |
| 18 - | Nut |
| q | 9 Nm |
 Note
Note
|
|
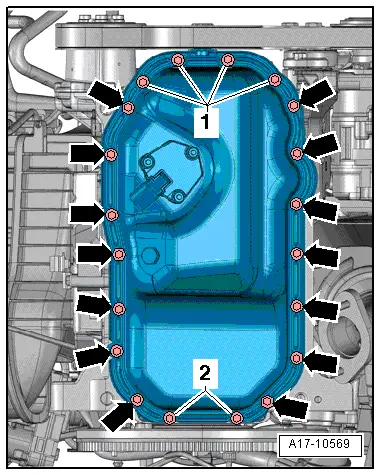
| Stage | Bolts | Tightening torque/angle specification |
| 1. | -1, 2-, -arrows- | 8 Nm |
| 2. | -1, 2- | turn 45° further |
| 3. | -arrows- | turn 90° further |
|
|