audi Workshop Repair Guides

Audi Workshop Service and Repair Manuals

Camshaft timing chain - exploded view > < Timing chain cover - exploded view
Removing and installing timing chain cover
Special tools and workshop equipment required
   
t  Support bracket -10 - 222 A-
  W00-0225
t  Shackle -10 - 222 A /12-
  W00-1091
Removing
–  Remove alternator → Electrical system; Rep. Gr.27.
–  Remove poly V-belt pulley for crankshaft → Chapter.
–  Remove poly V-belt pulley for coolant pump → Chapter.
–  Removing idler roller for poly V-belt → Chapter.
  A10-10024
–  Disengage coolant hose -1- at engine cover panel.
–  Pull oil dipstick -2- out of guide tube.
–  Unscrew bolts -arrows- and remove engine cover panel.
  A10-10950
–  Remove bolt -1- for coolant pipe.
–  Disconnect crankcase breather hose -2- from timing chain cover (press release tabs).
–  Remove sump → Chapter.
  A13-10526
–  Unplug electrical connector -1- for air conditioner compressor regulating valve -N280- at air conditioner compressor.
  WARNING
Risk of injury caused by refrigerant.
The air conditioner refrigerant circuit must not be opened.
–  Remove bolts -arrows- for air conditioner compressor.
  Caution
Danger of damage to refrigerant lines and hoses.
Do NOT stretch, kink or bend refrigerant lines and hoses.
–  Tie up air conditioner compressor together with refrigerant hoses to longitudinal member (refrigerant hoses remain connected).
–  Remove bracket for air conditioner compressor → Rep. Gr.87.
  A10-1637
–  Disconnect line -1- going to activated charcoal filter (press release tab).
  Note
Disregard -item 2-.
  A10-10762
–  Release activated charcoal filter -arrow B-, lift off -arrow A- and move clear to one side with line -1- connected.
  A20-10447
–  Remove bracket -3- for activated charcoal filter.
–  Remove bolt on filler neck -2- for washer fluid reservoir.
–  Detach electrical connector at coolant shortage indicator switch -F66- on coolant expansion tank and move wiring harness clear.
–  Remove bolts for coolant expansion tank -1- and place coolant expansion tank on top of engine with the hoses attached (secure if necessary).
  A13-0646
–  Vehicles from approx. 04.2008 onwards: remove banjo bolt -arrow- for oil supply pipe at timing chain cover.
  A21-10448
–  Loosen bolts -arrows- of assembly mounting at engine approx. 2 turns.
  A10-10019
–  Secure shackle -10 - 222 A /12- to engine lifting eye (right-side).
–  Position support bracket -10 - 222 A- on bolted flanges of wing panels (vehicles up to 05.2008) or body flanges (vehicles from 06.2008 onwards).
l  The spindle is located at rear.
–  Engage hook on spindle in shackle.
–  Apply light tension to spindle.
  A13-10047
–  Remove bolts -1- and -2- and detach connecting bracket.
–  Remove bolts -3 ... 6- and detach engine mounting.
  A13-0647
–  Remove bolts -1 ... 6- and -arrows- for timing chain cover.
–  Raise engine slightly and remove timing chain cover.
–  Use drift to drive out crankshaft oil seal.
  A13-10414
Installing
l  Tightening torques → Chapter, → Fig..
  Note
Renew gasket and O-rings.
–  Clean sealing surfaces; they must be free of oil and grease.
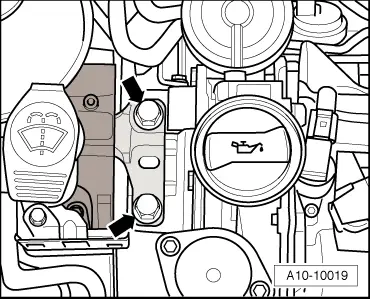
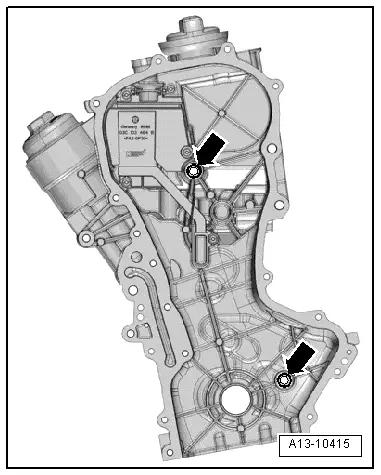
–  Insert O-rings -arrows- on reverse side of timing chain cover.
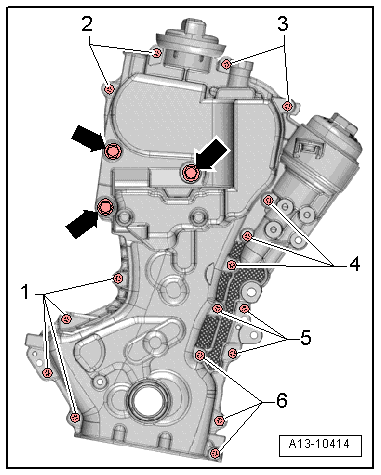
–  Fit gasket onto dowel pins in cylinder block.
–  Screw 2 threaded pins M6x80 into cylinder head and cylinder block to help guide cover.
–  Carefully fit timing chain cover onto threaded pins and dowel pins, then tighten bolts.
The remaining installation steps are carried out in the reverse sequence. Note the following:
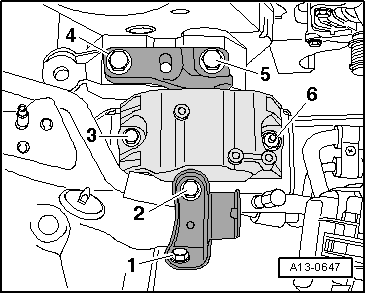
–  Install engine mounting and adjust assembly mountings → Chapter.
–  Renew crankshaft oil seal → Chapter.
–  Install air conditioner compressor → Rep. Gr.87.
–  Install sump → Anchor.
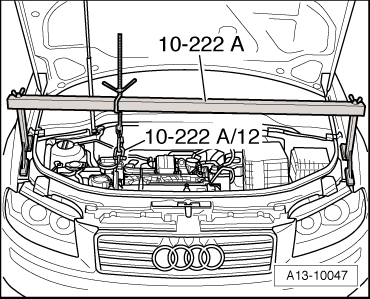
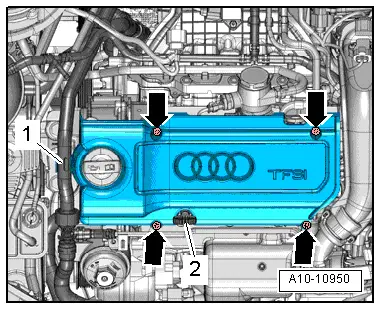
–  Install engine cover panel → Fig..
–  Install idler roller for poly V-belt → Chapter.
–  Install poly V-belt pulley for coolant pump → Chapter.
–  Install poly V-belt pulley for crankshaft → Chapter.
–  Install alternator → Electrical system; Rep. Gr.27.
  A13-10415

Camshaft timing chain - exploded view > < Timing chain cover - exploded view