audi Workshop Repair Guides

Audi Workshop Service and Repair Manuals

Renewing sealing flange - vehicles from VIN 8P_4_103001 onwards > < Removing and installing drive plate
Renewing sealing flange - vehicles up to VIN 8P_4_103000
Special tools and workshop equipment required
   
t  Assembly tool -T10017-
  W00-0630
t  Open ring spanner -V.A.G 1332/11-
t  Hexagon bolt M6×35 mm (3x)
t  Feeler gauge
t  Depth gauge
  W00-10349
Pressing sealing flange with sender wheel off crankshaft
l  Gearbox removed.
  Note
Shown in illustrations with engine removed.
–  Remove the flywheel → Chapter or the drive plate → Chapter.
–  Remove intermediate plate -arrows-.
–  Rotate engine to TDC → Chapter „Checking valve timing“.
–  Remove sump → Chapter.
  A10-10090
–  Remove engine speed sender -G28--arrow-.
  N13-0380
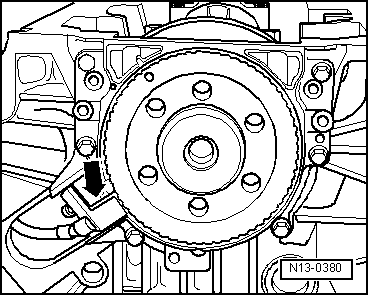
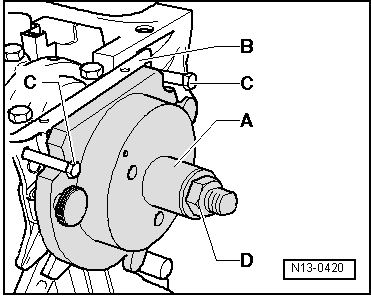
–  Unscrew securing bolts for sealing flange.
  Note
The sealing flange is pressed off the crankshaft together with the sender wheel.
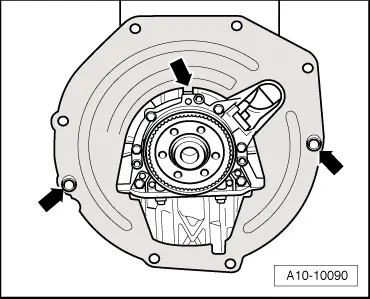
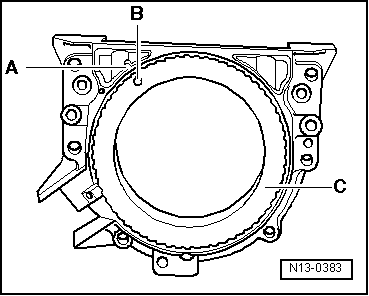
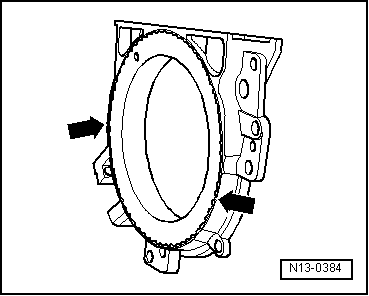
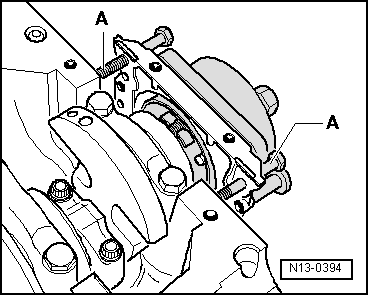
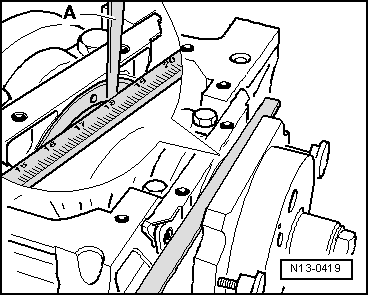
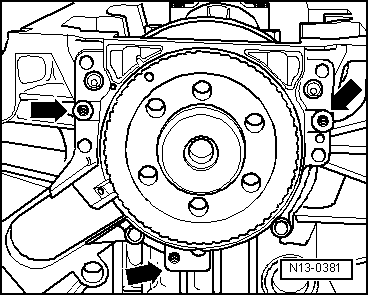
–  To press out, screw in 3 bolts M6x35 -arrows- alternately into sealing flange not more than 1/2 turn at a time.
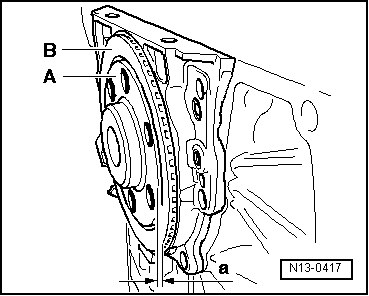
–  Remove sealing flange together with sender wheel.
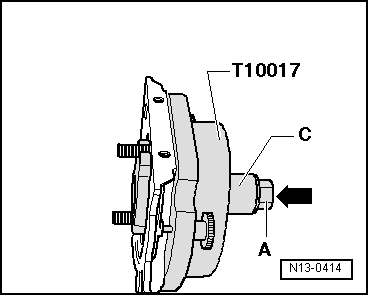
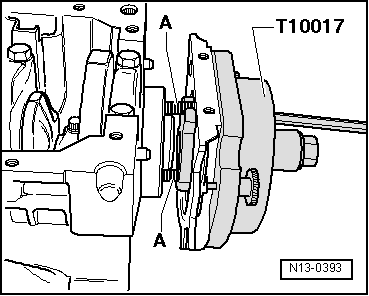
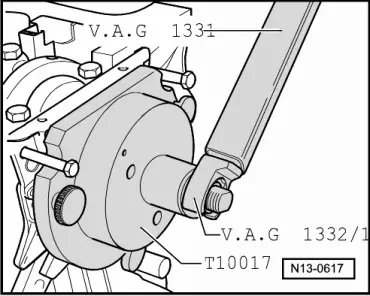
Pressing in sealing flange with sender wheel
  Note
t  
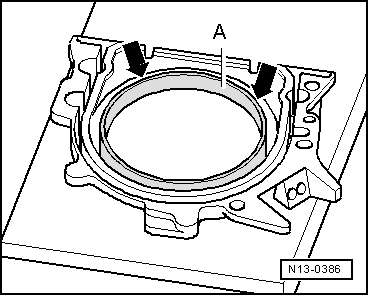
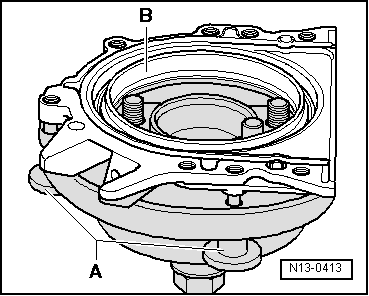
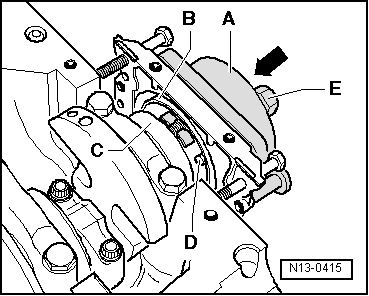
The sealing flange with PTFE oil seal is fitted with a sealing lip support ring. This support ring acts as an assembly sleeve and must not be removed before installation.
t  
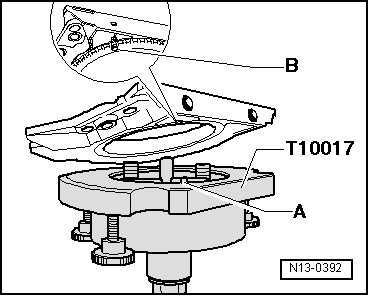
Sealing flange and sender wheel must not be separated or rotated out of position after removal from packaging.
t  
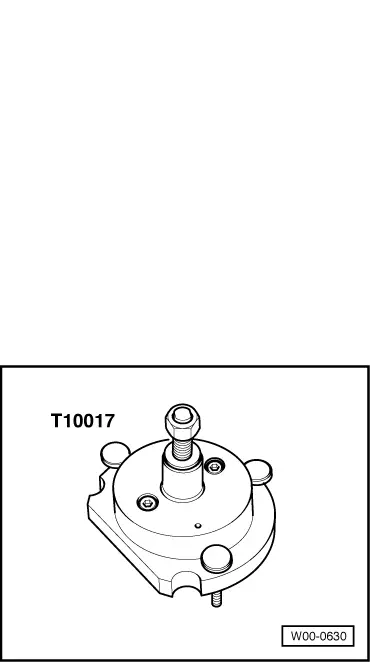
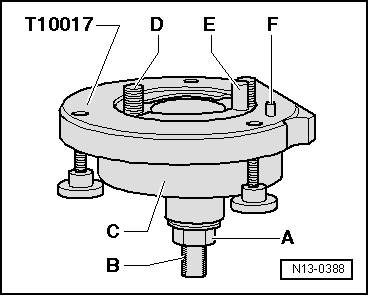
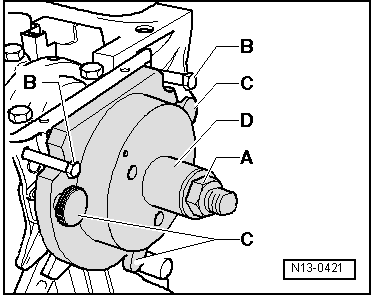
The sender wheel is held in its installation position by a locating pin on the assembly tool -T10017-.
t  The sealing flange and oil seal are one unit and can only be replaced together with the sender wheel.
t  
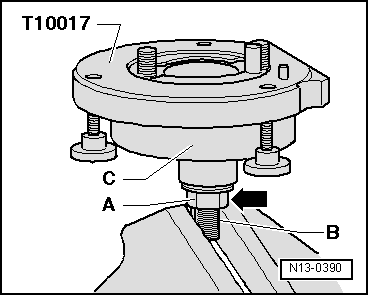
The assembly tool -T10017- is held in the correct position relative to the crankshaft by a guide pin which is inserted into a hole in the crankshaft.
  N13-0381
Construction of assembly tool -T10017-
A - Hexagon nut
B - Tightening flats
C - Assembly housing
D - Hexagon socket-head bolt
E - Guide pin
F - Locating pin
  N13-0388
A - Fitting oil seal with sender wheel onto assembly tool -T10017-:
–  Screw hexagon nut -A- to shortly before the tightening flats -B- on the threaded spindle.
  N13-0388
–  Clamp assembly tool -T10017- in a vice on tightening flats -B- of threaded spindle.
–  Press the assembly housing -C- downwards so that it lies on the hexagon nut -A--arrow-.
l  Inner part of assembly device and assembly housing must align (be level) with each other.
  N13-0390
–  Remove the securing clip -A- from new sealing flange.
  Note
The sender wheel must not be taken out of the sealing flange or rotated out of position.
  N13-0391
l  The locating hole -B- on the sender wheel -C- must align with the marking -A- on the sealing flange.
  N13-0383
–  Place the sealing flange (with the front side downwards) on a clean flat surface.
–  Press the sealing lip support ring -A- downwards in direction of -arrows- until it lies against the flat surface.
  N13-0386
l  The upper edge of the sender wheel and the front edge of the sealing flange must align -arrows-.
  N13-0384
–  Place the sealing flange with the front side on the assembly tool -T10017-, so that the locating pin -A- can be inserted in the sender wheel hole -B-.
  Note
Ensure the sealing flange lies flat on the assembly tool.
  N13-0392
–  Press the sealing flange and sealing lip support ring -B- onto the surface of the assembly tool -T10017- while tightening the 3 knurled screws -A- so that the locating pin will not slip out of the hole in the sender wheel.
  Note
Ensure that the sender wheel remains fixed on the assembly tool when installing the sealing flange.
  N13-0413
B - Installing assembly tool -T10017- with sealing flange on crankshaft flange:
l  Crankshaft flange free of oil and grease.
l  Engine is at TDC position.
–  Screw hexagon nut -A- to end of threaded spindle.
–  Press the threaded spindle of assembly tool -T10017- in direction of -arrow- until the hexagon nut -A- lies on the assembly housing -C-.
–  Position flat edge of assembly housing towards sealing surface for sump on cylinder block.
  N13-0414
–  Secure assembly tool -T10017- to crankshaft flange by screwing hexagon socket head bolts -A- approx. 5 threads into crankshaft flange.
  N13-0393
–  Screw two bolts M6×35 mm -item A- into cylinder block to guide sealing flange.
  N13-0394
C - Fitting assembly tool -T10017- onto crankshaft flange:
–  Press the assembly housing -A- by hand in the direction of the -arrow- until the sealing lip support ring -B- lies on the surface of the crankshaft flange -C-.
–  Insert the guide pin -D- into hole in crankshaft. This ensures that the sender wheel reaches its final installation position.
–  Tighten the 2 hexagon socket head bolts on assembly tool finger-tight.
–  Screw hexagon nut -E- onto threaded spindle by hand until it lies against the assembly housing -A-.
  N13-0415
D - Pressing sender wheel onto crankshaft flange with assembly tool -T10017-:
–  Tighten hexagon nut of assembly tool -T10017- to 35 Nm.
  Note
A small air gap must be present between cylinder block and sealing flange after tightening hexagon nut to 35 Nm.
  N13-0617
E - Checking installation position of sender wheel on crankshaft:
–  Screw hexagon nut -A- to end of threaded spindle.
–  Unscrew the 2 bolts -B- out of cylinder block.
–  Unscrew the 3 knurled screws -C- from sealing flange.
–  Remove assembly tool -T10017-.
–  Remove sealing lip support ring.
  N13-0421
l  The sender wheel is positioned correctly on the crankshaft if the distance -a- between the crankshaft flange -A- and sender wheel -B- is 0.5 mm.
  N13-0417
–  Place a depth gauge against the crankshaft flange.
–  Using a feeler gauge -A-, measure distance -a- between crankshaft flange and sender wheel.
If distance -a- is too small:
–  Press in the sender wheel further → Anchor.
When distance -a- is achieved:
–  Continue with assembly → Anchor.
  N13-0419
F - Pressing sender wheel in further:
–  Slide assembly housing -A- to sealing flange -B- by hand.
–  Screw two M6×35 mm bolts -C- into cylinder block to guide sealing flange -B-.
–  Screw hexagon nut -D- onto threaded spindle by hand until it lies against the assembly housing -A-.
  N13-0420
–  Tighten hexagon nut of assembly tool -T10017- to 40 Nm.
–  Check installation position of sender wheel on crankshaft again → Anchor.
If distance -A- is still too small:
–  Tighten hexagon nut of assembly tool -T10017- to 45 Nm.
–  Check installation position of sender wheel on crankshaft again → Anchor.
  N13-0617
Assembling:
–  Tighten the new securing bolts for sealing flange in diagonal sequence.
–  Secure engine speed sender -G28--arrow-.
–  Install sump → Anchor.
–  Engage intermediate plate on sealing flange and slip onto dowel sleeves.
–  Install the flywheel → Chapter or the drive plate → Chapter.
Tightening torques
  N13-0380
ComponentNm
Sealing flange to cylinder block12
Engine speed sender -G28- to cylinder block5


Renewing sealing flange - vehicles from VIN 8P_4_103001 onwards > < Removing and installing drive plate