audi Workshop Repair Guides

Audi Workshop Service and Repair Manuals

Removing and installing oil pump > < Removing and installing coarse oil separator, engine codes BZB, CAWB, CBFA, CCTA, CDAA, CCZA
Removing and installing sump (bottom section)
Special tools and workshop equipment required
   
t  Used oil collection and extraction unit -V.A.G 1782-
t  Electric drill with plastic brush
t  Safety goggles
t  Silicone sealant → Electronic parts catalogue
Removing
–  Remove noise insulation → Rep. Gr.66.
Cabriolet
–  Remove noise insulation frame → Rep. Gr.50.
All models:
  W00-10211
–  Unplug electrical connector -1- for oil level and oil temperature sender -G266-.
–  Drain off engine oil.
  A10-10025
–  Remove bolts -1 ... 20-.
–  Take off sump: if necessary loosen it by striking lightly with a rubber hammer.
Installing
l  Tightening torques → Chapter „Sump, oil pump - exploded view“
  Caution
Protect lubrication system and bearings against contamination.
Cover exposed parts of the engine.
t  Silicone sealant → Electronic parts catalogue
  Note
t  Note the expiry date of the silicone sealant.
t  The sump must be installed within 5 minutes after applying the silicone sealant.
–  Spray sealing surface with sealant remover and wait for it to take effect.
–  Remove sealant remaining on sump (top section) with flat scraper.
  WARNING
Protect eyes against injuries.
Wear safety goggles.
  A17-10270
–  Remove sealant residue on sump (bottom section) using rotating plastic brush or similar.
–  Clean sealing surfaces; they must be free of oil and grease.
  N17-0012
–  Cut off nozzle of tube at front marking (Ø of nozzle approx. 3 mm).
  A17-0081
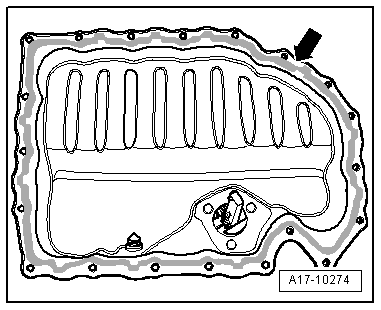
–  Apply bead of silicone sealant onto clean sealing surface of sump (bottom section), as illustrated.
  Caution
Make sure lubrication system is not clogged by excess sealant.
The bead of sealant must not be thicker than specified.
t  Thickness of sealant bead: 2 ... 3 mm
  Note
t  The sump must be installed within 5 minutes after applying the silicone sealant.
t  The bead of sealant must not be thicker than specified, otherwise excess sealant can enter the sump and obstruct the strainer in the oil intake pipe.
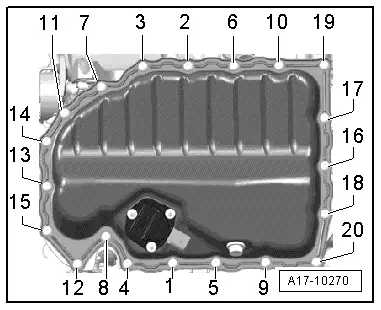
–  Immediately fit sump (bottom section) and tighten bolts; tightening sequence → Fig..
  Note
After fitting sump assembly, the sealant must dry for approx. 30 minutes. Then (and only then) fill the engine with engine oil.
–  Fill with engine oil and check oil level → Booklet808.
Further assembly is basically carried out in reverse order of dismantling.
  A17-10274

Removing and installing oil pump > < Removing and installing coarse oil separator, engine codes BZB, CAWB, CBFA, CCTA, CDAA, CCZA