| –
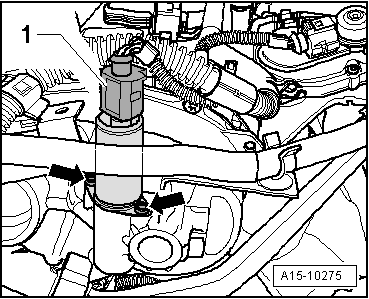
| Unplug electrical connector -1- from camshaft control valve 1 -N205-. |
| –
| Remove bolts -arrows- and take camshaft control valve 1 -N205- out of housing. |

Note | t
| Make sure the camshaft control valve 1 -N205- and the housing are free from any kind of dirt. |
| t
| Do not remove camshaft control valve 1 -N205- from packaging until you are ready to install it. |

Caution | Do not expose the camshaft control valve 1 -N205- to shock impacts. |
|
| –
| Lubricate the seal with engine oil. |
| –
| Carefully fit camshaft control valve 1 -N205- into housing and press in by hand as far as the stop (exert pressure in line with axis of valve). |
| –
| Screw in bolts and tighten to 4 Nm using torque wrench -V.A.G 1783-, ratchet insert 1/4" -VAS 6234-, Torx bit T20 and bit holder from Torx bit set -V.A.G -. |
| Further assembly is basically carried out in reverse order of dismantling. |
|
|
|