audi Workshop Repair Guides

Audi Workshop Service and Repair Manuals

Cylinder block (gearbox end) > < Renewing crankshaft oil seal - pulley end
Removing and installing sealing flange (front)
   
Removing and installing sealing flange (front)
Special tools and workshop equipment required
t  Counterhold tool -3415-
t  Assembly tool -T10053-
t  Torque wrench -V.A.G 1331-
t  Torque wrench -V.A.G 1332-
t  Electric drill with plastic brush attachment
t  Safety goggles
t  Sealant → Parts catalogue

Removing
–  Remove poly V-belt → Chapter.
–  Remove toothed belt → Chapter.
   
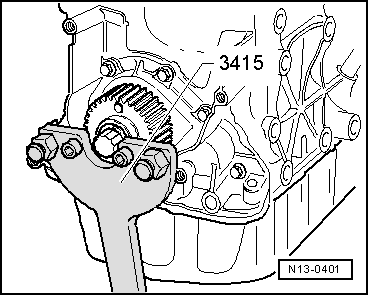
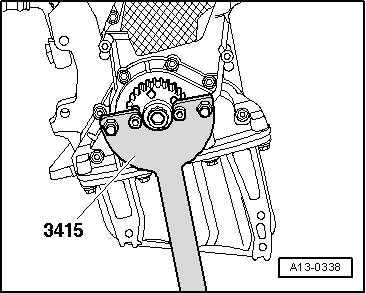
–  Remove crankshaft toothed belt sprocket. To do this, counter-hold sprocket with special tool -3415-.
  N13-0401
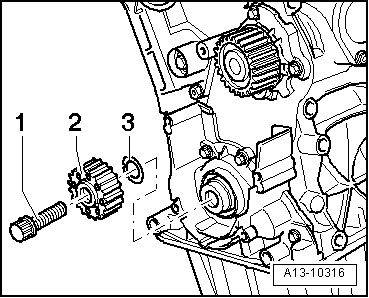
–  Unscrew central bolt -1- for crankshaft toothed belt sprocket -2- and remove sprocket.
–  Remove diamond-coated washer -3- from toothed belt sprocket.
  A13-10316
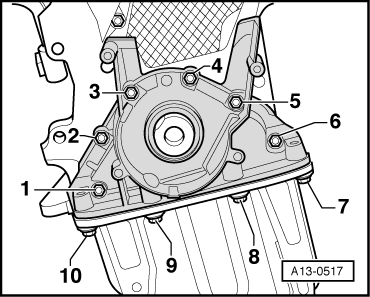
–  Remove bolts -1 ... 10-.
–  Lever off front sealing flange and remove.
–  Drive out oil seal with flange removed.
Installing
l  Tightening torque → Chapter
  Note
Place a cloth over the exposed section of the sump.
–  Carefully remove any sealant residue on the cylinder block and sump.
  WARNING
Wear safety goggles.
  A13-0517
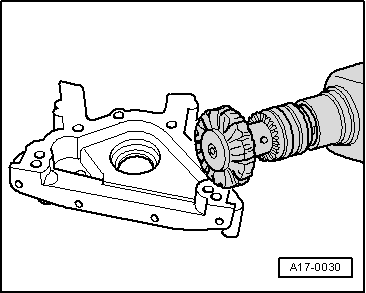
–  Remove sealant residue from sealing flange with rotating plastic brush or similar.
–  Clean sealing surfaces; they must be free of oil and grease.
  A17-0030
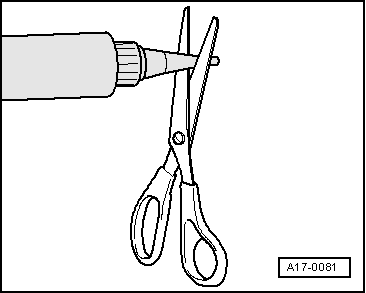
–  Cut off tube nozzle at front marking (diameter of nozzle approx. 2 mm).
  A17-0081
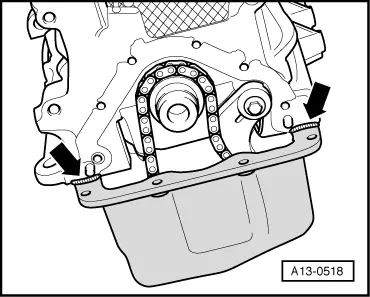
–  Apply a thin bead of sealant at the edge of the joint between the cylinder block and the sump -arrows-.
  A13-0518
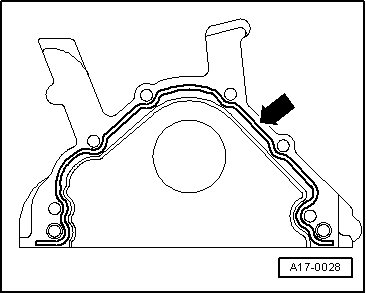
–  Apply the bead of sealant onto the clean sealing surface of the sealing flange as illustrated -arrow-.
l  Thickness of sealant bead: 2 ... 3 mm
  Caution
Make sure oil strainer is not clogged by excess sealant.
The bead of sealant must not be thicker than specified.
  Note
Sealant bead must not be wider than 3 mm, otherwise excess sealant could ingress into sump and clog strainer in oil intake pipe.
  A17-0028
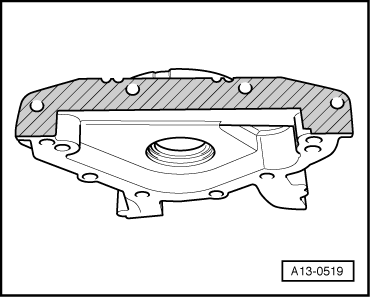
–  Coat the lower sealing surface on the sealing flange lightly with sealant -hatched area-.
  Note
The sealing flange must be installed within 5 minutes after applying sealant.
–  Push the sealing flange carefully onto the dowel pins on the cylinder block.
  Note
Use guide sleeve -T10053/1- to attach sealing flange with oil seal fitted.
  A13-0519
–  Tighten sealing flange bolts in three stages as follows:
1.  Screw in bolts -1 ... 10- hand-tight.
2.  Tighten bolts -1 ... 6- in diagonal sequence and in stages.
3.  Then tighten bolts -7 ... 10-.
–  Install crankshaft oil seal (pulley end) → Anchor.
  A13-0517
–  Install crankshaft toothed belt sprocket -2- with new diamond-coated washer -3- and new central bolt -1-.
  Note
t  Contact surfaces between toothed belt sprocket, diamond-coated washer and crankshaft must be free of oil.
t  Do not lubricate bolt for crankshaft sprocket.
  A13-10316
–  Use counterhold tool -3415- to tighten crankshaft toothed belt sprocket.
Remaining installation steps are carried out in reverse sequence; note the following:
–  Install toothed belt → Chapter.
–  Install crankshaft pulley → Chapter.
–  Install poly V-belt → Chapter.
  Note
Thread and shoulder must be free of oil and grease.
  A13-0338

Cylinder block (gearbox end) > < Renewing crankshaft oil seal - pulley end