audi Workshop Repair Guides

Audi Workshop Service and Repair Manuals

Removing and installing fuel delivery unit > < Fuel delivery unit and fuel gauge sender - exploded view
Fuel system pressurisation pumpG6 - electrical test
   
Fuel system pressurisation pump -G6- - electrical test
Special tools and workshop equipment required
t  Remote control -V.A.G 1348/3 A- with adapter cable -V.A.G 1348/3-3-
t  Hand-held multimeter -V.A.G 1526C-
t  Auxiliary measuring set -V.A.G 1594C-

   
Procedure
Observe test conditions → Chapter.
–  Remove rear seat bench → Rep. gr.72.
–  Unclip retaining tabs -arrows- for flange cover.
  A20-1206
–  Unplug electrical connector -arrow- at flange.
  A20-1067
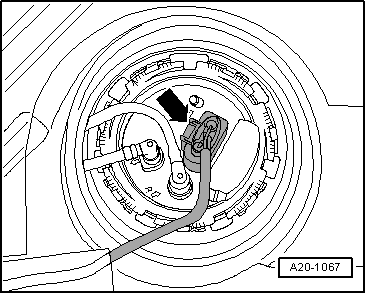
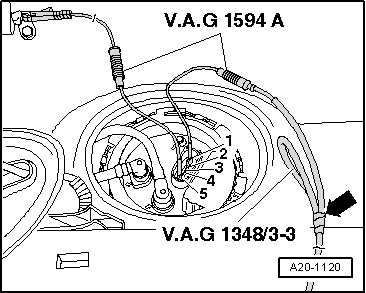
–  Connect remote control -V.A.G 1348/3 A- with adapter cable -V.A.G 1348/3-3- to contact -1- using a test lead from auxiliary measuring set -V.A.G 1594C-.
–  Tape off 2nd connector contact of the adapter cable -V.A.G 1348/3-3- with insulating tape -arrow- to prevent short circuits.
–  Connect contact -5- to the body (earth) using a test lead from auxiliary measuring set -V.A.G 1594C-.
–  Connect crocodile clip to positive („+“) battery terminal.
–  Press remote control button.
l  Pump should start running audibly.
  Note
The fuel pump runs very quietly. Where possible, avoid noisy surroundings for this test.
  A20-1120
If no noise can be heard from pump:
–  Remove fuel delivery unit → Chapter.
–  Check that the electrical wires between flange and fuel pump are connected and test for continuity.
If no fault is found in wiring, fuel pump is defective. Renew fuel delivery unit.
–  Install fuel delivery unit → Anchor.
  A20-0477

Removing and installing fuel delivery unit > < Fuel delivery unit and fuel gauge sender - exploded view