audi Workshop Repair Guides

Audi Workshop Service and Repair Manuals

Exploded view of front bumper, RS4 > < Removing and installing front bumper up to Model Year 2005
Exploded view of front bumper as of Model Year 2006
   
Exploded view of front bumper as of Model Year 2006
1 - Bolt
q   6 Nm
2 - Bolt
q   23 Nm
3 - Bumper cross member
q   Bumper cover removed
q   Removal involves unscrewing the bolts -2-.
q   Unplug the connectors to the horns and detach the bumper cross member to the front from the impact absorbers.
4 - Pop rivet
5 - Horn
q   To remove, drill off the rivet heads.
6 - Support
  Note
Make sure the support bracket extends on screwing in the adjusting screw.
q   Before fitting the bumper cover, set the adjusting screw of the support → Fig.
q   Tighten the adjusting screw with a long Torx wrench -T 30- through the holes in the cover -arrows- to 2 Nm.
q   To remove, drill the heads off the pop rivets.
7 - Pop rivet
8 - Horn
9 - Wing brace
10 - Guide
q   The side section of the bumper cover must be clipped in between the wing and guide → Fig.
11 - Bolt
q   1 Nm
12 - Bolt
q   1 Nm
13 - Bumper cover
  Note
On installation, the assembly/attachment sequence described below must be observed to ensure correct fitting.
–  Position the cover on the vehicle and first clip the left and right side sections into the guides -10-.
–  Tighten the nuts at the wing mounting flange → Fig.
–  Tighten the bolts -12- at the wheel housing liner.
–  Loosely screw in the bolts -1-.
q   Close the bonnet and check the alignment of the cover.
q   Correct the position of the cover if necessary and tighten the bolts -12-.
q   Tighten the bolt at the support to 2 Nm → Fig.
q   Removing and installing bumper cover → Chapter
q   Removing and installing cross member → Chapter

   
Wing mounting flange
–  On installation, make sure the clips -2- are attached to the studs.
–  Tighten the nuts -4- after inserting the bumper cover -1- in the wing -3-.
4 - Nut 4 Nm
  A63-10073
Adjusting support
  Note
t  
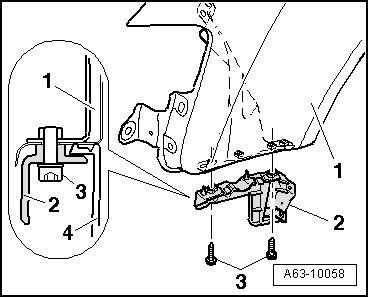
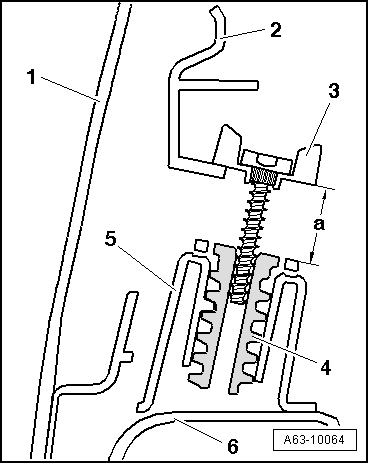
Make sure the support bracket -4- extends on screwing in the adjusting screw -3-.
t  If the support bracket does not extend, apply a small droplet (tiny amount) of locking fluid “D 000 600 A2” to the thread of the adjusting screw -3- and allow the locking fluid to harden.
t  Screw in the adjusting screw as far as dimension -a-.
t  The increased friction causes the support bracket to extend on screwing in the adjusting screw.
–  Before fitting the bumper cover -1-, set the adjusting screw -3- of the support -5- to dimension -a- = 21 mm +1 mm.
–  The support bracket -4- must be fully screwed in (left-hand thread).
–  The adjusting screw -3- and support bracket -4- are part of the scope of delivery of the support and are not replacement parts.
–  Screwing in the screw -3- screws out the support bracket -4-, causing it to hold the mount -2- of the bumper cover -1- in the specified position.
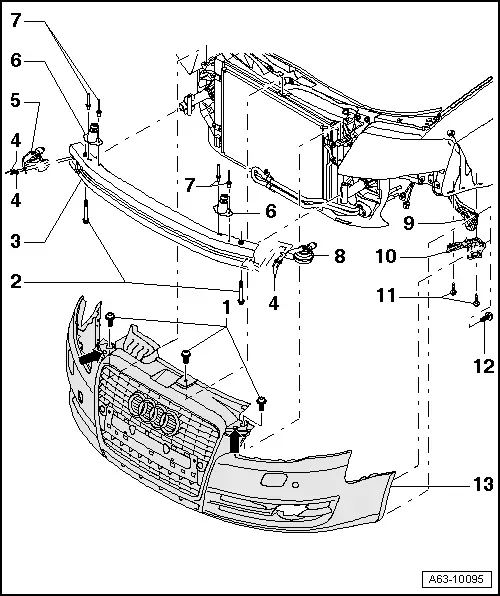
–  The support -5- is attached to the bumper cover -6- with pop rivets.
  A63-10064
Clamping pins for noise insulation
–  On removing the bumper cover -1-, turn the clamping pins -2- through 180° and pull them out of the speed nut -4- of the noise insulation -3-.
  A63-10057
Removing guide
–  Bumper cover removed
–  Unscrew the bolts -3- and pull the guide -2- downwards out of the wing -1-.
–  On installation, the bumper cover -4- must engage properly in the guide.
  A63-10058
Brace for wheel housing liner
–  For securing the front wheel housing liner -3-.
–  On installing the brace -1-, tighten the bolt -2-.
2 - Bolt 10 Nm
  A63-10063

Exploded view of front bumper, RS4 > < Removing and installing front bumper up to Model Year 2005