
A4 Cabriolet Mk2
| Removing and installing three-point seat belt with belt tensioner (rear) |
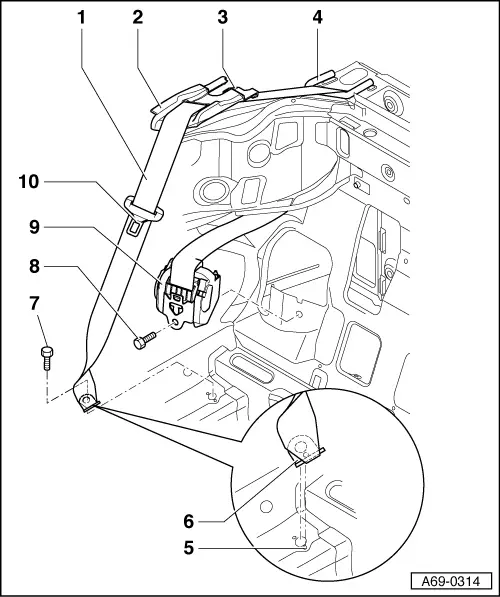
| 1 - | Belt |
| 2 - | Belt guide |
| 3 - | Connecting link |
| 4 - | Guide roller |
| 5 - | Locator stud |
| 6 - | Outer floor panel anchorage point |
| 7 - | Bolt |
| q | Tightening torque: 55 Nm |
| 8 - | Bolt |
| q | Tightening torque: 55 Nm |
| 9 - | Belt reel/belt tensioner |
| t | Removing |
 WARNING
|
| – | Disconnect battery. |
| – | Remove rear seat bench → Chapter. |
| – | Remove rear seat backrest → Chapter. |
| – | Open convertible roof compartment. |
| – | Unscrew bolt -8-. |
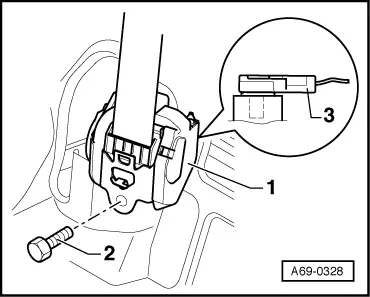
| – | Unplug connector for belt tensioner → Fig.. |
| – | Take out belt reel -9-. |
| – | Unscrew bolt -7-. |
| – | Unclip belt guide -2- at front and detach belt guide -2-. |
| – | Open connecting link -3- at belt guide -2-. |
| – | Pull belt -1- out of belt guide -2- and guide fitting -4-. |
| t | Installing |
| – | Plug in connector at belt tensioner → Fig.. |
| – | Screw on belt reel -9- with bolt -8-. |
| – | Thread belt -1- into guide fitting -4-. |
| – | With connecting link -3- open, thread belt -1- into guide -2-. |
| – | Close connecting link -3-. |
| – | Engage belt guide -2- at rear and press on belt guide -2- at front. |
| – | Make sure belt guide -2- is engaged in side trim at front. |
| – | Make sure outer floor panel anchorage point -6- engages in locator stud -5-. |
| – | Screw on outer floor panel anchorage point -6- with bolt -7-. |
| – | Install seat belt (rear) in reverse order of removal. |
| 10 - | Latch plate |
|
|