audi Workshop Repair Guides

Audi A4 Cabriolet Workshop Service and Repair Manuals

Removing and installing housing for ATF supply unit and stator shaft > < Removing and installing complete ATF supply unit (gearbox not dismantled)
Removing and installing ATF pump in housing of ATF supply unit
   
Removing
l  ATF supply unit removed.
–  Turn ATF supply unit upside down.
–  Remove circlip -1- and remove set of plates -2- from cylinder “C”.
  A38-10043
–  Press dished spring down using workshop press with mounting bracket -T10289-.
–  Remove split retaining ring -1-.
–  Release workshop press.
  A38-10044
–  Detach dished spring -5-.
  A38-10009
  WARNING
Wear safety goggles.
–  Carefully press piston “C” out of ATF supply unit by applying compressed air.
  A38-10045
–  Remove bolts -3 … 10-.
–  Unscrew bolts -1- and -2- approx. 5 turns.
  A38-10048
–  Apply TORX key with extension -1- to bolt head as illustrated.
–  Loosen the ATF supply unit by gently tapping the two bolts alternately with a plastic-headed hammer -arrow-.
–  Unscrew remaining two bolts.
–  Detach housing of ATF supply unit.
  A38-10049
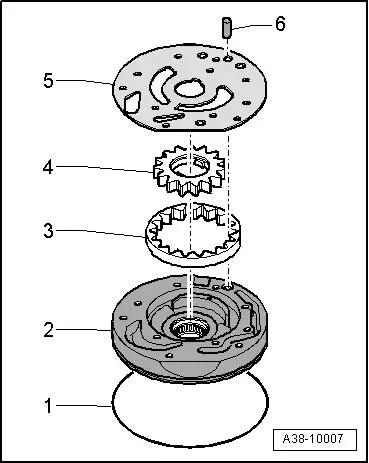
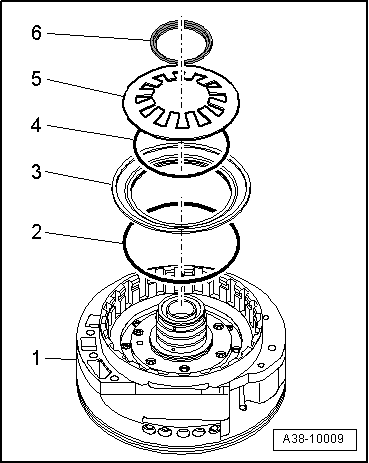
–  Remove intermediate plate -5- and locating sleeve -6-.
–  Remove ATF pump gears -3- and -4- from ATF pump housing -2-.
1 - O-ring
Installing
  Caution
Before assembly, check the individual components of the ATF pump for traces of wear and damage → Chapter.
–  Renew O-ring -1- on ATF pump housing.
–  Insert ATF pump gears -3- and -4- into ATF pump housing -2-.
l  The dots marked on the ATF pump gears face the intermediate plate -5-.
–  Fit intermediate plate and insert locating sleeve -6-.
l  The locating sleeve engages into the rectangular opening on the intermediate plate
  A38-10007
–  Screw guide pins -T10288/4- into the two opposite bores in housing of ATF supply unit.
  A38-10050
–  Fit housing of ATF supply unit onto ATF pump.
–  Tighten bolts on ATF pump in two stages as follows:
  A38-10048
StepTightening sequence
I
–  Tighten bolts to 5 Nm in sequence -1 ... 10-.
II
–  Tighten bolts to 10 Nm in sequence -1 ... 10-.

   
–  Renew O-rings -2- and -4- for piston “C”-item 3-.
–  Insert piston “C”-item 3- into ATF supply unit -item 1- as far as stop.
–  Fit dished spring -5-.
6 - Split retaining ring
  A38-10009
–  Press dished spring down using workshop press with mounting bracket -T10289-.
–  Insert split retaining ring -1-.
l  Collar of split retaining ring faces downwards.
–  Release workshop press.
  A38-10044
–  Insert corrugated spring -2- into cylinder “C”-item 1-.
–  Fit outer plates -3- and friction plates -4- alternately.
–  Insert thick outer plate -5-.
  Note
Make sure that the rounded edges of the thick outer plate face friction plate -4- and not circlip -6-. The contact surface for the circlip is thus increased.
–  Insert circlip -6-.
  Note
The clutch clearance must be re-adjusted → Anchor if the set of plates for clutch “C” has been renewed.
  A38-10010

Removing and installing housing for ATF supply unit and stator shaft > < Removing and installing complete ATF supply unit (gearbox not dismantled)