
A4 Cabriolet Mk2
| Cylinder head - exploded view |

| 1 - | Hall sender -G40- |
| q | For camshaft position |
| 2 - | 10 Nm |
| q | Apply locking fluid when installing; refer to → Electronic parts catalogue |
| 3 - | 15 Nm |
| 4 - | 100 Nm |
| q | Use counterhold tool -T10051- when loosening and tightening → Chapter „Removing and installing camshaft“ |
| 5 - | Hub |
| q | With sender wheel for Hall sender -G40- |
| q | To remove, use puller -T10052- → Chapter „Removing and installing camshaft“ |
| 6 - | Cylinder head bolt |
| q | Renew |
| q | Note correct sequence when loosening → Anchor |
| q | Note correct sequence when tightening → Anchor |
| q | Ensure that washers → Item are fitted in cylinder head |
| 7 - | Gasket for cylinder head cover |
| q | Renew if damaged or leaking |
| q | Only available together with cylinder head cover |
| q | Before fitting, apply sealant at sealing points → Fig. |
| q | Sealant → Electronic parts catalogue |
| q | Insert lugs into holes on cylinder head |
| 8 - | Crankcase breather hose |
| 9 - | Cap |
| 10 - | Seal |
| q | Renew if damaged or leaking |
| 11 - | Filler cap |
| 12 - | Special bolt, 10 Nm |
| q | Renew if damaged or leaking |
| q | Note correct sequence for loosening and tightening → Chapter „Removing and installing cylinder head cover“ |
| 13 - | Cylinder head cover |
| q | Removing and installing → Chapter |
| 14 - | Gasket |
| q | Renew |
| 15 - | Tandem pump |
| q | Removing and installing → Rep. Gr.20 |
| 16 - | M6 = 9 Nm; M8 = 22 Nm |
| 17 - | 9 Nm |
| 18 - | Connection |
| 19 - | Seal |
| q | Renew |
| 20 - | Cylinder head |
| q | Removing → Chapter |
 Caution
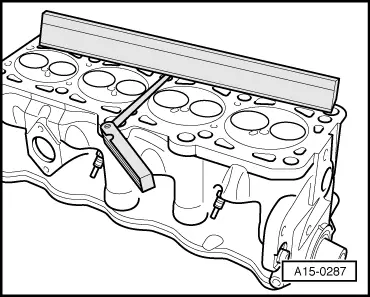
|
| q | Checking for distortion → Fig. |
| q | Installing → Anchor |
| q | If renewed, change coolant and engine oil |
| 21 - | Oil supply pipe |
| q | To turbocharger |
| 22 - | Banjo bolt, 25 Nm |
| 23 - | Seals |
| q | Renew |
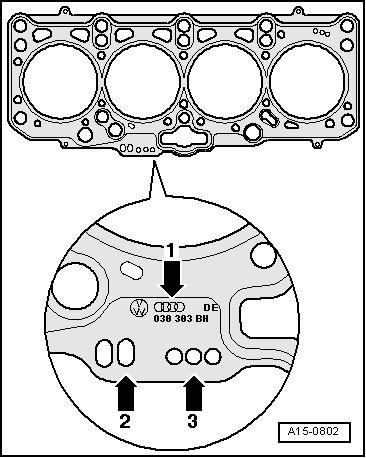
| 24 - | Cylinder head gasket |
| q | Renewing → Chapter „Removing and installing cylinder head“ |
| q | Note marking → Fig. |
| q | If renewed, change coolant and engine oil |
 Note
Note
|
|
|
|
|
|