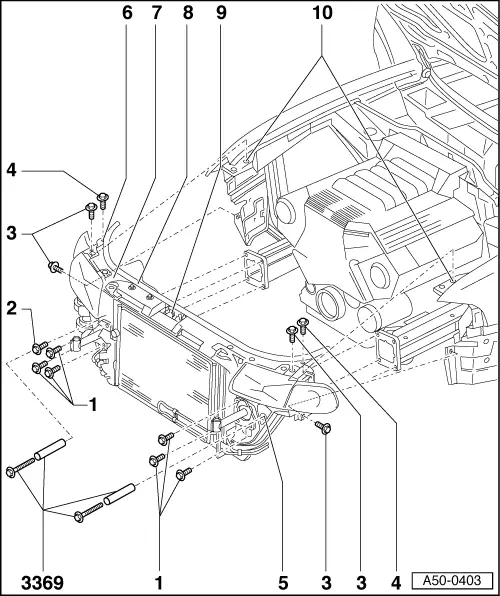
audi Workshop Repair Guides

Audi Workshop Service and Repair Manuals

Lock carrier service position > < Body front
General Body Assembly
Body front
Removing and installing lock carrier with ancillary components
  • Hexagon bolt (6x)
    • ◆ Tightening torque 45 Nm.
  • Hexagon bolt
    • ◆ Tightening torque 45 Nm.
  • Hexagon bolt (4x)
    • ◆ Tightening torque 10 Nm.
  • Hexagon bolt (2x)
    • ◆ Tightening torque 10 Nm.
  • Hole for special tool
    • ◆ For service position: fit special tool 3396 here.
  • Hole: Lock carrier
    • ◆ Mount for service position.
 
A50-0403
  • Lock carrier
    • ◆ Removal:
    • ‒ Remove bumper: .
    • ‒ Remove noise insulation
      .
    • ‒ Disengage Bowden cable for the bonnet lock=>Page55-9.
    • ‒ Unbolt air duct between lock carrier and air cleaner (air duct is bolted to lock carrier).
    • ‒ Detach electrical connectors.
    • ‒ Drain coolant and disconnect coolant hoses =>Fig.2.
    • ‒ Detach condenser from lock carrier only (do not disconnect lines) and secure with wire (e.g. at front wheel).

=> Heating, Air Conditioner; Repair group 87

 
A50-0403

Note:

Condenser must not be suspended by its lines.

Condenser lines must not be bent or kinked.

    • ◆ Detach hydraulic fluid cooler =>Fig.1 (do not disconnect lines).

=> Running Gear; Repair group 48

Note:

Hydraulic fluid cooler must not be suspended on its lines.

Lines leading to hydraulic fluid cooler must not be bent or kinked.

    • ‒ On models with an automatic gearbox, disconnect lines from ATF cooler.

=> Automatic Gearbox; Repair group 37

 
A50-0403
    • ◆ On vehicles with a charge air cooler, pull off air guide hose.
    • ‒ Detach left and right bonnet seals -8- at joint between wing and lock carrier -7-.
    • ‒ Remove bolts -3- and -4-.
    • ‒ A second mechanic is required to hold lock carrier -7-.
    • ‒ Remove bolts -1- and -2-.
    • ◆ Installation:
    • ‒ Install in reverse order.
    • ‒ Headlights must be readjusted.
    • ◆ Adjusting:
    • ‒ Lock carrier -7- must be centred between wings.
    • ‒ If the wings and bonnet are also being renewed, centre them in relation to one another before adjusting lock carrier.
 
A50-0403
  • Bonnet seal
  • Bowden cable for bonnet
    • ◆ Detach => Page 55-9.
  • Hole: Wing
 
A10-0019

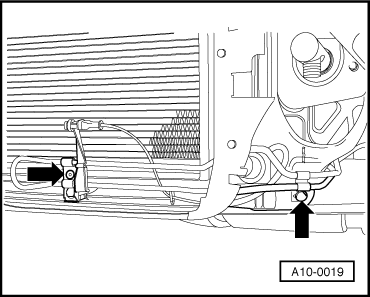
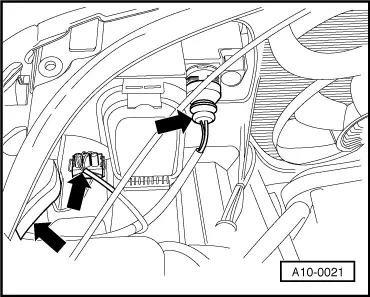
Fig.1    → Disconnecting hydraulic fluid cooler

  • ‒ Unscrew P.A. hydraulic line retainers from engine sub-frame and gearbox.

 
A10-0020

Fig.2    → Disconnecting coolant hose

  • ‒ Drain coolant from radiator.
  • ‒ Pull out retainer for coolant hose connecting flange at the bottom of the radiator and pull off the connecting flange.
  • ‒ Bleeding coolant system.

=> Engine Mechanical Components; Repair group 19

 
A17-0024

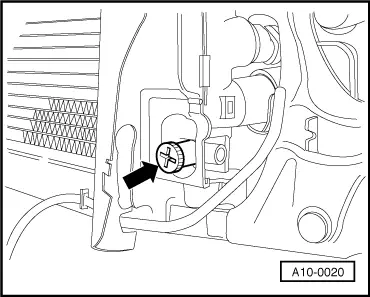
Fig.3    → Disconnecting charge air cooler hose

  • ‒ On vehicles with charge air cooling, slacken bolt on hose clamp -arrow-.
  • ‒ Detach hose.

  • ‒ Disconnect air duct to air cleaner at lock carrier and lift out.
 
A10-0021
  • ‒ → Unplug connectors for headlights, headlight height adjustment and indicators.
  • ‒ Unplug connector for radiator fan temperature sender in area of lower coolant hose on left of radiator.

Lock carrier service position > < Body front