audi Workshop Repair Guides

Audi Workshop Service and Repair Manuals

Roof trim MY 1999 > from chassis no. 8DXA 200 001 onwards > < Roof trim
General Body Assembly, Interior (Repair groups 68, 69, 70, 72, 74)
Roof trim
Removing and installing moulded headliner and sun visors
  • Bolt
    • ‒ Tightening torque 2.5 Nm
  • Sun visor
  • ◆ Removing
    • ‒ Unclip sun visor from holder -4- in centre of vehicle.
    • ‒ Unclip trim cap for bolt -1- and unscrew bolt -1-.
    • ‒ Disengage sun visor and detach connector.
  • ◆ Installing
    • ‒ Install in reverse order
  • Trim cap
 
A70-0023
  • Sun visor bracket
    • ‒ Lever off trim cap.
    • ‒ Remove bolt -1- (1x).
  • Centre sun visor
    • ‒ Unscrew bolt -1- and remove sun visor -5-.
  • Frame trim for sliding roof
  • Moulded headliner
  • ◆ Removing
    • ‒ Remove upper A-pillar trim
    • ‒ Remove upper B-pillar trim => Page 70-70
    • ‒ Remove upper C/D-pillar trim => Page 70-74
    • ‒ Lever out cover frame -6- on models with sliding/tilting roof.
    • ‒ Remove both sun visors -2-.
 
A70-0023
    • ‒ Remove centre sun visor -5-.
    • ‒ Remove both brackets -4-.
    • ‒ Remove front -10- and rear -9- grab handles.
    • ‒ Remove cover panel for moulded headliner cut-out =>Fig 1
    • ‒ Position gear lever or selector lever as far forward as possible.
    • ‒ Tilt backrest of passenger's seat to rearmost position.
    • ‒ Tilt backrest of driver's seat to rearmost position.
    • ‒ A second person is required to support the moulded headliner.
    • ‒ Detach all door seals in area of moulded headliner.
    • ‒ Pull moulded headliner to rear and disengage from retaining strip at rear window.
    • ‒ Remove moulded headliner towards passenger door.
 
A70-0023
  • ◆ Installing
    • ‒ Fit door seals.
    • ‒ Insert moulded headliner towards passenger's side and engage in retaining strip at rear window.
    • ‒ Carefully press moulded headliner over door seal (to fix moulded headliner in position).
    • ‒ Carry out remainder of installation in reverse order of removal.
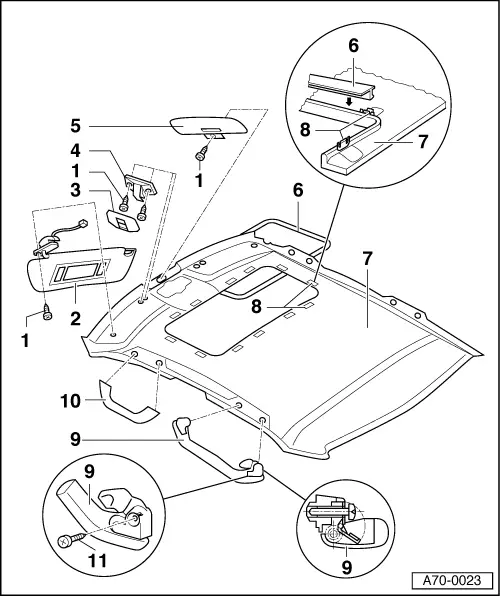
  • Clip (12x)
  • Rear grab handle (2x)
    • ◆ Open up grab handle.
    • ◆ Lever out trim caps.
    • ◆ Unscrew bolts -11-.
  • Front grab handle (2x)
    • ◆ Open up grab handle.
    • ◆ Lever out trim caps.
    • ◆ Unscrew bolts -11-.
  • Bolts (2x)
    • ‒ Tightening torque 2.5 Nm

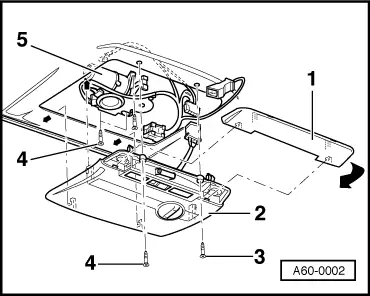
Fig.:1    Removing and installing cover for moulded headliner cut-out

 
A60-0002
  • ‒ → Unclip cover panel -1- downwards in direction of arrow and remove to front.
  • ‒ Unscrew bolts -3- (2x) and pull cover panel -2- forwards out of clips.
  • ‒ Detach connectors and remove cover panel.

Roof trim MY 1999 > from chassis no. 8DXA 200 001 onwards > < Roof trim