audi Workshop Repair Guides

Audi Workshop Service and Repair Manuals

Dismantling and assembling differential (gearbox with oil pump) > < Removing and installing differential
6-speed manual gearbox 01E Four-wheel drive
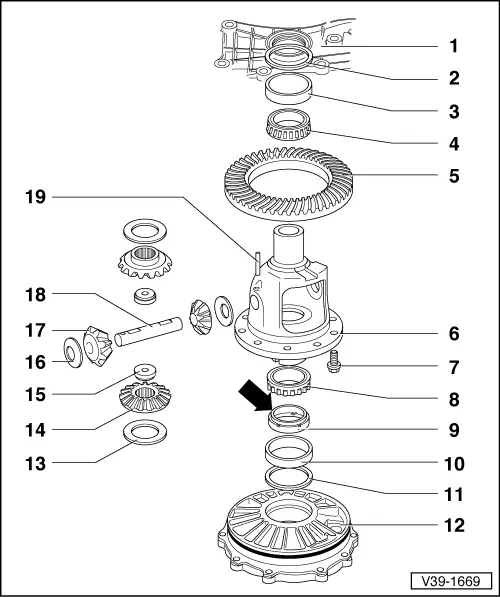
Dismantling and assembling differential (gearbox with no oil pump)
 
W39-0196

Special tools and workshop equipment required

  • ◆ Mandrel VW 295
  • ◆ Thrust plate VW 401
  • ◆ Thrust plate VW 402
  • ◆ Press tool VW 412
  • ◆ Pressing-out and pressing-in tool VW 459
  • ◆ Pressing-off tool for drive pinion bearing VW 470
 
W39-0197
  • ◆ Thrust plate 30-205
  • ◆ Fitting mandrel 30-505
  • ◆ Fitting sleeve 40-21
  • ◆ Thrust plate 40-105
  • ◆ Thrust pad 3062
  • ◆ Driving-out tool 3138
 
W39-0200
  • ◆ Taper roller bearing puller V.A.G 1582
  • ◆ Gripper V.A.G 1582/3
  • ◆ Gripper V.A.G 1582/6
 
V39-1669

Notes:

  • ◆ Removing and installing differential
  • ◆ Replacement of components marked 1) necessitates adjustment work => Adjustment table, Page 39-57.
  • Gearbox housing 1)
  • Shim "S2"
    • ◆ Note thickness
    • ◆ Adjustment table
  • Outer race for taper roller bearing, small 1)
    • ◆ Driving out => Fig.9
    • ◆ Driving in => Fig.10
  • Inner race for taper roller bearing, small 1)
    • ◆ Pulling off => Fig.1
    • ◆ Pressing on => Fig. 3
    • ◆ Low-friction bearing; do not lubricate for friction torque measurement
 
V39-1669
  • Crown wheel 1)
    • ◆ Paired with drive pinion (pinion set)
    • ◆ Removing => Fig.5
    • ◆ Installing => Fig.6
  • Differential housing 1)
  • Hexagon bolt, 60 Nm + further 45° turn
    • ◆ Always replace
    • ◆ Exclusive use is to be made of genuine bolts
  • Inner race for taper roller bearing, large 1)
    • ◆ Pulling off => Fig.2
    • ◆ Pressing on => Fig. 4
    • ◆ Low-friction bearing; do not lubricate for friction torque measurement
 
V39-1669
  • Drive wheel
    • ◆ For speedometer sender
    • ◆ Removing and installing => Page 39-4
    • ◆ Attach carefully to differential, taking care not to tilt; do not use force as this could break drive wheel
    • ◆ Installation position: Web -arrow- facing differential
  • Outer race for taper roller bearing, large 1)
    • ◆ Driving out => Fig.11
    • ◆ Driving in => Fig.12
  • Shim "S1"
    • ◆ Note thickness
    • ◆ Adjustment table => Page 39-57
  • Cover for differential1)
    • ◆ With O-ring
    • ◆ Replace O-ring
    • ◆ Lubricate O-ring when fitting
 
V39-1669
  • Shims
    • ◆ Re-determining thickness => Fig.8
  • Sun wheels
    • ◆ Adjusting => Fig.8
  • Threaded piece
  • Thrust washer
    • ◆ Check for cracks and chipping
  • Planet pinions
    • ◆ Installing => Fig.7
  • Shaft for bevel gears
    • ◆ Drive out with mandrel after removing spring pin
    • ◆ Align thrust washers before driving in
  • Spring pin
    • ◆ Replace
    • ◆ Drive in flush
 
V39-1670

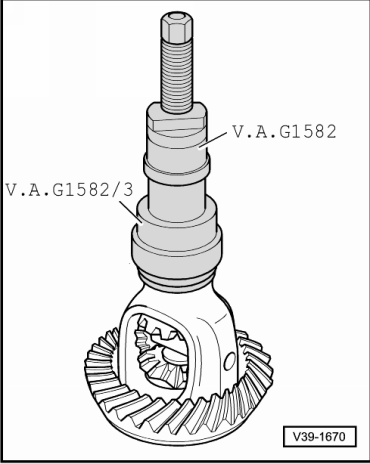
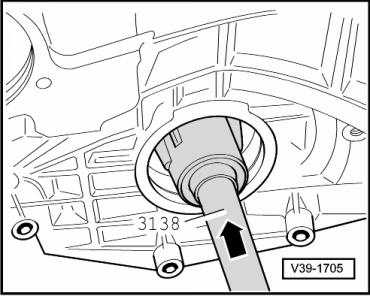
→ Fig.1    Pulling inner race for taper roller bearing, small off housing

  • ‒ Fit thrust plate 40-105 before positioning puller.
 
V39-1671

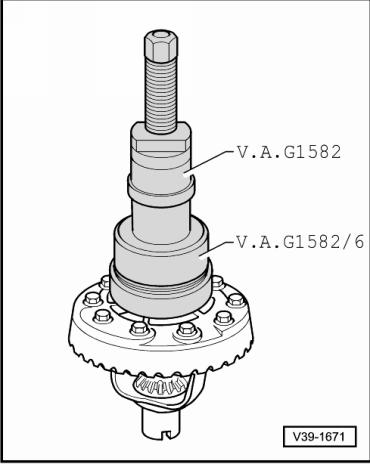
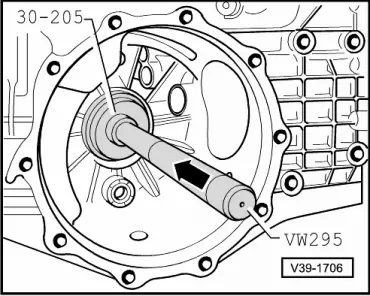
→ Fig.2    Pulling inner race for taper roller bearing, large off housing

  • ‒ Detach drive gear for speedometer.
  • ‒ Fit thrust plate 40-105 before positioning puller.
 
V39-0943

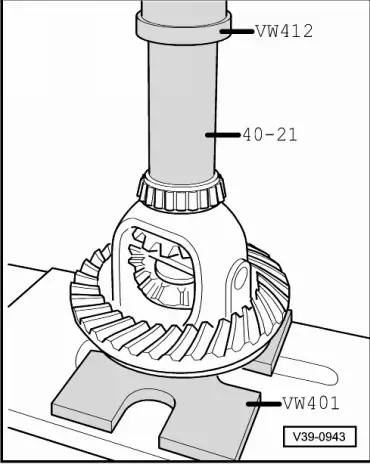
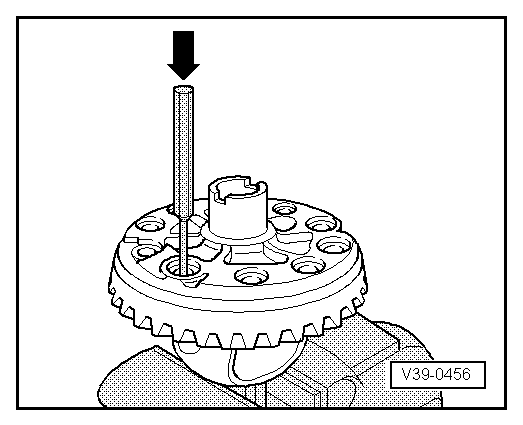
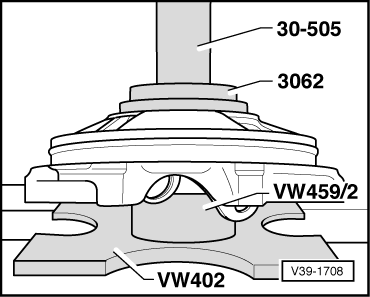
→ Fig.3    Pressing on inner race for taper roller bearing, small

  • ‒ Heat inner race to approx. 100 °C, place in position and press home.
Attention:
Wear protective gloves.
 
V39-0944

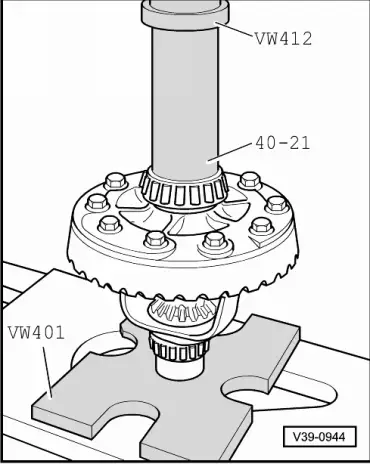
→ Fig.4    Pressing on inner race for taper roller bearing, large

  • ‒ Heat inner race to approx. 100 °C, place in position and press home.
Attention:
Wear protective gloves.

 
V39-0456

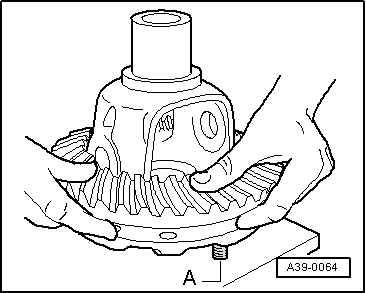
→ Fig.5    Driving crown wheel off housing

 
A39-0064

→ Fig.6    Fitting crown wheel

  • ‒ Use 2 improvised centring pins -A- as a guide.
  • ‒ Heat crown wheel to approx. 100 °C and fit in position.
Attention:
Wear protective gloves.
  • ‒ Allow to cool slightly before screwing in bolts. Then tighten to torque.
 
V39-0945

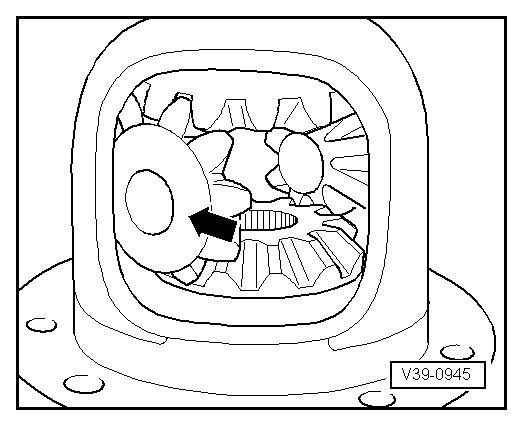
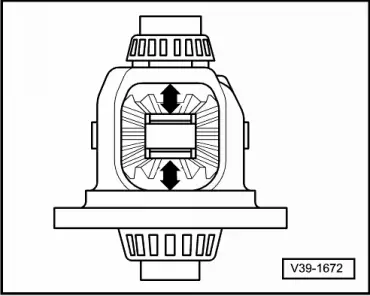
→ Fig.7    Installing bevel gears

  • ‒ Use screwdriver to carefully prise off drive wheel for speedometer sender.
  • ‒ Apply small quantity of grease to thrust washers for planet pinions and insert.
  • ‒ Insert sun wheels with selected shims => Fig.8.
  • ‒ Insert planet pinions with 180° offset and swivel in -arrow-.
  • ‒ Fit threaded pieces.
    • ‒ Installation position: Shoulder facing sun wheel
  • ‒ Align thrust washers and bevel gears so that they coincide with hole.
  • ‒ Drive bevel gear shaft into final position and secure.
 
V39-1672

→ Fig.8    Adjusting bevel gears

  • ‒ Insert sun wheels with thinnest shims (0.5 mm).
  • ‒ Insert planet pinions with thrust washers and press in shaft.

Note:

From now on bevel gears and thrust washers are not to be interchanged.

 
V39-1704
  • ‒ Press planet pinions outwards and check clearance of sun wheels by hand -arrows-.
  • ‒ Adjust clearance by inserting appropriate shim => Page 39-31.
    • ‒ Specification: max. 0.10 mm

Note:

→ Correct setting has also been made if there is no perceptible clearance, but bevel gears can still just be turned -arrow-.

  • ‒ Determine shim as per table. Part numbers

=> Parts List

Shims available

Shim thickness (mm)

0.50

0.70

0.90

0.60

0.80

1.00

 
V39-1705

→ Fig.9    Driving outer race for taper roller bearing, small out of gearbox housing

 
V39-1706

Fig.10    → Driving outer race for taper roller bearing, small into gearbox housing

 
V39-1707

→ Fig.11    Driving outer race for taper roller bearing, large out of cover

  • ‒ Use suitable support, e.g. VW 470 with recess facing cover.

 
V39-1708

→ Fig.12    Driving outer race for taper roller bearing, large into cover

Dismantling and assembling differential (gearbox with oil pump) > < Removing and installing differential