audi Workshop Repair Guides

Audi Workshop Service and Repair Manuals

Tightening torques > < Attaching engine to engine stand
4-Cylinder engine (2-valve), Mechanics
Removing and installing engine
Installing

Installation is carried out in the reverse order, when doing this note the following:

Note:

When performing repairs, renew seals, gaskets, self-locking nuts and bolts which have a specified tightening angle.

  • ‒ Check whether the dowel sleeves for centralising engine/gearbox are in the cylinder block, install if necessary.
  • ‒ Press intermediate plate onto dowel sleeves.

Vehicles with manual gearbox

  • ‒ Check clutch release bearing for wear and renew if necessary.
  • ‒ Lightly grease splines on gearbox input shaft with G 000 100. Do not grease guide sleeve for release bearing.
  • ‒ Check that clutch plate is properly centred in vehicles with manual gearbox.
  • ‒ A needle bearing must be fitted in the crankshaft on vehicles with manual gearbox. Install needle bearing if necessary .

Vehicles with automatic gearbox

  • ‒ In vehicles with automatic gearbox, no needle bearing must be fitted in the crankshaft. Remove needle bearing if necessary => Page 13-56.
  • ‒ When joining engine to gearbox, rotate the engine slightly about its longitudinal axis towards the right of the vehicle to line up the holes in the engine and gearbox flanges.
  • ‒ To secure the torque converter on the drive plate only use the correct nuts as specified in the parts catalogue.

=> Parts catalogue

  • ‒ Tighten torque converter nuts with Matra V175 15 mm A/F socket attachment.
 
A38-0025
  • ‒ Before installing engine, rotate torque converter and drive plate so that one hole and one stud are level with the aperture for the starter motor.

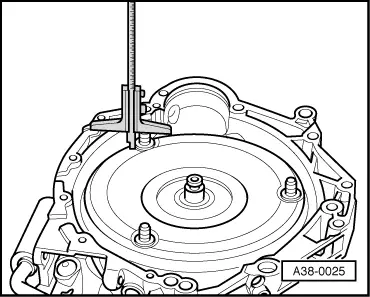
Checking position of torque converter

→ If the torque converter has been installed correctly, the distance between the joint surface on the torque converter bellhousing and the bottom contact surface on the torque converter studs should be approx 24.5 mm (automatic gearbox 01N).

 
A38-0025

→ If the torque converter has not been fully inserted, this distance will be approx. 13 mm.

Important
If the torque converter is not installed correctly, the torque converter drive plate or the ATF pump will be seriously damaged when the gearbox is joined to the engine.
  • ‒ Check ATF level:

=> Automatic gearbox 01N; Repair group 37; Checking and changing ATF; Checking ATF level and topping up ATF

All models

  • ‒ Ensure that engine mounts are free of stress by shaking engine to align it before tightening engine mounts.
  • ‒ Install A/C compressor and power steering pump.
  • ‒ Install ribbed belt .
  • ‒ Install lock carrier .
  • ‒ Fill up with coolant=> Page 19-6.

Notes:

  • ◆ Drained-off coolant may only be used again if the original cylinder head or cylinder block are re-installed.
  • ◆ Coolant must not be used again if it is dirty.
  • ‒ Allow stop for torque reaction support to rest on rubber buffer for torque reaction support under its own weight, and tighten bolts to 25 Nm.
  • ‒ Adjust throttle cable => Page 20-42
  • ‒ Stress-free alignment of exhaust system => Page 26-12.
  • ‒ Electrical connections and routing:

=> Current flow diagrams, Electrical fault-finding and Fitting locations

  • ‒ After connecting battery terminals, program in the radio anti-theft code.

=> Radio operating instructions

  • ‒ Close windows fully using electric window switches.
  • ‒ Then operate all electric window switches again for at least one second in the "close" direction to activate the automatic one-touch function.
  • ‒ Set clock to correct time.
  • ‒ Check oil level before starting engine.
  • ‒ Perform adaptation of throttle valve control part:

=> Motronic injection and ignition system (4-cylinder); Repair group 24; Testing throttle valve control part -J338; Performing basic setting of throttle valve control part -J338

  • ‒ Interrogate fault memory:

=> Motronic injection and ignition system (4-cylinder); Repair group 01; Self-diagnosis of Motronic system; Interrogating and erasing fault memory

Note:

Faults will have been stored in the memory because connectors have been unplugged. Therefore interrogate and erase fault memory after installing engine.

  • ‒ Adjust headlight settings:

=> Electrical system; Repair Group 94; Removing/ installing and servicing headlights; Adjusting headlights

Tightening torques > < Attaching engine to engine stand