-
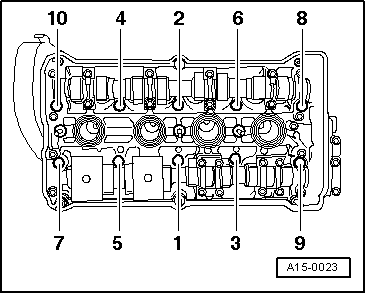
‒ → Tighten cylinder head bolts in two stages in sequence shown as follows:
-
‒ Stage 1: 60 Nm
-
‒ Stage 2: Torque a further
180 °(1/2 turn) with a rigid wrench.
It is permissible to torque by
2 x 90 °.
Note:
It is not necessary to re-tighten cylinder head bolts after repairs have been performed.
-
‒ Install cylinder head cover.
-
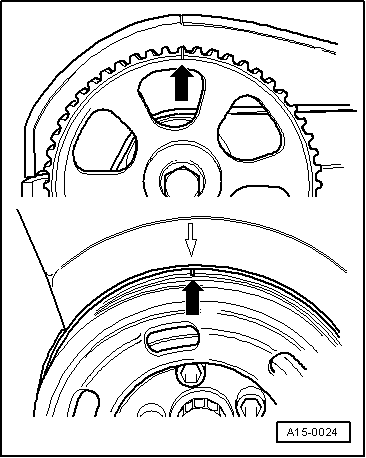
‒ Install toothed belt (adjust valve timing).
Note:
Follow all instructions for removing and installing toothed belt .
-
‒ Install ribbed belt and ribbed belt tensioning element.
-
‒ Install top coolant pipe.
-
‒ Install intake manifold.
-
‒ Adjust throttle cable
-
‒ Fill cooling system with fresh coolant => Page 19-7.
-
‒ After connecting battery, enter anti-theft code for radio
=> Radio operating instructions
-
‒ Close windows fully using electric window switches.
-
‒ Then operate all electric window switches again for at least one second in the "close" direction to activate the automatic one-touch function.
-
‒ Set clock to correct time.
-
‒ Perform adaption of throttle valve control part:
=> Motronic injection and ignition system (4-cylinder); Repair Group 24; Checking throttle valve control part -J338; Performing basic setting of throttle valve control part -J338
=> Motronic injection and ignition system (4-cylinder)07.96 ä;Repair group 24; Testing throttle valve control part; Adapting throttle valve control part to engine control unit
Tightening torques
|
|
|---|
|
Component
|
|
Nm
|
|
Support for intake manifold
|
to intake manifold
|
20
|
|
|
to bracket
|
20
|
|
|
to sump
|
20
|
|
Front exhaust pipe to exhaust manifold
|
30
|
|
Toothed belt tensioner to tensioning roller
|
25
|
|