audi Workshop Repair Guides

Audi Workshop Service and Repair Manuals

Removing and installing front sealing flange and oil pump drive chain > < Removing and installing upper section of sump
6-Cylinder engine (5-valve turbo), Mechanics
Removing and installing parts of lubrication system
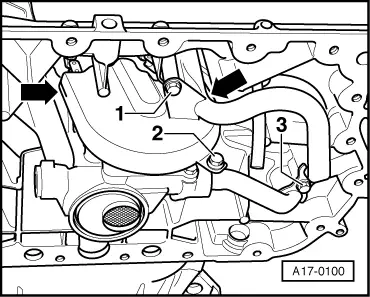
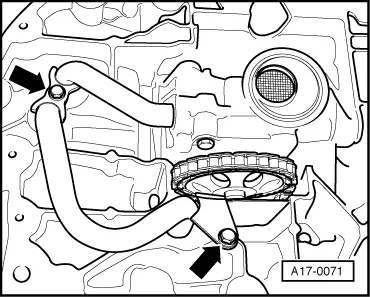
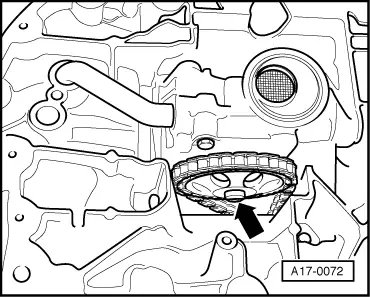
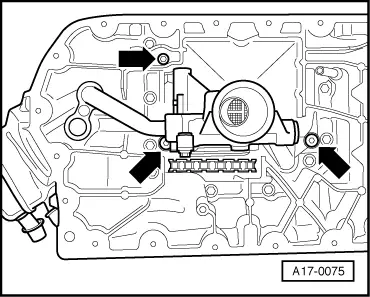
Removing and installing oil pump
 
A10-0018
  • ‒ → Remove noise insulation panel -arrows-.
  • ‒ Remove bumper

=> General body repairs; Repair group 63; Front bumper; Removing and installing front bumper

  • ‒ Move lock carrier to service position

=> General body repairs; Repair group 50; Removing and installing lock carrier; Lock carrier service position

 
A10-0320
  • ‒ → Unbolt air conditioner pipes from sump -arrows-.
 
A10-0323
Warning
Do not open air conditioner refrigerant circuit.
  • ‒ → Detach air conditioner compressor -1...3-.

Notes:

  • ◆ Watch position of guide bushes when installing.
  • ◆ When installing, insert bolt -1- in the compressor first.
  • ◆ To prevent damage to the condenser and refrigerant pipes/hoses, ensure that the pipes and hoses are not stretched, kinked or bent.
  • ‒ Drain off engine oil.

Note:

Use a separate container to collect the engine oil.

 
A17-0070
  • ‒ → Remove lower section of sump.

 
A17-0100
  • ‒ Unbolt cover plate for oil pump sprocket (-2-).

Notes:

  • ◆ When loosening bolt -2- securing cover plate, counter-hold at welded nut.
  • ◆ When installing, make sure that the plate engages in position -arrows-.
 
A17-0071
  • ‒ → Unbolt brackets for oil supply pipes -arrows- and pull the front (longer) oil supply pipe away downwards.

 
A17-0072
  • ‒ → Unscrew bolt securing chain sprocket to oil pump using Torx T45, and pull sprocket off oil pump.
 
A17-0075
  • ‒ → Remove oil pump together with shorter oil supply pipe.

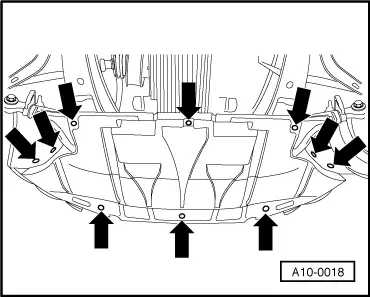
Installing:

Install in the opposite order to removing. When installing, note the following points:

  • ‒ Before bolting on oil pump, fit short oil supply pipe into pump and upper section of sump with new O-rings.
 
A17-0100
  • ‒ → Bolt on cover plate -2- for oil pump sprocket.

Notes:

  • ◆ When installing, make sure that the plate engages in position -arrows-.
  • ◆ When tightening bolt -2- securing cover plate, counter-hold at welded nut.
  • ‒ Clean both sealing surfaces for lower section of sump; ensure that they are free of oil and grease.

Note:

Do not use any adhesive or sealant.

  • ‒ Fit new gasket on lower section of sump and install on upper section of sump with two diagonally opposite bolts.
  • ‒ Tighten all securing bolts hand-tight.
  • ‒ Tighten bolts to 10 Nm with torque wrench, working from the centre outwards.
  • ‒ Fit new seal on oil drain plug and tighten to 30 Nm.
  • ‒ Fill up engine oil.

Oil system capacity:

=> Maintenance manual

  • ‒ Install subframe

=> Running gear, Front-wheel drive and four-wheel drive; Repair group 40; Removing and installing subframe

  • ‒ Install lock carrier in normal position

=> General body repairs, Exterior; Repair Group 50;

=> Front body; Lock carrier service position

  • ‒ Install bumper

=> General body repairs, Exterior; Repair group 63; Front bumper; Removing and installing front bumper - Assembly overview

Tightening torques

Component

Nm

Chain sprocket to oil pump

25

Lower section of sump to upper section of sump

10

Oil drain plug in lower section of sump

30

Oil pump to cylinder block

25

A/C compressor to bracket

25

Oil pump supply pipes to upper section of sump

10

Bracket for A/C pipes to sump

10

Removing and installing front sealing flange and oil pump drive chain > < Removing and installing upper section of sump