
A4 Mk1
|
Testing lambda control (engine code: AVV)
Testing lambda probe and lambda control (before catalytic converter)
Special tools and workshop equipment required
Requirements for test:
Test sequence
|
| → Indicated on display: |
|
||
|
| → Indicated on display: |
|
|||||||||||||||||||||||||||||||||||||||||||||||||||||||||||||||||
Notes:
Note: The first digit in this three-digit display (heating) fluctuates between 0 and 1.
Testing lambda probe learned values and lambda control
| ||||||||||||||||||||||||||||||||||||||||||||||||||||||||||||||||||
| → Indicated on display: |
|
||
|
| → Indicated on display: |
|
|||||||||||||||||||||||||||||||||||
| ||||||||||||||||||||||||||||||||||||
| → Indicated on display: |
|
||
|
| → Indicated on display: |
|
||||||||||||||||||||||||||||||||||||||||||||||||||||||||||||||||||||||||||||||||||||||||||||||
Note on display zone 2: The display indicates the lambda probe voltage signal after it is processed and smoothed by the engine control unit. A display of 1.5 V equals lambda 1. Further notes If the readout in display zone 1 does not match the specification, or if the readout does not fluctuate by at least 2 %:
If the readout in display zone 1 still does not match the specification even after the test drive, or if the readout still does not fluctuate by at least 2 %:
Reading Display Group 032
Reading Display Group 032
Reading Display Group 033
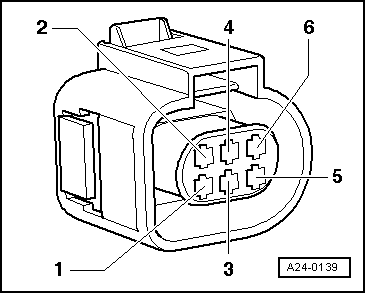
Testing basic voltage | |||||||||||||||||||||||||||||||||||||||||||||||||||||||||||||||||||||||||||||||||||||||||||||||
 |
|
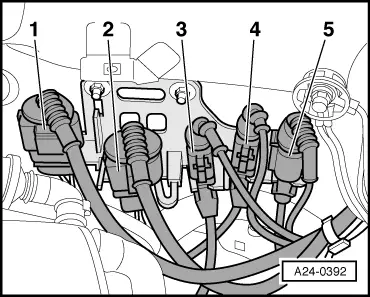
Note: For access to connector, unscrew bolts securing coolant expansion tank and pivot expansion tank clear to the side. The coolant hoses do not have to be disconnected. |
|
|
Note: For access to connector, unscrew bolts securing coolant expansion tank and pivot expansion tank clear to the side. The coolant hoses do not have to be disconnected.
|
 |
|||||||||||
=> Current flow diagrams, Electrical fault finding and Fitting locations binder
If the wiring is OK:
|