audi Workshop Repair Guides

Audi Workshop Service and Repair Manuals

Servicing suspension strut > < Suspension strut
Running gear, Front-wheel drive and four-wheel drive
Suspension strut
Removing and installing suspension strut

Special tools and workshop equipment required

  • ◆ V.A.G 1331 Torque wrench
  • ◆ V.A.G 1332 Torque wrench
  • ◆ V.A.G 1383 A Engine/gearbox lifter
  • ◆ 3287A Ball joint puller
 
A40-0476

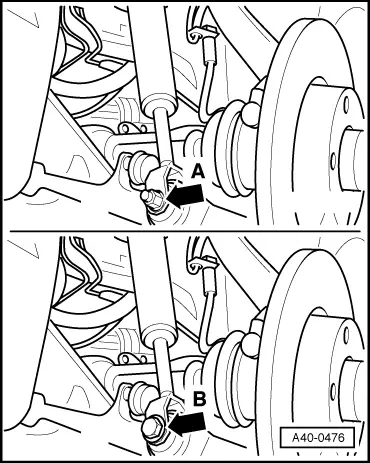
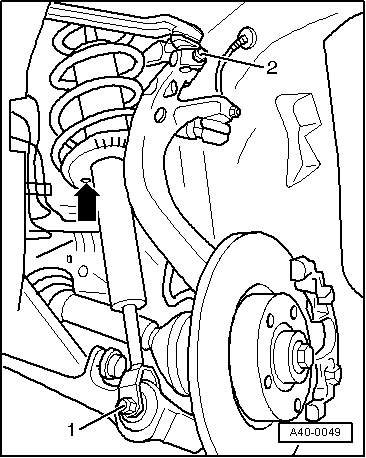
→ Note:

The suspension strut bolted joint was re-positioned on vehicles as of the following chassis numbers, i.e. bolt head -arrow B- points in direction of travel and nut is located between track control link and guide link:

  • ◆ 8D1A 146 169 (Model Year 2001)
  • ◆ 8D2A 000 512 (Model Year 2002)
  • ◆ 8D1N 905 194 (RS4)
  •     I -    Old suspension strut/track control link bolted joint -arrow A- (hexagon nut)
  •     II -    Re-positioned suspension strut/track control link bolted joint
    -arrow B- (hexagon bolt)
 
V44-0408

Removing

  • ‒ → Detach wheel trim. In the case of light alloy wheels, use puller from vehicle tool kit or suction grip -3208- to remove trim cap.
  • ‒ Remove wheel.

 
A40-0046
  • ‒ → Take out rubber grommets in plenum chamber -arrows-.

For vehicles with headlight range control, refer to .

To avoid damaging joints of lower links provide support, e.g. using V.A.G 1383-A (engine and gearbox lifter), to guard against excessive rebound.

 
A40-0047
  • ‒ → Unscrew suspension strut at body.
  •     1 -    Nuts
  • ‒ Pull wire of ABS speed sensor out of holder at brake caliper.
  • Take care not to damage surface of brake pipes.

 
A40-0209
  • ‒ → Unscrew nut -1-.
  • ‒ Take out hexagon bolt and lift out link -2-.

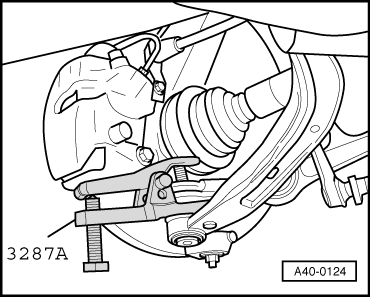
If hexagon bolt cannot be removed from wheel bearing housing, bolt and links must be pressed out of wheel bearing housing.

Slots in wheel bearing housing are never to be widened using a chisel or the like.

  • ‒ Swivel wheel bearing housing aside in direction of arrow.
 
A40-0209

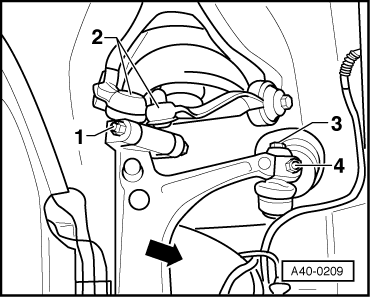
→ Bolts -3- and -4- are never to be slackened off.

Otherwise wheel alignment must be checked.

Guide link must be detached from wheel bearing housing to enable suspension strut/track control link hexagon bolt to be screwed out.

  • If necessary, support joint pin with 4 mm Allen key.

 
A40-0124
  • ‒ → Unscrew nut from joint pin of guide link and press off joint pin.
  • Take care not to damage boot when doing so.
 
A40-0048
  • ‒ → Unscrew suspension strut/track control link bolt -1-.
  • ‒ Take out suspension strut downwards.

Notes:

  • ◆ Take care not to damage boot when taking out suspension strut.
  • ◆ Servicing suspension strut
 
A40-0049

Installing

  • ‒ → Insert suspension strut such that hole -arrow- in spring plate is facing centre of vehicle.

Note:

Heed installation position of suspension strut/track control link bolted joint .

  • ‒ Bolt suspension strut to track control link.

Bonded rubber bushes can only be turned to a limited extent. Suspension strut/track control link bolted joint is therefore only to be tightened when vehicle is standing on ground.

  • ‒ Hand-tighten new nut for suspension strut/track control link bolted joint.
  • ‒ Engage upper link in wheel bearing housing, insert new bolt and tighten new nut -2- to 40 Nm.
  • ‒ Press down upper link as far as possible whilst screwing on.
  • ‒ Screw on nut at joint pin and tighten to 100 Nm.
  • If necessary, support joint pin with 4 mm Allen key.
  • ‒ Insert ABS wire in holder at brake caliper.
  • ‒ Screw on new suspension strut/body nuts and tighten to 21 Nm.
  • Take care not to damage surface of brake pipes.
  • ‒ Insert rubber grommets in plenum chamber.
  • ‒ If applicable, fit sender for headlight range control => Page 40-22.
  • ‒ Fit and secure wheel => Page 44-1.
  • ‒ Tighten suspension strut/track control link bolted joint to 90 Nm.

Servicing suspension strut > < Suspension strut