audi Workshop Repair Guides

Audi Workshop Service and Repair Manuals

Removing and installing track rods > < Exploded view
Running gear, Front-wheel drive and four-wheel drive
Steering box (right-hand drive)
Removing and installing power-assisted steering box (right-hand drive)

Special tools and workshop equipment required

  • ◆ 3094 Hose clamps up to ø 25 mm
  • ◆ V.A.G 1331 Torque wrench
  • ◆ V.A.G 1332 Torque wrench
  • ◆ V.A.G 1907 Screw for steering centring

Removing

  • ‒ Take out plenum chamber cover.
 
A48-0087
  • ‒ Remove battery.

=> Electrical System; Repair Group 27; Battery; Removing and installing battery

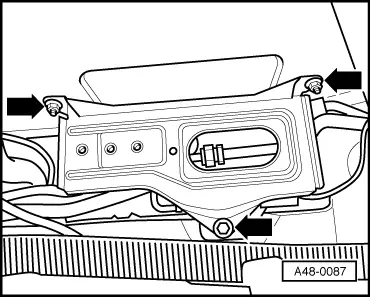
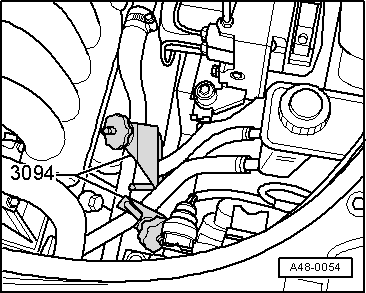
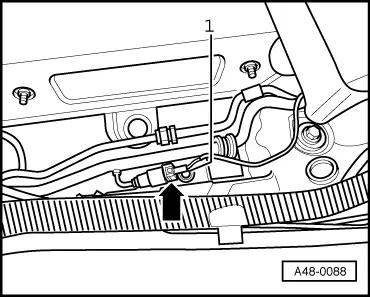
  • ‒ → Unscrew battery bracket -arrows-.
  • ‒ Remove driver's storage compartment.

=> General Body Repairs, Interior; Repair Group 68; Storage compartments/covers and trim panels; Removing driver's storage compartment

Attention:
Move steering wheel to centre position and do not turn it whilst performing repair work, as otherwise coil connector of airbag unit could be damaged.
  • ‒ Move steering wheel to centre position.
  • ‒ Pull out ignition key with steering wheel in centre position.
  • ‒ Move steering wheel slightly to engage steering lock.

Uncontrolled turning of steering wheel with steering box removed could strain and damage coil connector of airbag system.

 
A48-0062
  • ‒ → Unscrew nut -1- at universal joint.
  • ‒ Slacken off eccentric by turning tensioning bolt (Torx T50) clockwise and take out bolt.
 
A48-0043
  • ‒ → Swivel aside universal joint.
  • ‒ Pull out bulkhead collar to inside.

 
A48-0075
  • ‒ → Before detaching from steering box pinion, secure steering column with wire as shown.
Attention:
  • ◆ Mesh section between top and bottom part of steering column is never to be separated.
  • ◆ Do not turn steering wheel whilst performing repair work, as otherwise coil connector of airbag unit could be damaged.
  • ‒ Remove wheel bearing housing and mounting bracket with suspension strut .

When removing wheel bearing housing, take care not to damage track rod bellows (shield bellows if necessary).

 
A48-0078
  • ‒ → Unscrew nut -1-.
  • ‒ Prise out clips -2-.
  • ‒ Take out cover.
 
A48-0079
  • ‒ Remove air cleaner housing and air pipe for air-mass meter.
  • ‒ Take out bottom part of air cleaner box.
  • ‒ Unscrew nut -2- and self-tapping screws -3-.
  • ‒ → Take out shield -1-.

 
A48-0054
  • ‒ Remove cover from reservoir.
  • ‒ → Pinch off suction and return pipe with hose clamps -3094-.
 
A48-0084
  • ‒ Place drip tray in position to collect hydraulic fluid.
  • ‒ → Unscrew expansion hose -1- and return hose -2- from steering box.

 
A48-0085
  • ‒ → Unfasten holder -arrow- for hoses at steering box.
 
A48-0086
  • ‒ → Screw out right steering box bolt.

 
A48-0088
  • ‒ → On vehicles with air conditioner, unplug connector -arrow-.
  • ‒ Unscrew multi-point socket-head bolt -1- for attaching steering box.
 
A48-0089
  • ‒ → Unscrew bolt -arrow- for attaching steering box.
  • Bolt is located on side of servo unit.
  • ‒ Pull out steering box to right (2nd mechanic required).

 
N48-0255

Installing

→ Centre steering box removed with -V.A.G 1907-.

  • ‒ To do so, screw out hexagon socket-head bolt -1- at steering box.
  • ‒ Move rack until centring on rack -arrow- is aligned with tapped hole -2-.
  • ‒ Hand-tighten V.A.G 1907.
  • ‒ Apply lubricant G 052 745 A3 to steering box in area of bulkhead collar seat.
 
A48-0080
  • ‒ → Position steering box at plenum chamber (requires 2nd mechanic).

Make sure threads and contact surfaces of bolts are free from oil/grease.

To ensure compliance with wheel alignment values, repair set for South Africa contains 3 additional shims 8D0422211 (thickness 2 mm) for fitting between steering box and body (at all 3 bolted joints).

  • ‒ Fit but do not tighten bolts -1- and -2-.
  • ‒ Screw in bolt -3- and tighten to 68 Nm.
  • ‒ Then tighten bolts -1- and -2- to 68 Nm.

 
A48-0085
  • ‒ → Position holder for hoses at steering box.

Notes:

  • ◆ Always use new seals for banjo bolts.
  • ◆ Pressure and return hose must not make mutual contact or come into contact with other parts.
 
A48-0084
  • ‒ → Screw on return hose and tighten banjo bolt -22 mm- to 50 Nm.
  • ‒ Screw on pressure hose and tighten banjo bolt -19 mm- to 40 Nm.
  • ‒ Secure holder for hoses at steering box.
  • Tightening torque 20 Nm
  • ‒ Re-insert bulkhead collar.

Notes:

  • ◆ Replace seal if damaged.
  • ◆ Make sure seal is properly positioned.
  • ‒ Release steering lock.
  • ‒ Move steering wheel to centre position and then attach universal joint to steering pinion.
  • ‒ Insert tensioning bolt (Torx T50) and pre-tension in anti-clockwise direction. Use new nut.
  • ‒ Remove assembly lock from steering column.
 
N48-0255
  • ‒ → Then screw tool -V.A.G 1907 out of steering box.
  •     1 -    Hexagon socket-head bolt
  •     2 -    Tapped hole in steering box
  • ‒ Secure steering box with hexagon socket-head bolt -1- (tightening torque 13 Nm).
  • ‒ Tighten hexagon nut of tensioning bolt (steering column/steering pinion) to30 Nm.
  • ‒ Install driver's storage compartment.

=> General Body Repairs, Interior; Repair Group 68; Storage compartments/covers and trim panels; Removing driver's storage compartment

  • ‒ Remove hose clamps -3094- on completion of steering box assembly.
  • ‒ Fit wheel housing trim.
  • ‒ Fit mounting bracket with suspension strut and wheel bearing housing => Page 40-85.
  • ‒ Fit heat shield.
  • ‒ Fit cover of reservoir.
  • ‒ Fit bottom part of air cleaner box.
  • ‒ Fit air cleaner housing and air pipe for air-mass meter.
  • ‒ Install battery bracket, battery and plenum chamber cover.

=> Electrical System; Repair Group 27; Battery; Removing and installing battery

  • ‒ Check hydraulic fluid level .
  • ‒ Bleed steering system .
  • ‒ Check steering system for leaks .
  • ‒ Perform wheel alignment => Page 44-13.

Removing and installing track rods > < Exploded view