audi Workshop Repair Guides

Audi Workshop Service and Repair Manuals

Detaching compressor attached to left of engine from holder/re-attaching > < Vehicles with 4 or 6-cyl. engine (belt-driven compressor)
Detaching compressor attached to right of engine from holder/re-attaching
  Note
t  
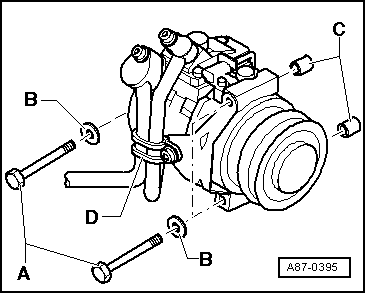
On vehicles with 1.9 l diesel engine up to Model Year 2003 for example, the compressor is attached to the right of the engine (a modified compressor attached to the left of the engine was gradually introduced as of Model Year 2004).
   
t  Do not unfasten refrigerant pipes and clamp -D-.
–  Remove noise insulation → General body repairs, exterior; Rep. Gr.50.
–  Move lock carrier to service position → General body repairs, exterior; Rep. Gr.50.
–  Slacken off and detach poly V-belt. → Engine, mechanics; Rep. Gr.13
–  Screw out bolts -A- (25 Nm).
  Note
t  Fit one washer -B- at each of the bolts -A-.
t  Before securing compressor, check position of both bushes -C- in holder or compressor.
  A87-0395
t  After attaching compressor, check routing of refrigerant pipes -A- (pipes must be inserted in holders -B- provided).
t  After attaching compressor, also check refrigerant pipes and corresponding holders to ensure adequate clearance from other components.
  A87-0404

Detaching compressor attached to left of engine from holder/re-attaching > < Vehicles with 4 or 6-cyl. engine (belt-driven compressor)