audi Workshop Repair Guides

Audi Workshop Service and Repair Manuals

Removing and installing front footwell vent > < Connecting elements between temperature flaps "1" and "2"
Heating
Dash panel vents and air ducts
Removing and installing intermediate piece for windscreen defroster vent

Removing

  • ‒ Remove dash panel.

=> General Body Repairs, Interior; Repair Group 70; Dash Panel; Removing and installing dash panel

 
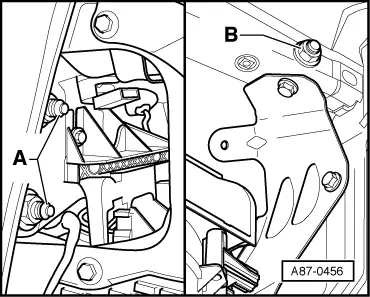
A87-0456
  • ‒ Detach mounting bracket for brake pedal (and clutch pedal) from dash panel cross member.

=> Relevant Brake System Workshop Manual; Repair Group 46

  • ‒ → Unfasten hexagon nuts -A- for dash panel cross member on left and screw them out approx. 15 mm.

=> General Body Repairs, Interior; Repair Group 70; Dash Panel

  • ‒ Remove hexagon nuts -B- for dash panel cross member on right.

=> General Body Repairs, Interior; Repair Group 70; Dash Panel

  • ‒ Remove connecting bolts between dash panel cross member and windscreen cross member (in passenger compartment), as well as connecting bolts between dash panel cross member and plenum chamber (between electronics box and windscreen cross member in plenum chamber).

=> General Body Repairs, Interior; Repair Group 70; Dash Panel

 
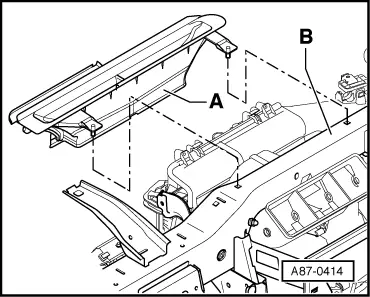
A87-0414
  • ‒ Carefully pull dash panel cross member to rear until it makes contact with nuts on left, whilst still resting on threaded pin on right.
  • ‒ → Detach intermediate piece -A- from dash panel cross member -B-.
  • ‒ Remove intermediate piece -A-.

Installing

Notes:

  • ◆ When installing dash panel, make sure intermediate defrost piece is properly positioned on defroster vent on insertion and that defroster vent is not squashed.
  • ◆ After installing dash panel, check exit direction and distribution of air flow from defroster vent to windscreen.

Removing and installing front footwell vent > < Connecting elements between temperature flaps "1" and "2"