
A4 Mk2
| Poly V-belt drive - exploded view |
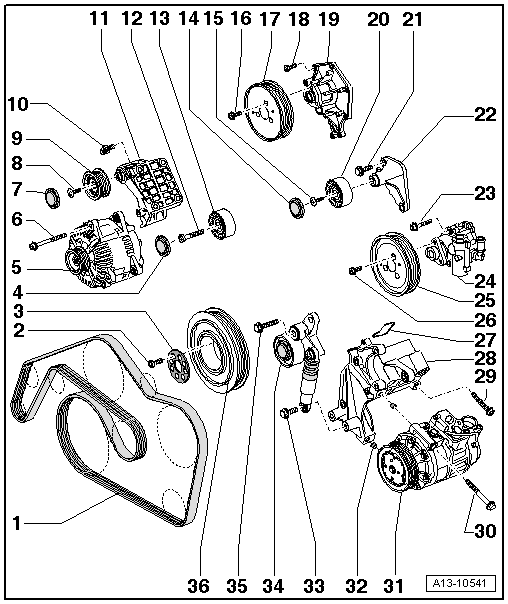
| 1 - | Poly V-belt |
| q | Before removing, mark direction of rotation with chalk or felt-tip pen. If the belt runs in the opposite direction when it is refitted, this can cause breakage. |
| q | Removing and installing → Chapter |
| q | Check for wear |
| q | When installing, make sure it is properly seated on pulleys. |
| 2 - | 20 Nm + 90° |
| q | Property class 10.9 |
| q | Renew |
| 3 - | Shim |
| q | Renew |
| q | Must be fitted on all vehicles, even if no shim was fitted previously |
| 4 - | Cover for idler roller |
| 5 - | Alternator |
| q | Removing and installing → Rep. gr.27 |
| q | To facilitate attachment of alternator, knock back threaded bushes for alternator securing bolts slightly |
| 6 - | 23 Nm |
| 7 - | Cover for idler roller |
| 8 - | 23 Nm |
| q | Property class 10.9 |
| 9 - | Idler roller for poly V-belt |
| q | Note installation position |
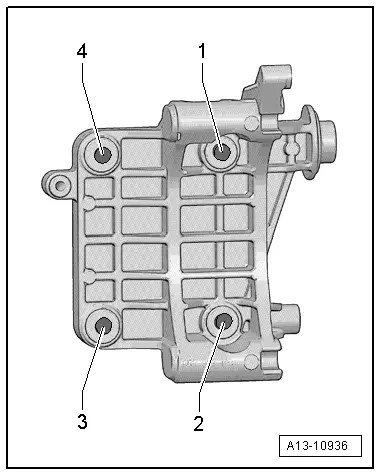
| 10 - | Bolt |
| q | Tightening torque and sequence → Fig. |
| 11 - | Bracket for alternator and idler roller |
| 12 - | 23 Nm |
| q | Property class 10.9 |
| 13 - | Idler roller for poly V-belt |
| q | Note installation position |
| 14 - | Cover for idler roller |
| q | On vehicles with additional idler roller |
| 15 - | 23 Nm |
| q | Property class 10.9 |
| q | On vehicles with additional idler roller |
| 16 - | 23 Nm |
| 17 - | Poly V-belt pulley for coolant pump |
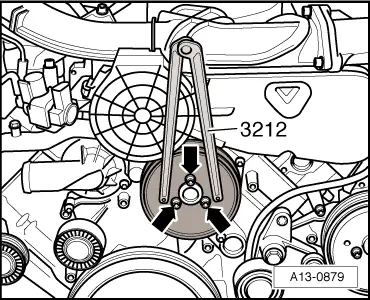
| q | Counterhold with pin wrench -3212- when loosening and tightening → Fig.. |
| q | Installation position: marking „vorne“ (front) faces in direction of travel. |
| 18 - | 9 Nm |
| 19 - | Coolant pump |
| q | Removing and installing → Chapter |
| 20 - | Idler roller for poly V-belt |
| q | Only applicable on new versions: |
| q | Removing and installing → Chapter |
| 21 - | 23 Nm |
| q | On vehicles with additional idler roller |
| 22 - | Bracket for idler roller |
| q | On vehicles with additional idler roller |
| 23 - | 23 Nm |
| 24 - | Power steering pump |
| q | Removing and installing → Rep. gr.48 |
| 25 - | Poly V-belt pulley for power steering pump |
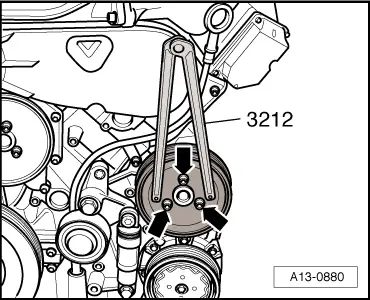
| q | Counterhold with pin wrench -3212- when loosening and tightening → Fig.. |
| q | Installation position: marking „vorne“ (front) faces in direction of travel. |
| 26 - | 22 Nm |
| 27 - | Gasket |
| q | Renew |
| 28 - | Bracket for ancillaries |
| 29 - | 40 Nm |
| 30 - | 25 Nm |
| 31 - | Air conditioner compressor |
| q | Do not unscrew or disconnect refrigerant hoses or pipes. |
| q | Removing and installing → Rep. gr.87 |
| q | When installing check dowel sleeves -item 32- |
| 32 - | Dowel sleeve |
| q | 2x |
| q | Check for correct seating in bracket |
| 33 - | 23 Nm |
| 34 - | Poly V-belt tensioner |
 Caution
|
| q | Removing and installing → Chapter |
| 35 - | Bolt |
Caution
|
| q | Bolt with M10 thread: 50 Nm + turn 90° further |
| q | Bolt with M11 thread: 60 Nm + turn 90° further |
| q | Renew |
| 36 - | Vibration damper |
| q | With poly V-belt pulley |
| q | Removing and installing → Chapter |
|
|
|
|
|
|