audi Workshop Repair Guides

Audi Workshop Service and Repair Manuals

Renewing crankshaft oil seal (pulley end) > < Removing and installing poly V-belt
Removing and installing vibration damper
   
Removing
–  Move lock carrier to service position → Rep. Gr.50.
  Note
To loosen and tighten vibration damper, counterhold with ring spanner on centre nut for alternator pulley.
–  Loosen the 8 securing bolts -arrow- at vibration damper several turns.
  Note
  A13-10305
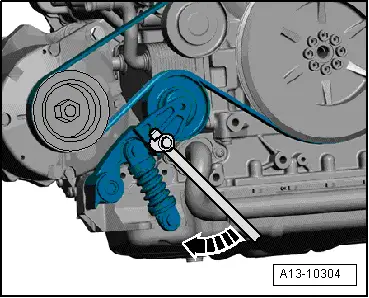
Before removing, mark direction of rotation of poly V-belt with chalk or felt-tipped pen. If the belt runs in the opposite direction when it is refitted, this can cause breakage.
–  To slacken poly V-belt, pivot belt tensioner in direction of -arrow- (use a socket wrench with 3/8” drive).
  Note
t  Make sure that the head of the socket wrench is long enough to engage fully in the belt tensioner.
t  “Stahlwille 425QR” or similar can be used.
–  Remove poly V-belt.
–  Release pressure from the tensioner.
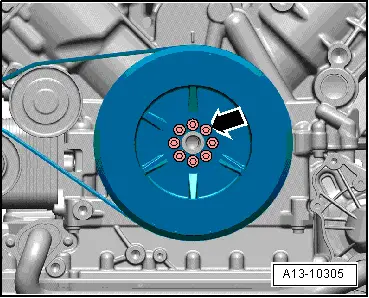
–  Remove vibration damper.
Installing
Installation is carried out in the reverse order; note the following:
  Note
Renew the bolts tightened with specified tightening angle.
–  Install vibration damper, using only genuine bolts (same as original equipment) → Electronic parts catalogue.
l  The vibration damper can only be fitted in one position (note dowel sleeve).
  A13-10304
–  Tighten bolts for vibration damper in 3 stages:
  A13-10305
StageBoltsTightening torque/tightening angle
1.-arrow-15 Nm in diagonal sequence
2.-arrow-22 Nm in diagonal sequence
3.-arrow-Turn 90° further in diagonal sequence

–  Install poly V-belt → Anchor.
–  Install lock carrier with attachments → Rep. Gr.50.
–  Install bumper cover (front) → Rep. Gr.63.
   

Renewing crankshaft oil seal (pulley end) > < Removing and installing poly V-belt