audi Workshop Repair Guides

Audi Workshop Service and Repair Manuals

Renewing subframe bushes > < Rear subframe
Removing and installing subframe
  Note
t  The following steps describe the procedure for removing the subframe as a complete unit (i.e. including rear final drive, hub carriers/wheel bearing housings, trapezium links, etc.).
t  Check and adjust wheel alignment after completing repair → Chapter.
   
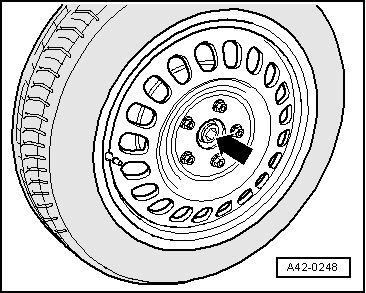
–  If necessary for removal of components, loosen flange bolt -arrow- only 90° with vehicle standing on its wheels.
  WARNING
The vehicle must be standing on its wheels when loosening and tightening the flange bolt.
-Accident risk-
Special tools and workshop equipment required
  A42-0248
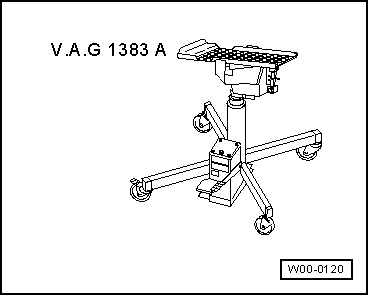
t  Engine and gearbox jack -V.A.G 1383 A-
  W00-0120
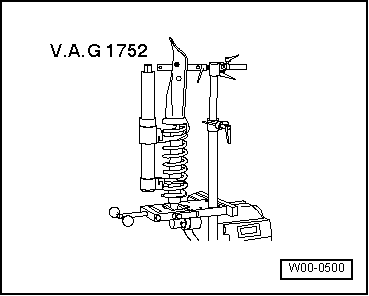
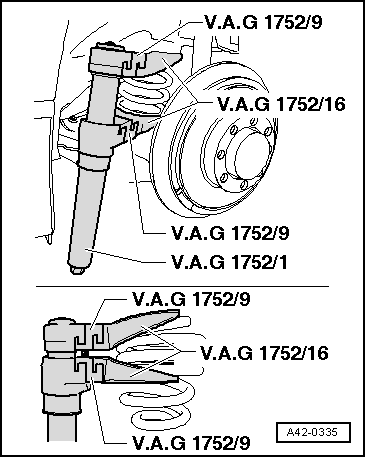
t  Spring compressor -V.A.G 1752/1-
t  Adapter -V.A.G 1752/9-
t  Rear axle spring retainers (A4) -V.A.G 1752/16-
t  Torque wrench -V.A.G 1331-
t  Torque wrench -V.A.G 1332-
t  Socket -T40027-
Removing
  WARNING
BEFORE slackening subframe bolts, secure vehicle against tipping over (e.g. by placing a weight of approx. 50 kg in the luggage compartment).
  W00-0500
Cabriolet models only
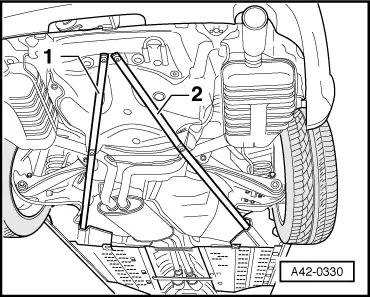
–  Remove diagonal struts -1- and -2- → Chapter.
  A42-0330
All vehicles (continued):
–  Remove underbody trim (rear and side) in front of subframe.
–  Remove wheels.
–  Secure brake discs with one wheel bolt each.
–  Remove rear section of exhaust system. → Engine, mechanics; Rep. Gr. 26; Removing and installing exhaust system components
–  Remove coil spring → Chapter.
  A42-0335
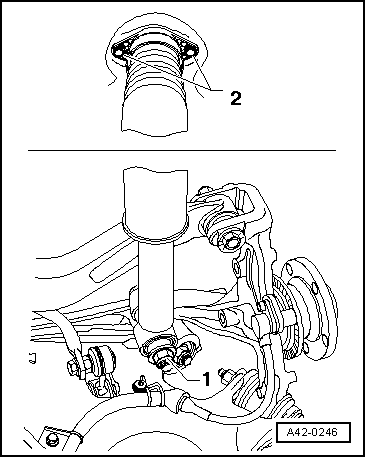
–  Unbolt shock absorber from wheel bearing housing -1-.
Vehicles with heavy-duty suspension
–  Remove stone deflector from trapezium link.
All vehicles (continued):
–  Loosen bolts and detach handbrake cable from bracket below trapezium link.
  A42-0246
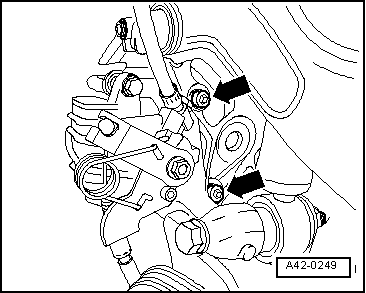
–  Unbolt brake caliper -arrows-. Use the socket -T40027-.
  Note
t  Tie up brake caliper to body with wire.
t  Do not suspend the brake caliper from the brake hose.
–  Detach wheel speed sensor and wiring guide → Fig..
–  On vehicles with headlight range control, detach connector from vehicle level sender.
Vehicles with four-wheel drive
–  Unbolt propshaft from rear final drive. → Rear final drive 01R; Rep. Gr. 39; Servicing propshaft; Removing and installing propshaft
–  Secure propshaft to body with wire.
–  Detach handbrake cables from fuel tank.
  A42-0249
–  Remove bolts -2- and take out shock absorber.
–  Remove brake disc and splash plate.
  A42-0246
All vehicles (continued):
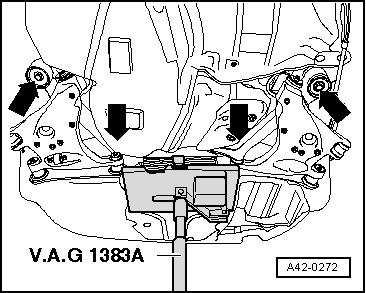
–  Apply engine/gearbox jack -V.A.G 1383 A- with universal gearbox support -V.A.G 1359/2- and a suitable wooden block to subframe/final drive (illustration shows vehicle with front-wheel drive).
–  Wind strap around subframe/final drive.
  WARNING
BEFORE slackening subframe bolts, secure vehicle against tipping over (e.g. by placing a weight of approx. 50 kg in the luggage compartment).
–  Remove subframe bolts -arrows-.
Vehicles with front-wheel drive
–  Place handbrake cable and brake caliper over transverse link.
–  Lower subframe carefully. Guide subframe to prevent it slipping.
Vehicles with four-wheel drive
–  Carefully lower subframe approx 15 cm. Guide subframe to prevent it slipping.
–  Push subframe to the left until right handbrake cable and brake caliper can be routed over transverse link.
  Note
Take care not to stretch and damage brake hose.
–  Push subframe to the right until left handbrake cable and brake caliper can be routed over transverse link.
–  Lower subframe.
Installing
  Note
Renew bolts and self-locking nuts ⇒ instructions in exploded views from → Chapter onwards.
Installation of the subframe in the body is performed in reverse sequence to removal.
–  Centralise subframe by aligning four holes inside bushes with tapped holes in body.
–  Install and tighten new subframe bolts with new washers → Chapter, → Item and → Item (front-wheel drive), or → Item and → Item (four-wheel drive).
Vehicles with four-wheel drive
–  Install brake disc splash plate. → Brake system; Rep. Gr. 46; Rear brakes type C38; Servicing brake caliper
–  Install brake disc and secure with one wheel bolt.
–  Bolt propshaft to rear final drive. → Rear final drive 01R; Rep. Gr. 39; Servicing propshaft; Removing and installing propshaft
–  Attach shock absorber to body → Item
–  Attach handbrake cables to fuel tank.
All vehicles (continued):
–  Install and align exhaust system → Engine, mechanics; Rep. Gr. 26; Removing and installing exhaust system components.
–  Attach connector for headlight range control to vehicle level sender.
–  Install speed sensor and wiring guide → Fig..
–  Bolt brake caliper onto hub carrier or wheel bearing housing. → Brake system; Rep. Gr. 46; Rear brakes type C38; Servicing brake caliper
–  Attach handbrake cable with bracket under trapezium link and tighten bolts → Item.
  A42-0272
–  Tighten shock absorber nut -1- initially to 20 Nm.
–  Install coil spring → Chapter.
Only if flange bolt has been loosened:
Always install a new flange bolt.
–  On vehicles with four-wheel drive, fit 5 wheel bolts and tighten finger-tight. Apply handbrake firmly.
–  Tighten flange bolt initially only to specified torque, without turning further → Item (front-wheel drive) or → Item (four-wheel drive).
–  Bonded rubber bushes can only be turned to a limited extent. The mountings of the suspension links must therefore only be tightened when the suspension is in the unladen position → Chapter.
–  Tighten bolt connection -1- → Item (front-wheel drive) or → Item (four-wheel drive).
–  Fit and secure wheel → Wheels and tyres; Rep. Gr.44.
Only if flange bolt has been loosened:
–  Tighten flange bolt by turning further through specified angle → Item (front-wheel drive), or → Item (four-wheel drive).
  WARNING
The vehicle must be standing on its wheels when loosening and tightening the flange bolt.
-Accident risk-
–  Install underbody trim (rear and side).
–  Check and adjust wheel alignment → Chapter.
Wheel alignment must always be checked and adjusted if necessary using VW/Audi-approved equipment.
Vehicles with heavy-duty suspension
–  Install stone deflector and tighten bolts → Item.
Cabriolet models only
  A42-0246
–  Install diagonal struts -1- and -2- → Chapter.
  A42-0330

Renewing subframe bushes > < Rear subframe