audi Workshop Repair Guides

Audi Workshop Service and Repair Manuals

Removing and installing gas strut for rear lid > < Removing and installing rear lid
Adjusting rear lid
Adjusting rear lid
Special tools and workshop equipment required
   
t  Setting gauge -3371-
  W00-0190
Gap widths

t  Dimension -A- = 3.5 mm
t  Dimension -B- = 4.5 mm
t  Dimension -C- = 5.0 mm
t  Dimension -D- = 3.5 mm
t  Dimension -E- = 2.2 mm (all around)
t  Make sure gap is parallel to body.
  Note
Gas struts must be fitted before adjusting new rear lid.
Adjustment via striker
  Note
Prior to adjustment, completely screw in adjusting buffers on rear lid → Fig..
   
Vehicle with fixed striker
–  Remove rear cross panel trim → Rep. gr.70.
–  Unfasten nuts with washers -1- and -3-; it must be possible to move striker -2-.
–  Note different versions.
  A55-10449
Vehicle with power latching system
–  Unfasten nuts with washers; it must be possible to move striker -2- with motor for power latching system -1-.
–  To facilitate adjustment, marks are provided in rear cross panel for aligning striker.
  A55-10446
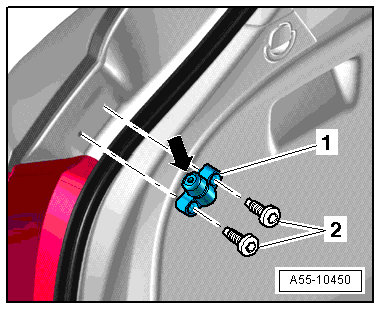
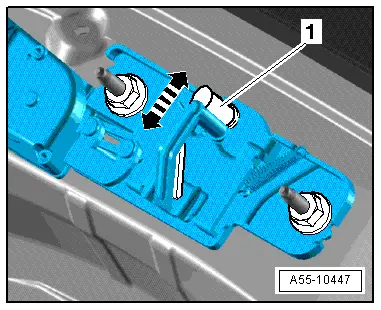
Top and bottom end position of striker
  Caution
t  When adjusting the rear lid, the power latching system motor must be in the »rear lid closed« position (bottom end position).
t  The striker must not be fitted in the top end position -1- (marked in white), as otherwise the rear lid could be pulled down too far when it is closed and could become damaged.
t  The motor for the power latching system must not be electrically connected when adjusting the rear lid.
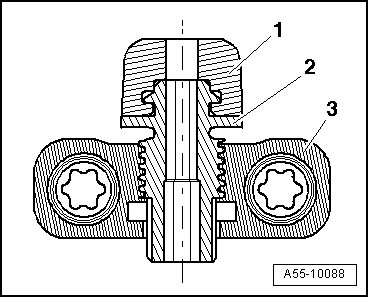
–  Before adjusting the rear lid, completely screw in the top parts of the adjusting buffers on the rear lid → Fig..
  A55-10447
–  Hand-tighten nuts -1- and -3-.
–  Close rear lid and align with body contour.
–  Rear lid lock must be engaged in main catch (2nd stop).
–  Open rear lid in this position and tighten nuts -1- and -3- to torque → Item.
  A55-10449
Striker with power latching system
–  Mark position prior to removal if the same striker is to be re-installed.
  Note
t  The striker with power latching system must only be installed in the »rear lid closed« position, that is in the same position as a new part would be delivered in.
t  If the same striker is re-installed, open the rear lid and block the rear lid lock or rotary latch using a screwdriver or similar tool.
t  The power latching system moves to the »rear lid closed« position = basic setting.
t  Then unplug the connector from the power latching system. The rear lid lock can be opened again using the handle trim opening mechanism in the rear lid.
–  Only tighten nuts -1- slightly.
–  Close rear lid and align with body contour.
–  Rear lid lock must be engaged in main catch (2nd stop).
–  Open rear lid in this position and tighten nuts -1- to torque → Item.
  A55-10448
–  When installing, tighten bolts -2- at stop -1- on body to 8 Nm → Item.
–  Unscrew adjusting buffer -arrow- until bump stops of closed rear lid make contact with adjusting buffer.
–  Check whether rear lid still closes easily. Repeat adjustment procedure if necessary.
–  If rear lid does not close easily, screw in adjusting buffer slightly.
  A55-10450
Installation position of adjusting buffer
1 - Rear lid
q   If correctly adjusted, adjusting buffer -3- must be slightly compressed on coming into contact with bump stop -2- with rear lid closed.
2 - Stop on rear lid
q   Installing → Fig.
q   When installing, tighten corresponding bolts to 8 Nm.
3 - Adjusting buffer on body
q   Adjusting buffer is secured with bolts on body.
q   When installing, tighten corresponding bolts to 8 Nm.
q   The height is adjusted via the adjuster screw.
q   If correctly adjusted, adjusting buffer must be slightly compressed on coming into contact with bump stop (on rear lid) with rear lid closed.
4 - Side panel

   
Adjuster screw for adjusting buffer
–  Before adjusting rear lid, screw adjuster screw -2- with protective cap -1- completely into adjusting buffer -3-.
–  Unscrew adjuster screw -2- until protective cap -1- is slightly compressed on coming into contact with bump stop on rear lid with rear lid closed.
–  Make sure that rear lid has no play and closes in line with body contour by pressing or pulling on side edges of rear lid beneath rear window.
–  Repeat adjustment if necessary.
  A55-10088
Stop on rear lid
–  When fitting stop -2-, tighten bolt -1- to 8 Nm.
–  Height adjustment is performed via adjusting buffers on body.
  A55-10459

Removing and installing gas strut for rear lid > < Removing and installing rear lid