audi Workshop Repair Guides

Audi Workshop Service and Repair Manuals

Unplugging and plugging in connectors > < Removing and installing front standard seat (with electric adjustment)
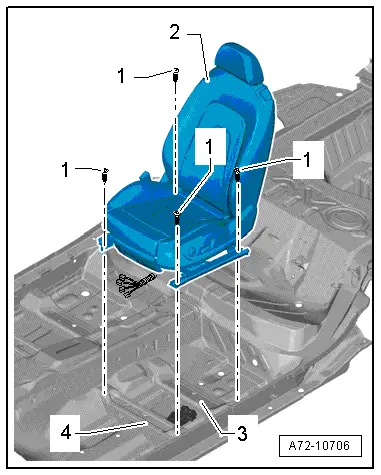
Removing front seat if seat longitudinal adjustment motor or control unit are defective
Checking seat longitudinal adjustment motor -V28-/-V31- or control unit -J136-/-J521-
  WARNING
t  Observe safety regulations for pyrotechnic components → Chapter.
t  Before handling pyrotechnic components (e.g. unplugging the electrical connector) the mechanic must discharge static electricity by briefly touching the door striker plate, or similar.
–  Move seat to highest position.
–  Remove trim (sill side) → Chapter.
  Note
To avoid unnecessary repair costs, check the electrical/electronic components and wiring before removing the seat any further.
–  Perform the following checks:
t  Check fuse → Current flow diagrams, Electrical fault finding and Fitting locations.
t  Check voltage at connector point and perform Fault Finding if necessary → Current flow diagrams, Electrical fault finding and Fitting locations.
t  Check voltage at control unit → Current flow diagrams, Electrical fault finding and Fitting locations.
t  Check voltage at seat longitudinal adjustment motor → Current flow diagrams, Electrical fault finding and Fitting locations.
–  Renew fuse if it is defective → Current flow diagrams, Electrical fault finding and Fitting locations.
–  Repair or renew wire if there is no voltage at connector point → Current flow diagrams, Electrical fault finding and Fitting locations.
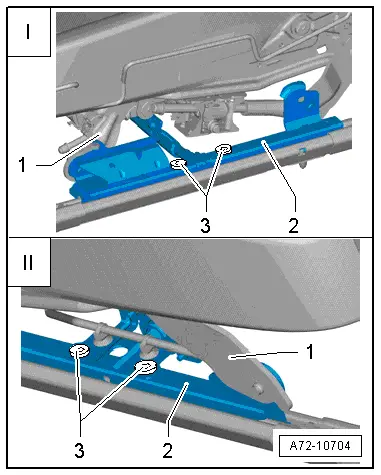
–  If seat longitudinal adjustment motor is defective, lower seat pan frame must be renewed → Chapter.
–  If control unit is defective, renew control unit -J136-/-J521- → Chapter.
   
Removing if seat longitudinal adjustment motor -V28-/-V31- is defective
  Caution
t  Check electrical/electronic components and wiring before loosening bolts -3-.
t  After slackening off bolts, lower seat pan frame -2- including seat longitudinal adjustment motor must be renewed.
  WARNING
Before handling pyrotechnic components (e.g. unplugging the electrical connector) the mechanic must discharge static electricity by briefly touching the door striker plate, or similar.
–  Switch on ignition.
–  With ignition switched on, disconnect battery earth wire → Electrical system; Rep. gr.27.
–  Remove bolts -3- (4x) on both sides.
I - Bolt connection for seat longitudinal adjustment motor (sill side)
II - Bolt connection for seat longitudinal adjustment motor (tunnel side)
  Note
For better access, reach beneath seat from front to unscrew bolts (tunnel side).
  WARNING
Before handling pyrotechnic components (e.g. unplugging the electrical connector) the mechanic must discharge static electricity by briefly touching the door striker plate, or similar.
–  Unplug connector at seat longitudinal adjustment motor.
  A72-10704
–  Move seat until bolts -1- (4x) are visible.
–  Unscrew bolts.
–  Unplug connectors at connector point → Chapter.
–  Connect airbag adapter -VAS 6281- → Chapter.
–  Lift front seat out of vehicle with the assistance of a second mechanic.
–  Attach front seat to seat repair stand -VAS 6136- → Chapter.
  A72-10706
–  Separate lower -2- and upper -1- seat pan frames → Chapter.
–  Renew lower seat pan frame with seat longitudinal adjustment motor → Chapter.
Removing if control unit -J136-/-J521- is defective
  WARNING
t  Observe safety regulations for pyrotechnic components → Chapter.
t  Before handling pyrotechnic components (e.g. unplugging the electrical connector) the mechanic must discharge static electricity by briefly touching the door striker plate, or similar.
–  Switch on ignition.
–  With ignition switched on, disconnect battery earth wire → Electrical system; Rep. gr.27.
–  Unplug connector at seat longitudinal adjustment motor.
  A72-10704
–  Connect seat longitudinal adjustment motor to an external power source and move seat forward or backwards as necessary until bolts -1- (4x) are visible.
–  Unscrew bolts.
–  Unplug connectors at connector point → Chapter.
–  Connect airbag adapter -VAS 6281- → Chapter.
–  Lift front seat out of vehicle with the assistance of a second mechanic.
–  Attach front seat to seat repair stand -VAS 6136- → Chapter.
–  Renew control unit -J136-/-J521- → Chapter.
Installing
  WARNING
t  Observe safety regulations for pyrotechnic components → Chapter.
t  Before handling pyrotechnic components (e.g. plugging in the electrical connector) the mechanic must discharge static electricity by briefly touching the door striker plate, or similar.
Installation is carried out in the reverse order; note the following:
–  Install front seat before detaching airbag adapter -VAS 6281- → Chapter.
–  Plug in connectors at couplings of connector point in floor → Chapter.
  Note
Make sure electrical connectors are fitted correctly (as far as stop) and engage audibly.
  WARNING
The battery must be connected with the ignition switched on. If pyrotechnic components (e.g. airbag or belt tensioner) are inexpertly repaired, this may result in unwanted triggering after connecting the battery. There must not be anyone in the vehicle while you are connecting the battery.
–  With ignition switched on, connect battery earth wire → Electrical system; Rep. gr.27.
  Note
If the airbag warning lamp -K75- indicates a fault following installation, you must interrogate, erase and then re-interrogate the event memory → Vehicle diagnostic tester.
  A72-10706

Unplugging and plugging in connectors > < Removing and installing front standard seat (with electric adjustment)