audi Workshop Repair Guides

Audi Workshop Service and Repair Manuals

Removing and installing sunlight penetration photosensorG107 > < Removing and installing dash panel vents and rear vent
Removing/installing and checking condensation drain hose
  Note
t  This vehicle is fitted with 2 condensation drains (on the right and left at the air conditioning unit/transmission tunnel).
   
t  There is no valve and no flap at the outlet opening -C- of the condensation drain hose -B-; the condensation drains off by way of the rubber lips.
  A87-10435
t  
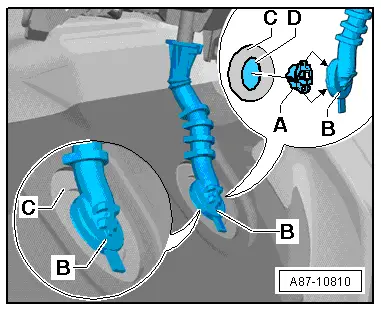
There are different versions of the condensation drain hoses -B-. On version „1“ (refer to illustration above), the condensation drain -B- is inserted directly in the opening -D-. On version „2“, the holder -A- is inserted in the condensation drain -B-. The holder -A- is held in position in the opening -D- in the floor panel -C- by way of the retainer tabs on the holder -A-. To stop condensation escaping from the condensation drain -B- into the passenger compartment, the condensation drain -B- must be pressed firmly against the floor panel -C- after fitting the holder -A-. If not sufficiently tensioned, seal the joint between the two components with silicone adhesive sealant D176 001 A3 for example → Electronic parts catalogue.
In the event of moisture problems in the passenger compartment, check the following in addition to the condensation drain:
–  Water drains for plenum chamber → Chapter
–  Scuttle panel trim and cover for fresh air intake housing for correct installation and damage → Chapter
–  Dust and pollen filter for contamination and correct installation → Chapter
–  Forced air extraction in luggage compartment → Chapter
–  Actuation and operation of the air flow/fresh-air flaps → Chapter and the air recirculation flap → Chapter e.g. by way of the guided fault-finding „Final control diagnosis“ function → "Guided fault-finding" function of vehicle diagnostic, testing and information system VAS 5051.
t  In the event of problems with moisture in the passenger compartment which only occur with the air conditioner compressor switched on under certain ambient conditions, additionally check the outlet temperature of the air from the evaporator as follows:
–  In the guided fault-finding „Reading measured value block“ function, select the measured value block with the measured value of the evaporator output temperature sender -G263- → "Guided fault-finding" function of vehicle diagnostic, testing and information system VAS 5051.
–  Check the temperature of the air flowing out of the evaporator under the usage conditions described by the customer or with the following settings on the air conditioner operating and display unit, Climatronic control unit -J255-: „Auto“ mode, air conditioner compressor switched on (lamp in AC button lights), „cold“ temperature setting, medium fresh air blower speed with a voltage of approx. 7 V at the fresh air blower -V2-, fresh air mode (lamp in „air recirculation button“ not lit) and dash panel vents open.
–  If the measured value of the sender is too low (at ambient temperature above 0 °C, colder than 0 °C for lengthy period) or too high although the air conditioner is operating properly (e.g. greater than 10 °C), rectify the cause of the deviation paying attention to the notes on checking the cooling output → Chapter.
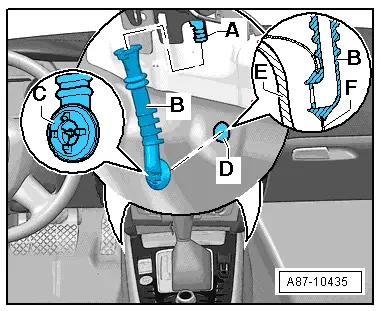
Removing and checking condensation drain hose
–  Switch off the ignition.
–  Remove the glove compartment (for the right condensation drain) → General body repairs, interior; Rep. gr.68.
–  Remove the storage compartment under the dash panel on the driver side (for the left condensation drain) → General body repairs, interior; Rep. gr.70.
–  Carefully fold back the floor covering in the area of the condensation drain hose (left or right) until the condensation drain is visible → General body repairs, interior; Rep. gr.68.
  A87-10810
–  Check both condensation drain hoses -B- for correct routing and contamination and eliminate any cross-sectional constriction for example.
–  Cover the area beneath the two openings -D- (for the drain openings of the condensation drain hose -C-) with absorbent paper to stop any water running beneath the floor covering.
–  Remove the two condensation drain hoses -B-.
–  Use a piece of wire, for example, to check for contamination of the two condensation drains of the air conditioning unit -A-.
–  Check the distance between the insulating mat -E- in the transmission tunnel and the end of the condensation drain hose -C- by way of the openings -D- in the floor panel -F-. There must be enough of a gap for condensation to drain out of the condensation drain hose -B-.
Installing
Install in reverse order; paying attention to the following:
–  Fit the two condensation drain hoses -B- such that they are neither twisted nor crushed (different versions for left and right side) → Parts catalogue.
–  When fitting the floor covering, take particular care to ensure that it does not squash the condensation drain hose -B-.
–  If a condensation drain hose -B- is not fitted securely enough to the condensation drain of the air conditioning unit -A-, secure it with a clip for example if necessary to stop it slipping off.
  A87-10435

Removing and installing sunlight penetration photosensorG107 > < Removing and installing dash panel vents and rear vent