audi Workshop Repair Guides

Audi Workshop Service and Repair Manuals

Detaching refrigerant lines at air conditioner compressor/attaching (vehicles with 6-cyl. engine) > < Detaching refrigerant lines from air conditioner compressor/attaching
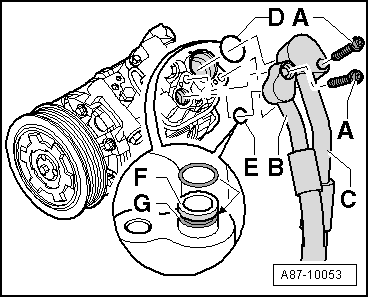
Detaching refrigerant lines from air conditioner compressor/attaching (vehicles with 4-cyl. engine)
–  Switch off the ignition.
–  Drain the refrigerant circuit → Air conditioner with refrigerant R134a.
  Note
Depending on the position of the service connection at the refrigerant line and the vehicle model, it may be necessary to remove the additional body brace stiffener on the left to permit connection of the service coupling of the air conditioner service station (e.g. on the Audi Q5) → Running gear; Rep. gr.40 and → Air conditioner with refrigerant R134a
Vehicles with a high-voltage system (hybrid vehicles)
For all work on vehicles with a high-voltage system, pay attention to the additional warnings for such vehicles → Chapter and → Electrical system; Rep. gr.93.
As work in the vicinity of high-voltage system components is necessary for the following sequence of operations, perform „Visual inspection of high-voltage components and cables for damage“ → Chapter and heed the „General warnings for working on high-voltage system“ → Electrical system; Rep. gr.93
  WARNING
Danger from unexpected engine starting
When performing general work on vehicles with a high-voltage system, switch off the ignition and remove the ignition key from the passenger compartment.
  WARNING
Working on vehicles with high-voltage wiring:
l  Do not support yourself or tools on high-voltage wiring or associated components --> this can damage the insulation.
l  High-voltage wiring must not be excessively bent or kinked --> this can damage the insulation.
l  The round high-voltage connectors are colour-coded with an external coloured ring and are provided with mechanical coding or guide lugs. It is important to observe this coding when joining up the round high-voltage connectors, otherwise the connectors can be damaged.
  DANGER!
Risk of fatal injury if high-voltage components are damaged.
Observe the following when working in the vicinity of high-voltage components or wiring:
t  It is not permitted to use cutting or forming tools, other sharp-edged tools or heat sources such as welding, brazing, soldering, hot air or thermal bonding equipment.
t  Before starting work, visually inspect the high-voltage components in the areas involved.
t  Before working in the engine compartment, visually inspect the power electronics -JX1-, electric drive motor -V141-, air conditioner compressor -V470- and high-voltage wiring.
t  Before working on the vehicle underbody, visually inspect the high-voltage wiring and covers.
t  Before working on the rear section of the vehicle, visually inspect the high-voltage wiring and the electro-box with the maintenance connector for high-voltage system - TW -.
t  Visually inspect all potential equalisation lines.
Check the following when making the visual inspection:
t  There must be no external damage on any component.
t  The insulation of the high-voltage wiring and potential equalisation lines must not be damaged.
t  There must be no unusual deformation of the high-voltage wiring.
t  All high-voltage components must be identified by a red warning sticker.
   
–  Remove the bolts -1- and -4-.
–  Detach the refrigerant lines.
Vehicles with no high-voltage system
t  Detaching air conditioner compressor from holder (only if refrigerant lines cannot be detached with compressor attached) → Chapter
  Note
t  On vehicles with a 4-cyl. engine, detachment of the refrigerant lines does not always involve detaching the air conditioner compressor from the holder. Depending on the version of the power steering vane pump, it may be possible to detach the refrigerant lines from the air conditioner compressor with the compressor attached to the holder.
t  The vane pump is only fitted on vehicles without electromechanical power steering → Running gear; Rep. gr.48.
t  On vehicles with a 4-cyl. engine on which the bolt at the refrigerant line connection at the air conditioner compressor is not accessible, the air conditioner compressor is to be detached from the holder → Chapter.
t  If the refrigerant line on the low-pressure end (from the refrigerant line with internal heat exchanger to the air conditioner compressor) is to be removed, the number of components to be taken out depends on the routing of the refrigerant line (routing depends on engine).
  A87-11073
–  Remove the bolts -A-.
–  Detach the refrigerant lines -B- and -C-.
All vehicles
  Caution
Danger of damaging refrigerant lines and hoses.
Take care not to strain, kink or bend refrigerant lines and hoses.
  Note
Seal the open lines and the connections at the air conditioner compressor with suitable caps (to prevent the ingress of dirt and moisture).
Attaching
Attach in reverse order, paying attention to the following:
  A87-10053
–  Replace the O-rings -D- and -E-; for version refer to → Electronic parts catalogue
–  Check the guide ring -F- at the connections of both refrigerant lines -B- and -C- for damage.
–  Clean the connections of the refrigerant lines and the connections at the air conditioner compressor and check for damage.
–  Moisten the O-rings slightly with refrigeration oil before fitting → Chapter.
–  Insert the appropriate O-ring (-D- and -E-) in the groove -G- at the connections of both refrigerant lines -B- and -C-.
  Note
t  Use is not to be made of the O-rings from the caps of the replacement compressor connections.
t  Pay attention to correct positioning of the O-rings in the groove -G- of the corresponding refrigerant line.
–  Insert both refrigerant lines -B- and -C- in the corresponding air conditioner compressor connections.
–  Tighten the bolts -A- to 9 Nm (bolts with M6 thread) and 25 Nm (bolts with M8 thread).
  Note
Following attachment of the refrigerant lines to the air conditioner compressor (and after installing the compressor) check the routing of the lines. They must be inserted in the holders provided and not make contact with other components.
–  Evacuate and charge the refrigerant circuit → Air conditioner with refrigerant R134a.
–  Re-install the remaining components removed.
–  Switch on the ignition.
–  Interrogate the event recorder of the operating and display unit, Climatronic control unit -J255- and erase any faults displayed → "Guided fault-finding" function of vehicle diagnostic, testing and information system VAS 5051.
–  Start up the air conditioner after charging the refrigerant circuit → Chapter.
  Note
Also heed the notes on start-up of the air conditioner after charging → Air conditioner with refrigerant R134a.
  A87-10053

Detaching refrigerant lines at air conditioner compressor/attaching (vehicles with 6-cyl. engine) > < Detaching refrigerant lines from air conditioner compressor/attaching