audi Workshop Repair Guides

Audi Workshop Service and Repair Manuals

Removing and installing holder and add-on components of auxiliary heater > < Removing and installing intake air noise insulation
Removing and installing auxiliary heater exhaust system
  Note
The following illustrations show the position of the auxiliary heater on an Audi A5 Coupé. The layout differs slightly on the Audi A4 and Audi Q5 (different auxiliary heater holder). On these other vehicles the exhaust system is however to be removed and installed in the same manner as described for the Audi A5 Coupé.
Removing
–  Switch off ignition (and auxiliary heater).
–  Detach the front noise insulation → General body repairs, exterior; Rep. Gr.66.
  Note
Depending on the vehicle model, removal of the front noise insulation may involve detaching the bumper cover (e.g. on the Audi A4 allroad) → General body repairs, exterior; Rep. Gr.66
–  Remove the front right wheel housing liner → General body repairs, exterior; Rep. Gr.63.
–  Remove the right headlight (not necessary on the Audi Q5; if applicable remove the trim at the fog light) → Electrical system; Rep. Gr.94.
   
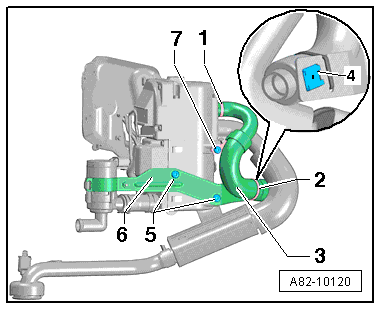
–  Pull the intake air noise insulation -3- sideways out of the holder (not necessary on the Audi Q5).
  Note
Pull the intake air noise insulation -3- sideways out of the holder to provide access to the clamp.
–  Slacken off the bolt -7- at the holder and swivel the holder aside (not fitted on the Audi Q5).
  A82-10120
–  Unscrew the nut -2-.
–  Unfasten the clip -7-.
–  Screw out the bolt -5- and detach the silencer -6- with the exhaust pipe -1-.
  Note
Depending on the design of the auxiliary heater and the vehicle equipment spec, there may be a thermal insulator on the exhaust pipe fitted between the auxiliary heater and the silencer -6- (to protect the surrounding components).
Installing
Install in reverse order; paying attention to the following:
  Note
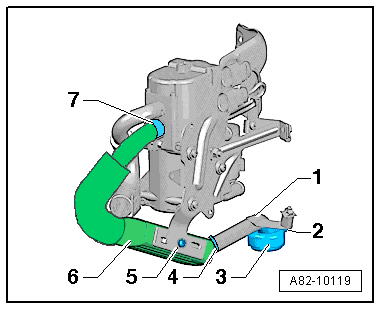
If the exhaust pipe -1- and the silencer -6- are separated, make sure that the slit in the exhaust pipe is facing the arrow on the silencer on assembly.
–  Make sure the exhaust system is not making contact anywhere.
  A82-10119
–  When attaching the noise insulation, make sure the socket -3- slides over the exhaust pipe -1-.
  A82-10119
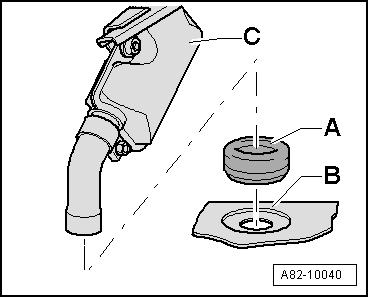
–  After fitting the front noise insulation, check the rubber grommet -A- and the exhaust pipe of the auxiliary heater. The rubber grommet -A- must be positioned in the noise insulation -B- such that there is no strain and the exhaust pipe must either end flush with the rubber grommet -A- or protrude slightly out of the rubber grommet -A-.
Tightening torques → Chapter
  A82-10040
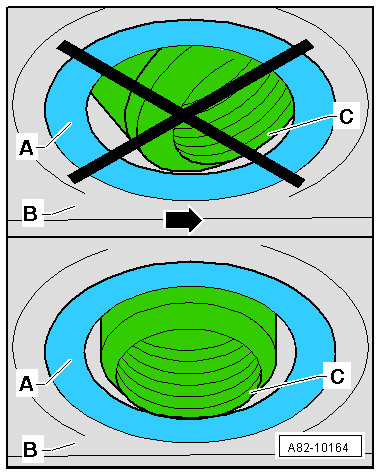
–  After working on the auxiliary/supplementary heater or the noise insulation, check the mouth of the exhaust pipe -C-. The mouth of the exhaust pipe -C- must be fitted at right angles to the noise encapsulation -B- where it passes through the grommet -A- in the noise encapsulation -B-.
  Note
The mouth of the exhaust pipe -C- must not face in the direction of travel -arrow- (as otherwise the flow of air past the moving vehicle could lead to an increased back pressure in the exhaust system).
  A82-10164

Removing and installing holder and add-on components of auxiliary heater > < Removing and installing intake air noise insulation