A4 Mk3
|

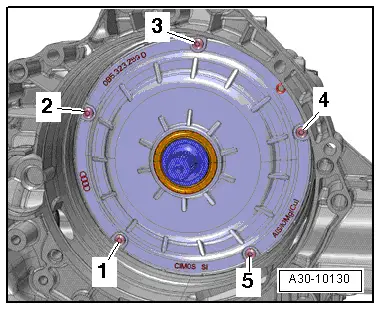
| 1 - | Flywheel |
| q | Removing and installing → Chapter |
| 2 - | Clutch cover |
| q | Removing and installing → Chapter „Removing and installing dual clutch“ |
| 3 - | Bolt |
| q | Tightening torque and sequence → Fig. |
| 4 - | O-ring |
| q | Renew |
| 5 - | Dual clutch |
| q | → Chapter „Removing and installing dual clutch“ |
| l | After renewing dual clutch, run appropriate „Guided Function“ using vehicle diagnostic tester → Chapter |
| 6 - | Gearbox housing |
| 7 - | Ball bearing |
| q | For dual clutch |
| q | → Chapter „Renewing ball bearing for input shaft“ |
| 8 - | Circlip |
| q | For ball bearing |
| q | Renew |
| 9 - | Circlip |
| q | For dual clutch |
| q | Renew |
| 10 - | Oil seal |
| q | For input shaft |
| q | → Chapter „Renewing input shaft oil seal“ |
| 11 - | Bolt |
| q | Renew |
| q | 3x for 4-cylinder engines |
| q | 6x for 6-cylinder engines |
| q | 60 Nm |