
A4 Mk3
| Exploded view - flywheel and dual clutch |

| 1 - | Flywheel |
| q | Different versions are available; for correct version refer to → Electronic parts catalogue |
| q | Removing and installing → Chapter |
| 2 - | Clutch cover |
| q | Different versions (without or with thrust washer → Item); observe notes and allocation in → Electronic parts catalogue |
| q | Removing and installing → Chapter „Removing and installing dual clutch“ |
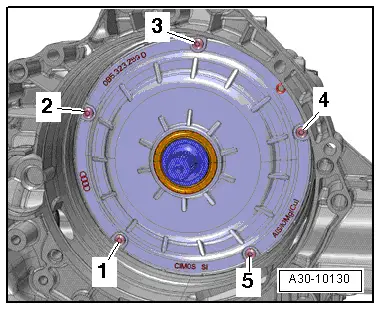
| 3 - | Bolt |
| q | Tightening torque and sequence → Fig. |
| 4 - | O-ring |
| q | Renew |
| 5 - | Dual clutch |
| q | Different versions are available; for correct version refer to → Electronic parts catalogue |
| q | Removing and installing → Chapter |
| l | After renewing the dual clutch, run the appropriate „Guided Function“ on a vehicle diagnostic tester → 7-speed dual clutch gearbox 0B5 (S tronic); Rep. gr.34. |
| 6 - | Gearbox housing |
| 7 - | Thrust washer |
| q | Not installed in all versions; note allocation to clutch cover in → Electronic parts catalogue |
| 8 - | Ball bearing |
| q | For dual clutch |
| q | Renewing → Chapter |
| 9 - | Circlip |
| q | Renew |
| q | For ball bearing |
| 10 - | Circlip |
| q | Renew |
| q | For dual clutch |
| 11 - | Oil seal |
| q | For input shaft |
| q | Renewing → Chapter |
| 12 - | Bolt |
| q | Renew |
| q | 6x for 6-cylinder engines |
| q | 60 Nm |
|
|
| Stage | Bolts | Tightening torque |
| 1. | -1 … 5- | Screw in evenly by hand until bolt heads make contact with clutch cover |
| 2. | -1 … 5- | Tighten bolts consecutively in steps of 90° until clutch cover makes contact with gearbox housing |
| 3. | -1 … 5- | 8 Nm |