
A4 Mk3
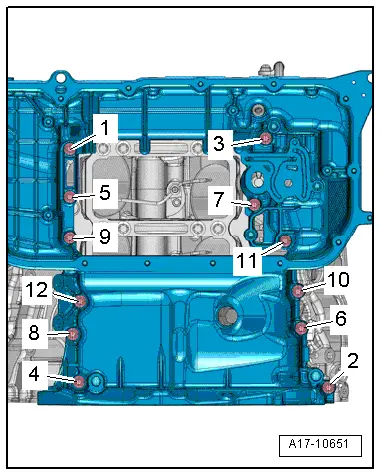
| Sump (top section) - exploded view |

| 1 - | Bolt |
| q | 9 Nm |
| 2 - | Valve for oil pressure control -N428- |
| q | Removing and installing → Chapter |
| 3 - | O-ring |
| q | Renew |
| 4 - | Sump (top section) |
| q | Removing and installing → Chapter |
| 5 - | Seal |
| q | Renew |
| 6 - | Dowel sleeve |
| 7 - | Guide tube |
| q | For oil dipstick |
| 8 - | Bolts |
| q | 9 Nm |
| 9 - | O-rings |
| q | Renew |
| 10 - | Sealing plug |
| 11 - | Seal |
| q | Renew |
| 12 - | Oil return valve |
| q | For engine oil cooler |
| 13 - | Seal |
| q | Renew |
| 14 - | Dowel sleeve |
| 15 - | Bolt |
| q | Tightening torque and sequence → Fig. |
| 16 - | Seal |
| q | Renew |
| 17 - | Screw plug |
| q | For „TDC“ marking |
| q | 25 Nm |
| 18 - | Vacuum line |
| q | From vacuum pump |
| 19 - | Bolt |
| q | Renew |
| q | 3 Nm + 45° further |
| 20 - | O-ring |
| q | Renew |
| 21 - | Bolt |
| q | 9 Nm |
 Note
Note
|
|
| Stage | Bolts | Tightening torque/angle specification |
| 1. | -1 … 12- | 2 Nm |
| 2. | -1 … 12- | 5 Nm |
| 3. | -1 … 12- | turn 90° further |