A4 Mk3
| Fuel tank with attached components - exploded view |
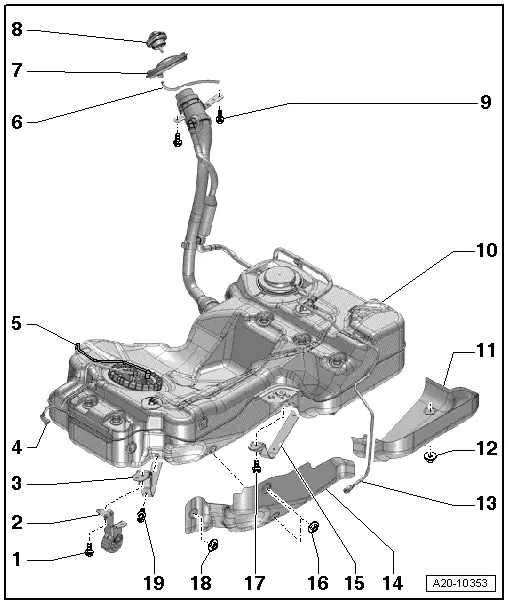
| 1 - | Bolt |
| q | Tightening torque → Rep. gr.26 |
| 2 - | Mounting for exhaust system |
| 3 - | Securing strap |
| q | Different lengths |
| 4 - | Fuel line |
| q | From fuel filter to engine |
| q | Do not kink |
| q | Clipped onto fuel tank |
| q | Press release tab on pipe connector to disconnect |
| 5 - | Fuel line |
| q | Only on vehicles with auxiliary heater: leading to metering pump for auxiliary heater |
| q | Do not kink |
| q | Clipped onto fuel tank |
| q | Press release tab on pipe connector to disconnect |
| 6 - | Overflow hose |
| q | Attached to bracket for bumper |
| 7 - | Rubber cup |
| 8 - | Filler cap |
| q | Screw down until it clicks audibly |
| q | Secured to tank flap unit |
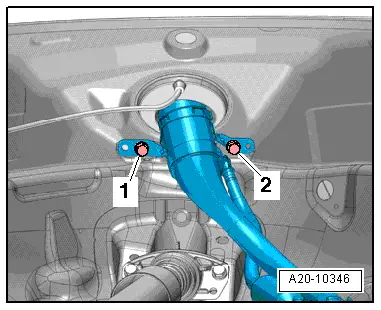
| 9 - | Bolt |
| q | To secure fuel filler neck |
| q | To eliminate electrostatic charge → Fig. |
| q | 20 Nm |
| 10 - | Fuel tank |
| q | Removing and installing → Chapter |
| 11 - | Heat shield for fuel tank |
| 12 - | Nut |
| q | 2 Nm |
| 13 - | Breather line |
| q | To activated charcoal filter |
| q | Do not kink |
| q | Clipped onto fuel tank |
| q | Press release tab on pipe connector to disconnect |
| 14 - | Heat shield for fuel tank |
| 15 - | Securing strap |
| q | Different lengths |
| 16 - | Nut |
| q | 2 Nm |
| 17 - | Bolt |
| q | 20 Nm |
| 18 - | Nut |
| q | 2 Nm |
| 19 - | Spreader clip |
|
|
 WARNING