audi Workshop Repair Guides

Audi Workshop Service and Repair Manuals

Removing and installing upper transverse link > < Exploded view of upper transverse link, track rod, coil spring, lower transverse link, vehicle level sender
Removing and installing lower transverse link
Special tools and workshop equipment required
   
t  Torque wrench -V.A.G 1331-
  W00-0427
t  Torque wrench -V.A.G 1332-
  W00-0428
Removing
–  Before starting work, measure distance -a- from centre of wheel to lower edge of wheel housing with vehicle standing on its wheels.
–  Raise vehicle on lifting platform.
–  Remove wheel.
–  Remove coil spring → Chapter.
  A42-10125
–  On vehicles with vehicle level sender -1-, remove bolt -2-.
  A42-10208
–  Remove bolt -4-.
  A42-10216
–  Remove nut -3-.
–  Remove bolt -1- and detach spacer -2-.
  Note
The wheel alignment must be checked if nut -3- is slackened or bolt -1- is removed.
  A42-10209
–  Remove bolt -1-.
–  Unscrew nut -3- and remove bolt -2-.
–  Take out lower transverse link.
Installing
Installation is carried out in the reverse sequence. Note the following points:
Tightening torques → Chapter „Exploded view of upper transverse link, track rod, coil spring, lower transverse link, vehicle level sender“
  Note
t  Bonded rubber bushes can only be turned to a limited extent. The suspension mountings must therefore only be tightened when the suspension is in the unladen position or reference position.
t  Raising suspension to unladen position (vehicles with coil springs) → Chapter
  A42-10207
–  Fit lower transverse link and screw in bolt -1- loosely initially.
  Note
To provide access to the bolt head when tightening bolt -2-, the aerodynamic fairing (Cd panel) and wheel spoiler must be removed → Rep. gr.66.
–  Fit bolt -2- and screw on nut -3- loosely.
  A42-10207
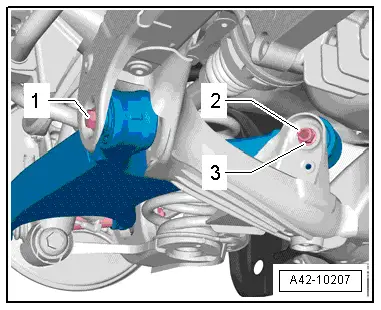
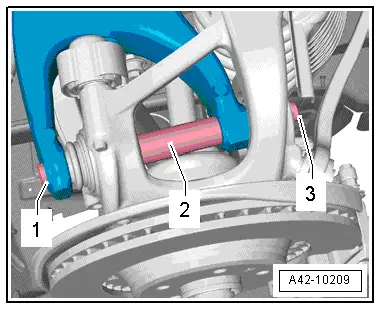
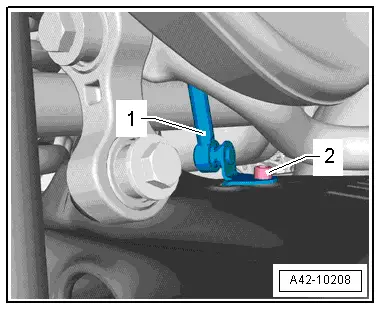
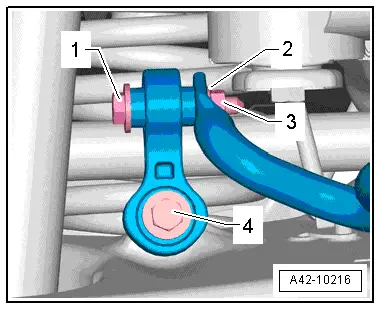
–  Fit bolt -1- with spacer -2- and screw on nut -3- loosely.
  Caution
The bolt connection must not be tightened by the nut -3-.
–  Tighten bolt -1-.
–  Tighten remaining bolts.
–  Install coil spring → Chapter.
–  Secure wheel → Wheels and tyres; Rep. gr.44.
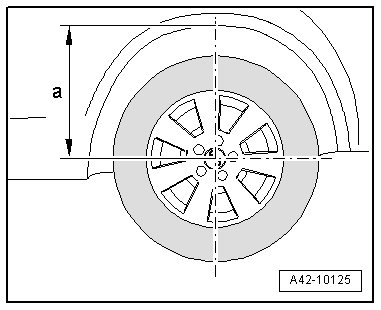
–  Wheel alignment must be checked and adjusted, see chart → Chapter.
Front and rear wheel alignment must always be checked and adjusted if necessary using VW/Audi approved equipment.
–  On vehicles with automatic headlight range control, carry out basic adjustment of headlights → Rep. gr.94.
–  If, on vehicles with electronic damping control, the vehicle level sender has been removed and refitted or the linkage detached, the reference position must be re-adapted → Chapter → Vehicle diagnostic, testing and information system VAS 5051.
–  If the reference position has been re-adapted on vehicles with lane departure warning, the lane departure warning control unit -J759- must be recalibrated → Chapter.
  A42-10209

Removing and installing upper transverse link > < Exploded view of upper transverse link, track rod, coil spring, lower transverse link, vehicle level sender