audi Workshop Repair Guides

Audi Workshop Service and Repair Manuals

Adjusting gas discharge headlights - rest-of-the-world vehicles > < Checking and adjusting headlight settings
Adjusting halogen headlights - rest-of-the-world vehicles
l  Tyre pressure OK.
l  Headlight lenses must be clean and dry.
l  Headlight lenses must not be damaged.
l  Reflectors and bulbs OK.
l  Vehicle correctly loaded.
Vehicle loading: driver's seat occupied, otherwise vehicle unloaded (unladen weight).
l  One person or 75 kg.
The unladen weight is the weight of the vehicle ready for operation with full fuel tank including the weight of all equipment normally carried.
l  Fuel tank: at least 90% full.
l  Equipment: e.g. spare wheel, tools, jack, fire extinguisher etc.
If the fuel tank is not at least 90 % full, put in additional weight as follows:
–  Read off fuel tank level at fuel gauge in instrument cluster, compare with the following table and if necessary, place additional weight in luggage compartment.
   
Fuel gaugeAdditional weight in kg
1/445
1/230
3/415
Full0
Example: If fuel tank is half full, place an additional weight of 30 kg into luggage compartment.

  Note
Use canisters filled with water as additional weight (a 5 litre canister filled with water weighs approx. 5 kg).
l  Roll vehicle several metres or depress front and rear springs fully several times so that springs settle correctly.
l  Release electromechanical parking brake to relieve any load on suspension.
l  Vehicle and headlight adjustment unit must be on a level surface.
   
l  Headlight adjustment unit must be aligned to vehicle → Operating instructions for headlight adjustment unit.
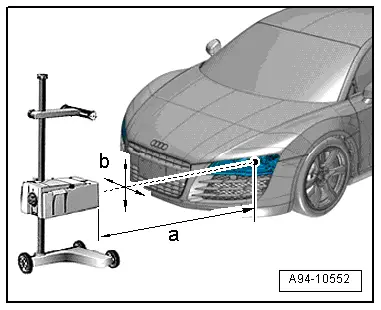
l  Position headlight adjustment unit in front of headlight at distance -a- 30 ... 70 cm. Dimension -b- = 3 cm must not be exceeded (measured from headlight centre).
l  Adjusting dip setting on headlight adjustment unit → Operating instructions for headlight adjustment unit
  A94-10552
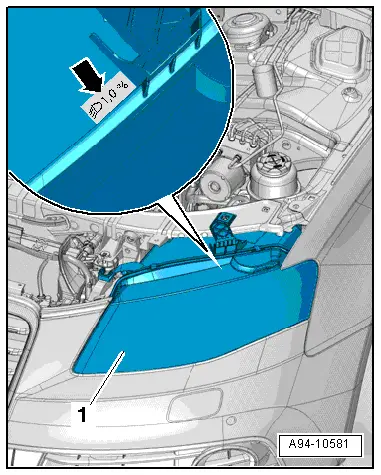
l  Dip setting -arrow- is marked on top edge of headlight -1- in „%“.
  Note
t  Adjust headlights according to dip setting marked on headlight.
t  The percentage value is for a range of 10 m. Example: Converting a dip setting of 1.0% = 10 cm.
Preparations
–  Vehicle must be on a level surface.
–  Turn light switch to „dipped beam“ position – not to „Auto“ position.
–  Set knurled wheel for headlight range control to position „0“.
  A94-10581
Headlight adjustment
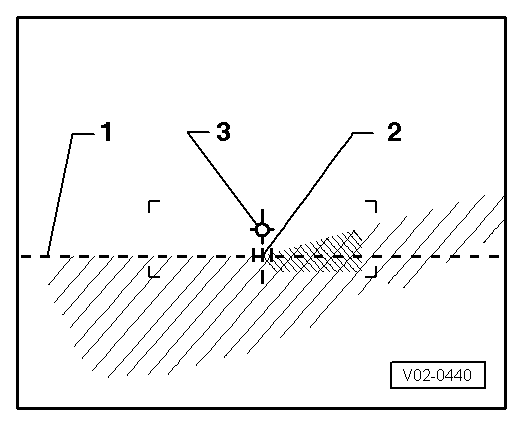
l  The horizontal light-dark border should coincide with the setting line -1- of the test surface on the headlight adjustment unit.
l  The break-away point -2- between the horizontal section of the light-dark border on the left and the rising section on the right should coincide with the vertical line running through the central point -3-. The bright spot in the centre of the beam should be to the right of the vertical line.
  Note
t  To make it easier to find the break-away point -2-, cover and uncover the left half of the headlight (as seen in direction of travel) a few times. Then check the dipped beam again.
t  If dipped beams have been adjusted correctly the centre point of the main beam should lie on central point -3-.
  V02-0440
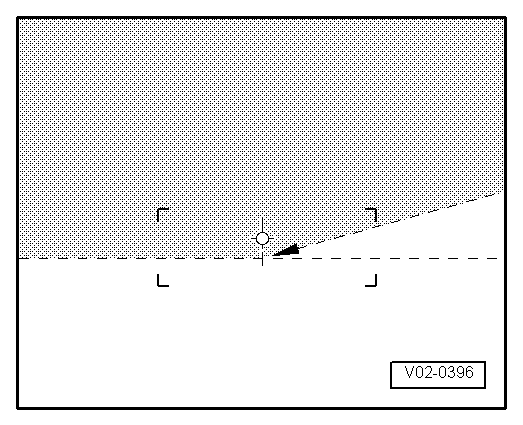
t  If using an old test screen with a 15° setting line, the adjustment procedure is the same as for the test screen without a 15° setting line. Disregard the 15° setting line -arrow- to avoid incorrect settings.
  V02-0396
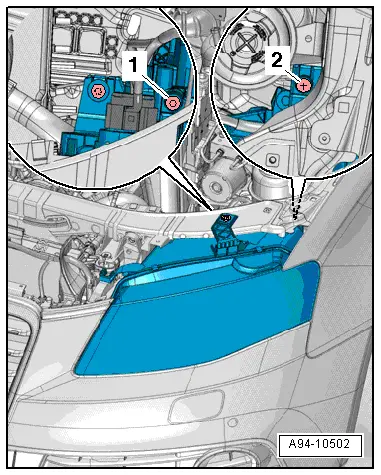
–  Before adjusting height of headlight, use adjuster screw -1- to position light-dark border below setting line.
–  Then adjust light-dark border to setting line from below.
–  Turn adjuster screw -2- for lateral adjustment.
  Note
The arrangement on the right headlight is symmetrically opposite.
  A94-10502

Adjusting gas discharge headlights - rest-of-the-world vehicles > < Checking and adjusting headlight settings