
5 Series E60 528xi (N52K) SAL
Warning!
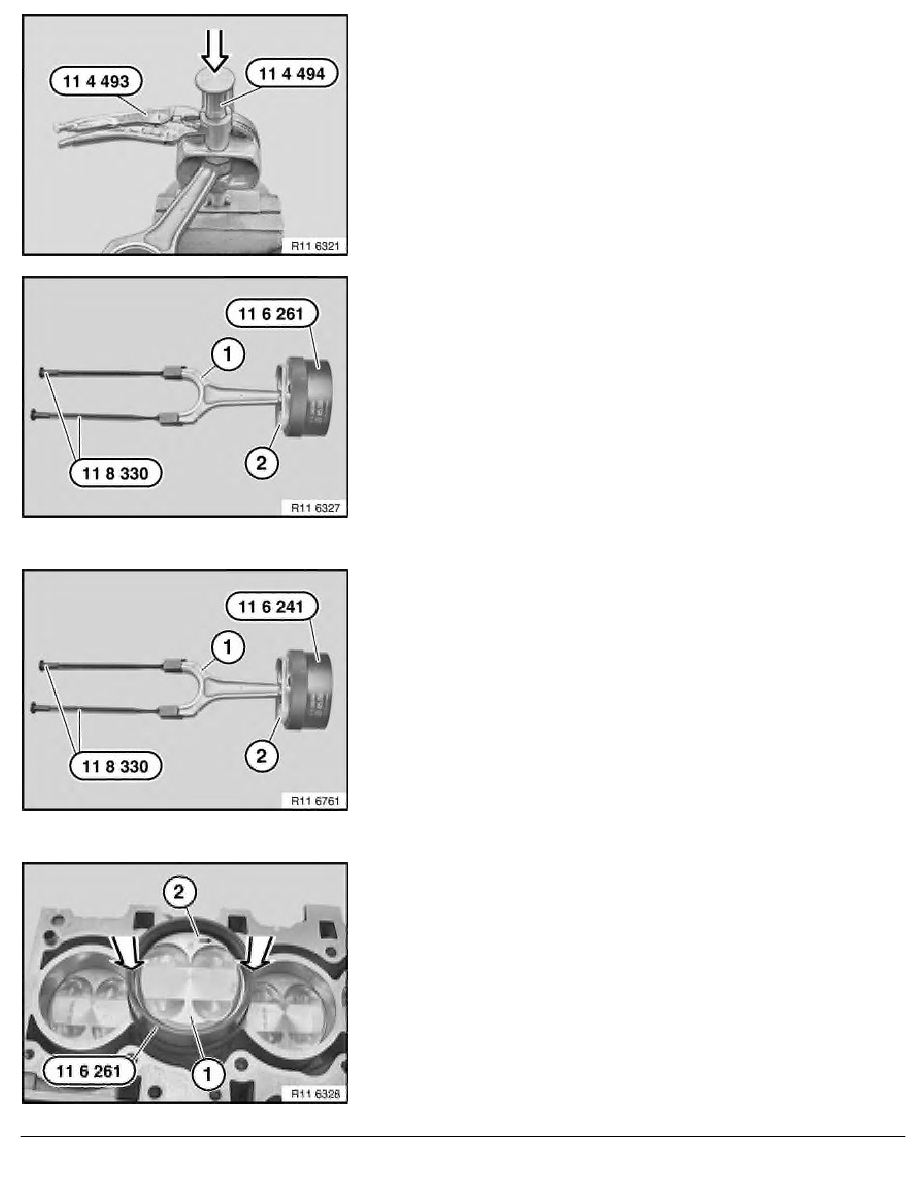
Protective goggles must be worn.
Guide lug and cutout on special tool 11 4 493 must point to
piston crown. Only then can special tool 11 4 494 be correctly
fitted.
When special tools 11 4 493 and 11 4 494 are correctly
positioned, the piston pin circlip must be driven in with a plastic
hammer in the direction of the arrow.
Note:
For vehicles with B30 engines.
Install all piston rings.
Install all connecting rod bearing shells.
Coat piston (2) and piston rings with oil.
Pre-install piston (2) in special tool 11 6 261 .
Attach special tool 11 8 330 to connecting rod (1).
Installation:
Check protective lugs on special tool 11 8 330 for correct
position and damage.
Note:
For vehicles with B25 engines.
Install all piston rings.
Install all connecting rod bearing shells.
Coat piston (2) and piston rings with oil.
Pre-install piston (2) in special tool 11 6 241 .
Attach special tool 11 8 330 to connecting rod (1).
Installation:
Check protective lugs on special tool 11 8 330 for correct
position and damage.
Insert piston (1) with connecting rod in cylinder.
Important!
Do not touch the oil spray nozzle when installing the
components.
Risk of damage!
Danger of piston ring failure.
Press in piston (1) at marked points (see arrows) with finger
pressure only, do not drive in.
Insert piston (1) so that arrow (2) on piston crown points to
camshaft drive.
RA Removing and installing/replacing all pistons (N52K)
BMW AG - TIS
21.02.2013 10:43
Issue status (12/2007) Valid only until next DVD is issued
Copyright
Page - 5 -