5 Series E61 523i (N52) TOUR

1
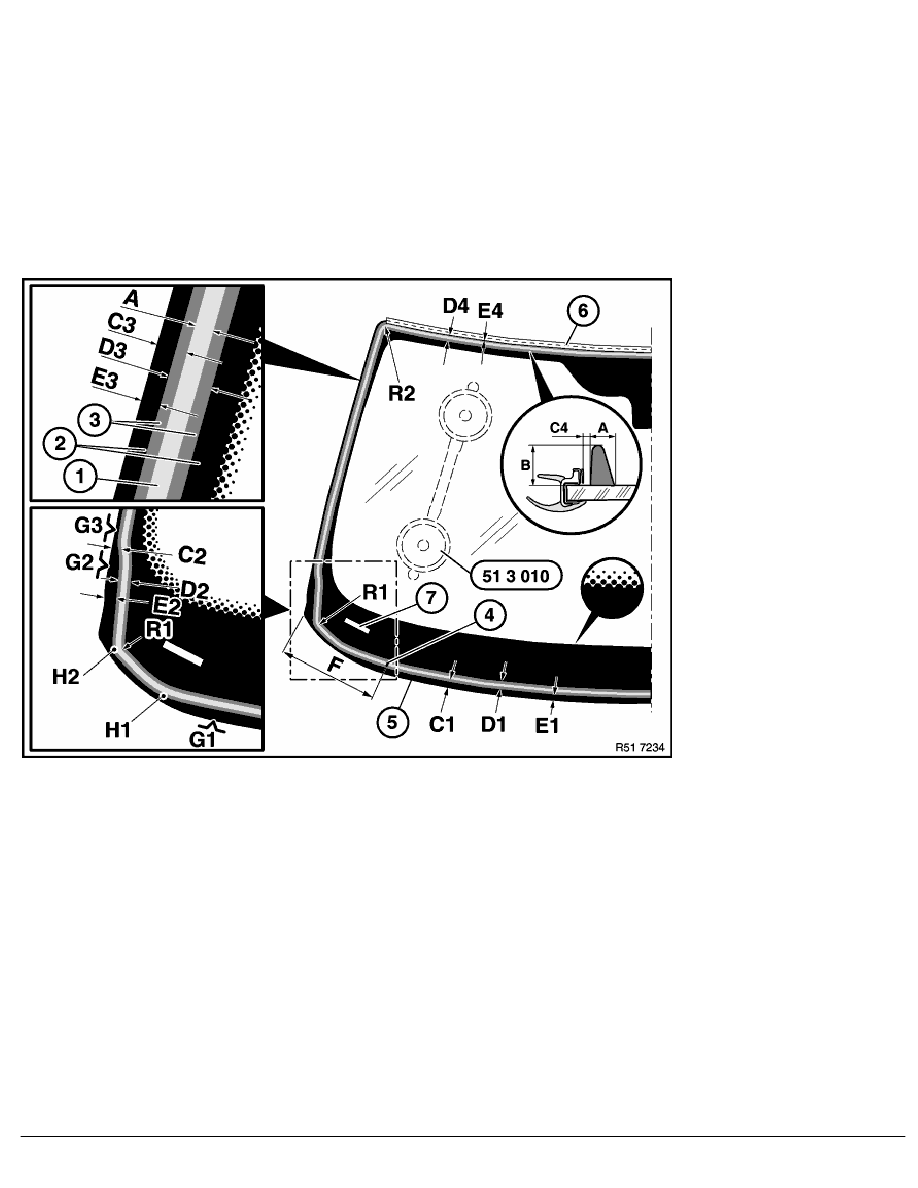
Dashboard trim panel
2
Windscreen
3
Semicircular spacer buffer
4
Glue bead
5
Cowl panel (plate)
6
Expanding foam tape (sound insulation, cowl panel)
7
Sound insulation, bulkhead upper section
8
Side frame
Overview for windscreen cementing (E60, E61):
1
Glue bead
C4
2
±
1 mm (spacing from 1 to 6)
2
Ceramic layer
D1.2
20
±
2 mm (width from 3) at bottom to G2
3
Primer coat
D3.4
14
+2
mm (width from 3) at side and top
4
Application point of glue bead
E1
11 mm (spacing from 3 to 5)
5
Window edge
E2
11 mm (spacing from 3 to 5)
6
Rubber frame, top
E3
0 mm (spacing from 3 to 5)
7
Sight glass for US chassis number
E4
0 mm (spacing from 3 to 6)
A
7
±
1 mm (width of adhesive bead)
F
280 mm (spacing from 4 to 5)
B
11
-2
mm (height of adhesive bead)
G1...3 Artificial lines in 2 to 5 (for measurement of C)
C1
18
±
1 mm (distance 1 to 5) at bottom to G1
H1.2
Artificial points in 2 (1 rests on H on inside)
C2
17
±
1 mm (distance 1 to 5) at G2
R1
approx. 20 mm (radius of 1 at bottom)
C3
4
±
1 mm (distance 1 to 5) G3 to R2
R2
approx. 16 mm (radius of 1 at top)
RA Removing and installing/replacing windscreen
BMW AG - TIS
05.02.2013 10:35
Issue status (12/2007) Valid only until next DVD is issued
Copyright
Page - 4 -
