
Electra Park Avenue V6-231 3.8L VIN 3 FI (1988)
Refrigerant: Technical Service Bulletins
R134A Service Recommendations
When servicing a previously retrofitted vehicle, there is concern that if all of the R12 is not completely removed prior to the retrofit procedure, it could
contaminate your R134a equipment and recovery tank when a subsequent A/C repair is performed. Although the number of retrofits being performed
today is minimal, the volume will increase as R12 prices rise.
GM Service Technology Group is in the process of field testing a new R134a refrigerant purity tester similar to the PureGuard R12 refrigerant tester you
now use. This new tool will mount to your ACR4 R134a Recovery Recycle and Recharge cart and sample all R134a refrigerant prior to recovery. It is
expected that testing of this tool will be completed this year.
This new tool, the Pureguard 2, will also test vehicles and your recycle tank for air contamination, which is threatening A/C system performance. High
levels of air have been found in the recovery tanks on a number of R12 and R134a recovery carts. Air contamination is caused by improper recovery
procedures and short-cutting refrigerant recycling times. Use the following procedure for testing and correcting air contamination in your A/C service
equipment.
1.
Make certain that the ACR4 equipment has not been used for at least 12 hours. It is recommended that the equipment be left in an area where the
temperature will remain constant overnight to allow the temperature of the refrigerant in the tank to stabilize.
2.
Record the surrounding air temperature next to the ACR4 refrigerant tank.
Important:
A major assumption is that the ambient air temperature next to the tank represents the refrigerant temperature in the tank. Failure to take care
in measuring the temperature could result in unnecessary work.
3.
Close both liquid (blue) and vapor (red) valves on the ACR4 tank.
4.
Disconnect low side (blue) service hose from the back of the ACR4.
5.
Slowly disconnect the tank vapor hose (red) from the back of the ACR4 and connect it to the low side service port.
6.
Open the vapor (red) valve on the tank and record the tank pressure on the low side gage.
7.
Restore hoses to the original position.
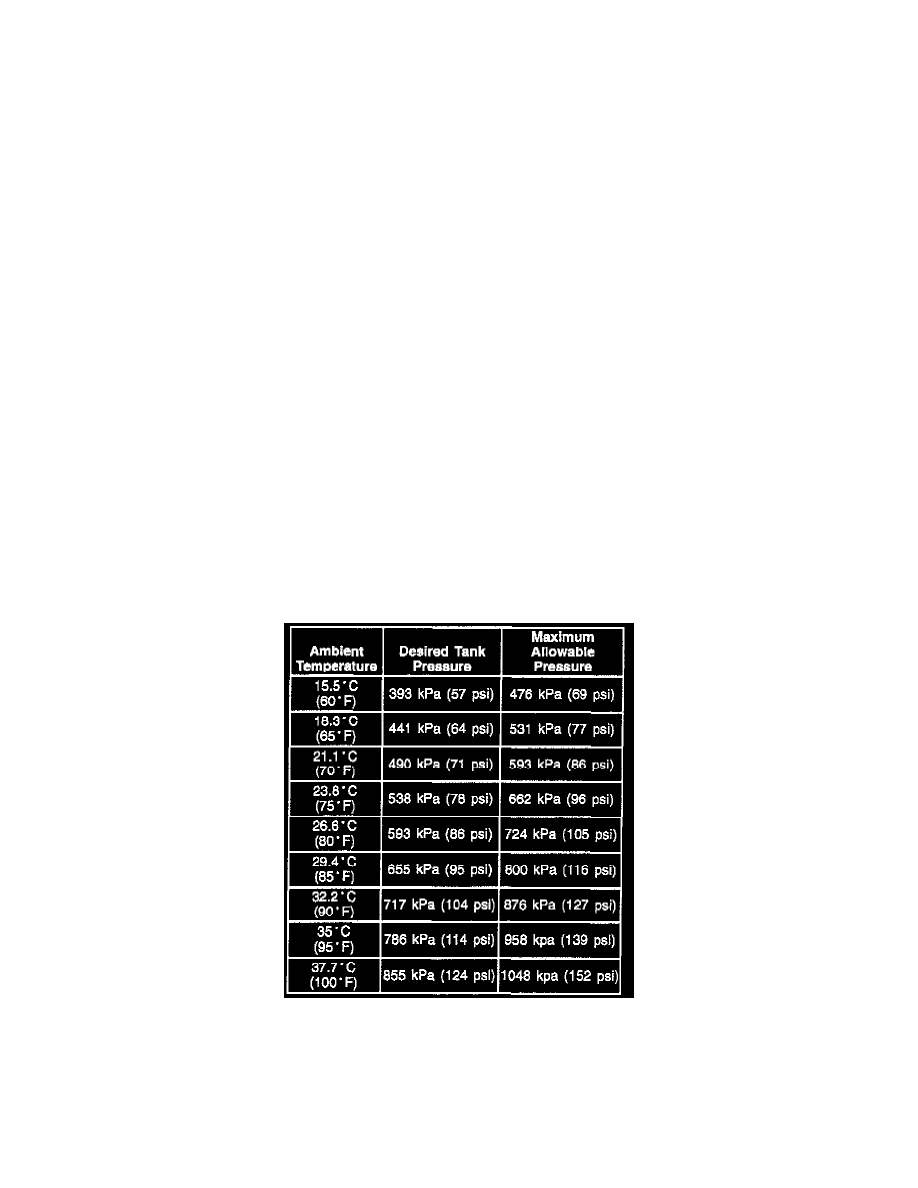
8.
Referring to the Table, find the ambient temperature measured in Step 2. Compare the pressure reading from Step 6 to the "maximum allowable
pressure". If the pressure reading from Step 6 is less than the "maximum allowable pressure", no further action is necessary.
Important:
The closer the tank pressure is to the desired tank pressure, the better the A/C system will perform.
9.
If the pressure reading from Step 6 exceeds the maximum allowable pressure from the Table, open both tank valves and operate the ACR4 through
4 or 5 evacuation cycles. This will activate the automatic air purge to lower the tank pressure.