
Rainier AWD L6-4.2L VIN S (2005)
Heater Hose: Service and Repair
Heater and Air Conditioning (A/C) Pipe/Repair - Auxiliary
HEATER AND AIR CONDITIONING (A/C) PIPE REPLACEMENT/REPAIR - AUXILIARY
TOOLS REQUIRED
J 41425 A/C Line Repair Kit
Do not service the rear A/C or heater lines as a complete unit.
Service the rear A/C or heater lines as a sectional repair.
You can obtain the various sections of line through GMSPO.
Use the J 41425 when any of the following actions damage the rear A/C or heater lines:
-
Rub-through
-
Collision damage
-
Leakage in the system
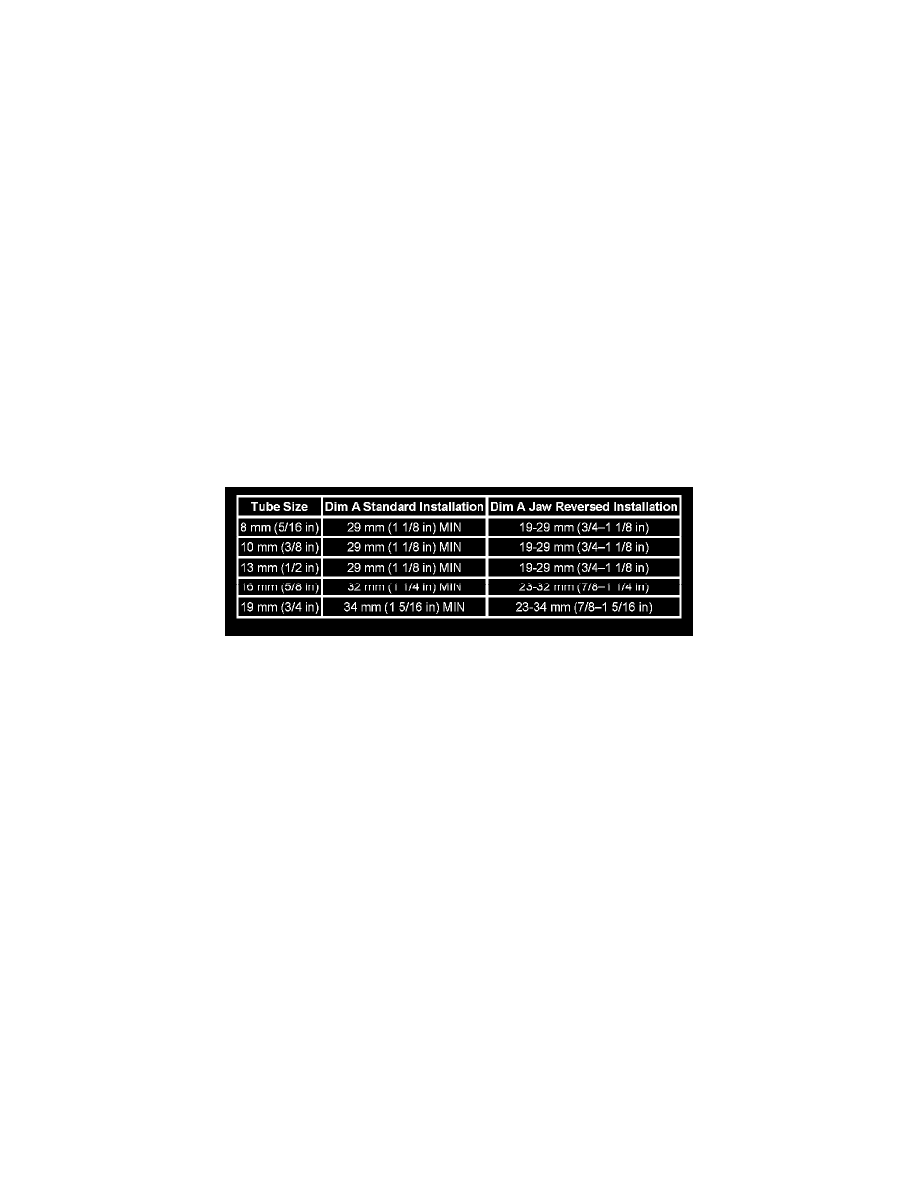
MINIMUM TUBE LENGTH REQUIRED TABLE
IMPORTANT: When sectioning the rear A/C or heater lines, ensure that the correct minimum length remains in the straight part of the line on both
sides of the splice.
Follow the Straight Line Repair procedure in order to repair line damage in a straight section of line.
Follow the Line Sectioning Repair procedure in order to repair any damage in a bend area. Do not repair the rear A/C or heater lines in a bend area,
replace the lines. Maintaining the original line shape will prevent vibrations and rub-through.
STRAIGHT LINE REPAIR
1. Recover the refrigerant, if repairing the A/C lines. Refer to Refrigerant Recovery and Recharging.
2. Drain the coolant, if repairing the heater lines. Refer to Draining and Filling Cooling System (LL8) Draining and Filling Cooling System (LM4) in
Cooling System.
3. Raise and support the vehicle. Refer to Lifting and Jacking the Vehicle in General Information.
4. Locate the area that requires repair.
5. Obtain a length of replacement line to make the repair.
6. Use a tubing cutter in order to cut and remove the section of damaged line.
7. Use a tubing cutter in order to cut the replacement line to length.
IMPORTANT: The length of the replacement line must be the same as the section being replaced.
8. Use the cleaning pad from the J 41425 in order to clean any burrs or grease from the line ends. Be sure to clean at least 19 mm (0.75 in) from the
line splice area.
9. Use the LOK prep sealant in order to prep the line ends.
10. Apply one drop of the J 41425-3 sealing compound to the outside of each end of the line.
11. Insert the line ends into the LOK fitting.
12. Rotate the LOK fitting one complete turn in order to evenly distribute the sealing compound around the lines.
13. Install the correct LOK fitting jaws into the J 41425-1 tool.
14. Install the J 41425-1 tool over the LOK connectors.Verify that the LOK connector ends are positioned in the counter bores of the jaws.
15. Tighten the forcing screw of the J 41425-1 tool.When fully seated, the LOK connector collars will bottom out on the center shoulder of the LOK
fitting.
IMPORTANT: Hold the J 41425-1 tool body with a 3/8" breaker bar.
16. Loosen the forcing screw and remove the J 41425-1 tool from the repaired line.