Regal V6-231 3.8L VIN L SFI (1990)

Brake Master Cylinder: Service and Repair
Cast Iron Type
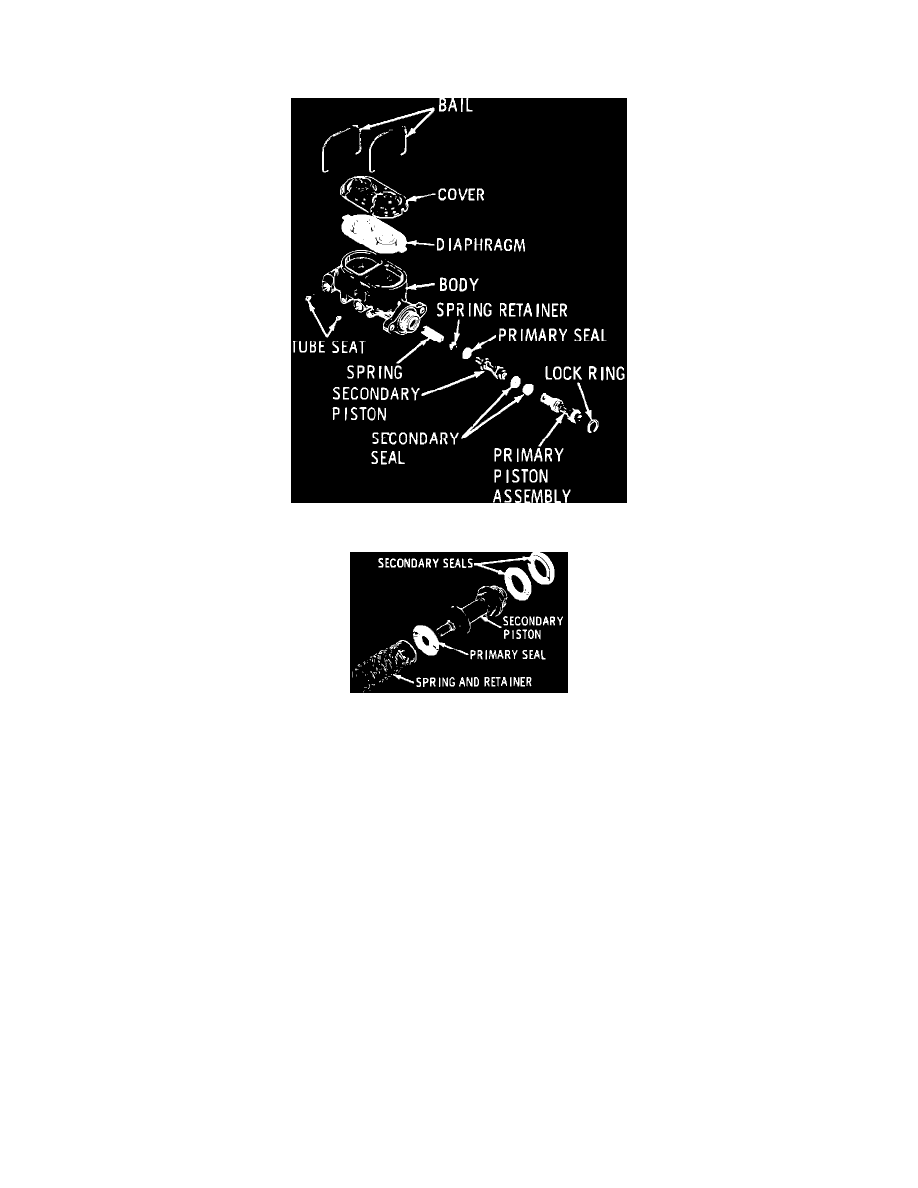
Fig. 28 Cast Iron Type Master Cylinder
Fig. 29 Secondary Piston & Seals. Cast Iron Type Master Cylinder
Refer to Figs. 28 and 29 while performing the following procedures.
Disassembly
1.
Remove master cylinder from vehicle.
2.
Clean outside of master cylinder, then remove reservoir cover and diaphragm.
3.
Turn master cylinder over, then pump pushrod by hand to remove any remaining brake fluid.
4.
Clamp master cylinder in a vise, with vise jaws gripping mounting flange and fluid ports pointing up. Do not clamp master cylinder body in
vise.
5.
Remove lock ring and primary piston assembly from cylinder bore.
6.
Apply compressed air to secondary outlet port to remove secondary piston spring and retainer.
7.
Using a 13/64 inch drill, enlarge hole in tube fitting insert of fluid outlet holes. Place a heavy washer over outlet hole, then thread a 1/4 X 20 X 3/4
screw into insert. Tighten screw until insert is unseated, then remove insert, screw and washer.
8.
Remove primary and secondary seal from secondary piston.
Inspection
Clean all parts not included in repair kit with brake fluid. Do not dry with compressed air.
1.
Inspect cylinder bore for scoring and corrosion. Replace master cylinder if necessary.
2.
Polish discolored or stained cylinder with crocus cloth, then rinse in clean brake fluid. Ensure compensating port is clean.
Assembly
Lubricate all rubber parts with clean brake fluid prior to installation.
1.
With master cylinder in a vise, insert brass tube fitting inserts from overhaul kit into outlet holes.
2.
Using spare brake line tube, thread tube nut into outlet hole and turn down until tube fitting insert bottoms into outlet hole. Remove tube nut and
inspect outlet hole for burrs.
