
Regal V6-3.8L VIN K (1997)
Note
The rivet stud and surrounding panel area MUST BE properly refinished PRIOR to the installation of the electrical ground wire terminal and
conductive nut to maintain a secure, stable and corrosion-free electrical ground.
11. Refinish the repair area using an anti-corrosion primer. Refer to Anti-Corrosion Treatment and Repair in SI.
12. Allow the refinished repair area to cure sufficiently before removing the protective material applied to the rivet stud threads.
13. Remove the painters tape or equivalent from the rivet stud threads.
14. Using GM approved residue-free solvent or equivalent, thoroughly clean the rivet stud threads to remove any adhesive and allow to dry.
15. Using a small brush, apply Dielectric Lubricant GM P/N 12377900 (Canadian P/N 10953529) to the threads of the M6 conductive rivet stud.
Note
Fretting corrosion is a build-up of insulating, oxidized wear debris that can form when there is a small motion between electrical contacts. The
oxidized wear debris can accumulate at the electrical contact points causing the electrical resistance across the connection to increase.
16. Carefully remove ANY corrosion or contamination that may be present on the electrical ground wire terminal.
17. Install the electrical ground wire terminal to the M6 conductive rivet stud.
18. Select a M6 conductive nut. Refer to the Parts Information section of this bulletin.
19. Install the M6 conductive nut to the rivet stud and:
Tighten
Tighten to 8 Nm (71 lb in)
20. Verify proper system operation.
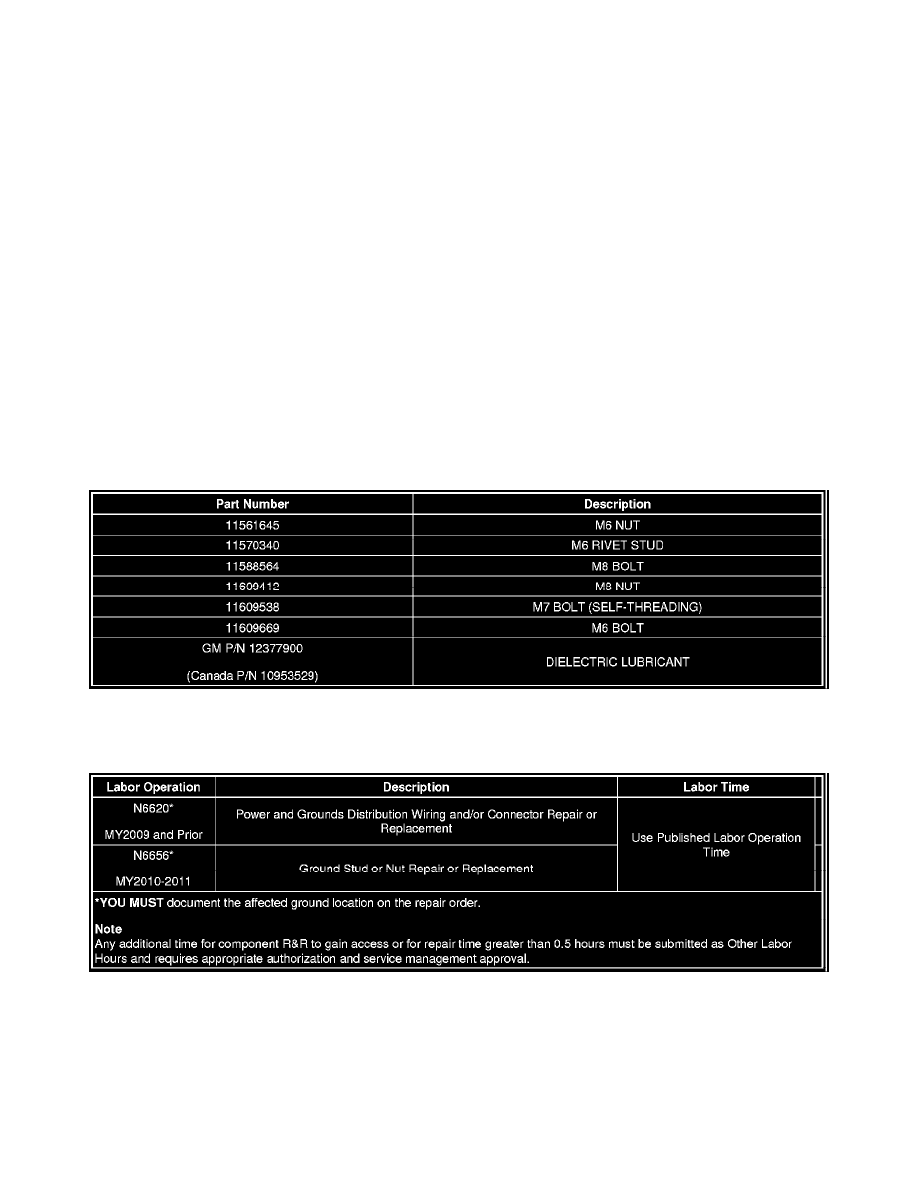
Parts Information
Warranty Information (excluding Saab Models)
For vehicles repaired under warranty, use:
Warranty Information (Saab Models)