
Skylark L4-138 2.3L SOHC VIN 3 MFI QUAD 4 (1992)
Front Door Panel: Service and Repair
Door Trim Panel Replacement
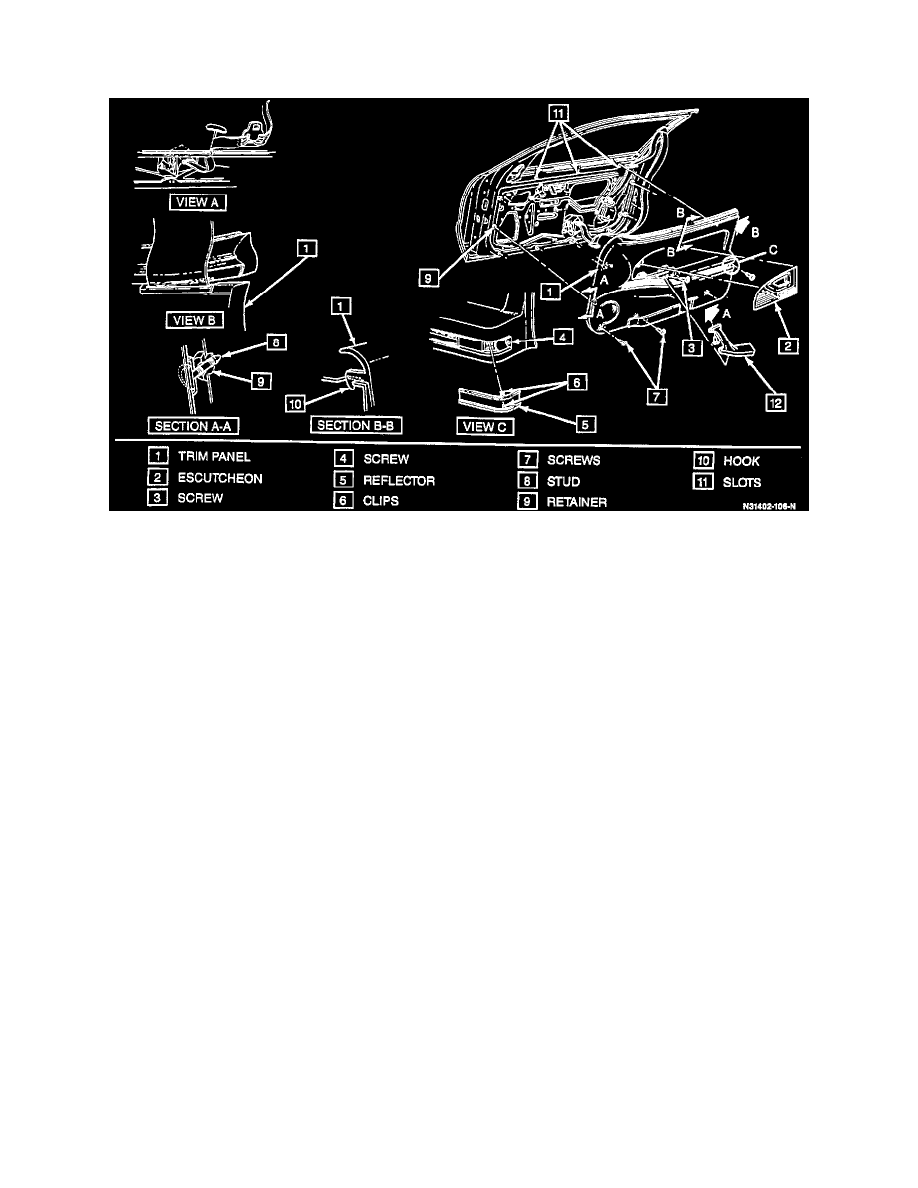
Door Trim Panel Assembly - 2 Door Shown
NOTICE: When removing a door trim panel that has a power window switch attached, the ignition switch must be in the off position. This will
eliminate the possibility of shorting out the switch if a screwdriver or awl is used to remove the switch from the harness.
Remove or Disconnect
1. Outside mirror escutcheon.
2. Seat belt opening escutcheon.
3. Screw (3).
4. Reflector (5) using a thin bladed screw driver to disengage clips (6) from trim panel (1).
5. Screw (4).
6. Screws (7).
7. Window regulator handle if equipped.
8. Pull outboard on trim panel (1), disengaging studs (8) from retainers (9).
9. Seat belt through slit in bottom of trim panel.
10. Lift up on bottom of trim panel (1) to disengage hooks (10) from slots (11).
11. Any electrical connectors to switches on trim panel.
12. Trim panel (1) from vehicle.
Install or Connect
1. Any electrical connectors to switches on trim panel (1).
2. Hooks (10) into slots (11) and push down on trim panel to engage.
3. Seat belt through slits in top and bottom of trim panel.
4. Align studs (8) to retainers (9) and apply pressure on trim panel to engage.
5. Screws (7).
6. Screws (4).
7. Reflector (5) by aligning clips (6) to slots in trim panel (1) and apply pressure to secure in place.
8. Screw (3).
9. Inside pull handle.
10. Window regulator handle, if equipped.
11. Seat belt opening escutcheon.
12. Outside mirror escutcheon.