
Skylark V6-173 2.8L VIN X 2-bbl (1984)
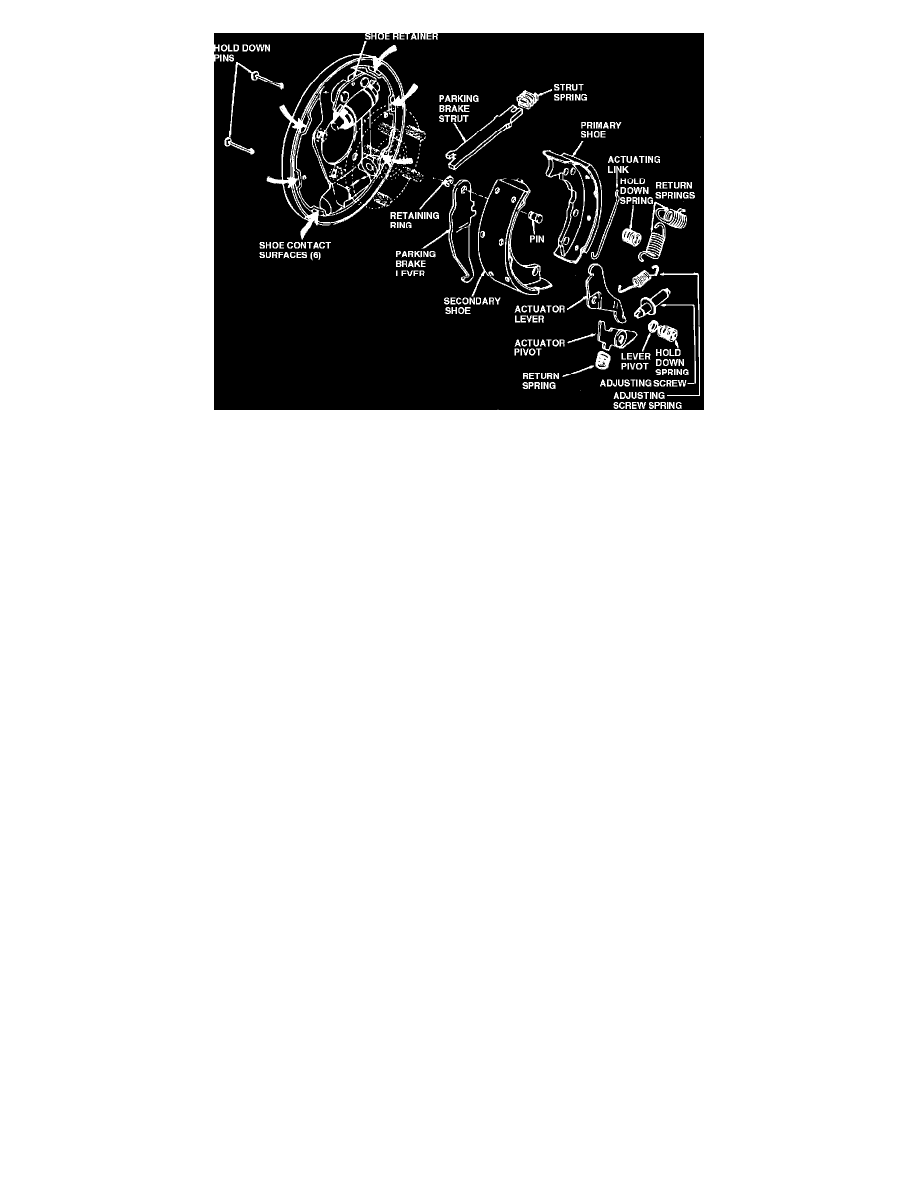
Fig. 1 Drum brake assembly. Type 4
1.
Inspect components for damage or unusual wear. Replace as necessary.
2.
On Chevette and 1000 models, inspect backing plate for evidence of axle seal leakage. If leakage exists, refer to individual car chapter for axle
seal replacement procedure.
3.
Inspect backing plate attaching bolts, and ensure they are tight.
4.
Inspect wheel cylinders. Excessive fluid indicates cup leakage and need for wheel cylinder replacement. A slight amount of fluid is always
present and is considered normal, acting as a lubricant for the cylinder pistons.
5.
Check adjuster screw operation. If satisfactory, lightly lubricate adjusting screw and washer with suitable brake lube. If operation is unsatisfactory,
replace.
6.
Using fine emery cloth or other suitable abrasive, clean rust and dirt from shoe contact surfaces on backing plate, Fig. 1.
Installation
1.
Lightly lubricate backing plate shoe contact surfaces with suitable brake lube.
2.
Install parking brake lever on secondary shoe.
3.
Connect primary and secondary brake shoes with adjusting screw spring, then position adjusting screw in same position from which it was
removed. Ensure adjusting screw spring star-wheel does not contact adjusting screw spring after installation, and also ensure righthand
thread adjusting screw is installed on left side of vehicle and lefthand thread adjusting screw is installed on right side of vehicle.
4.
Spread brake shoes apart to clear axle flange, then install parking brake cable on lever. Position brake assembly on backing plate.
5.
Spread brake shoes slightly, then install parking brake strut and spring. Spring end of strut engages the primary shoe, while the other end engages
the parking brake lever and secondary shoe.
6.
Install actuator lever, pivot and return spring, then hook actuating link in shoe retainer.
7.
Lift actuator lever and hook actuating link to lever.
8.
Install hold-down pins, lever pivot and hold-down springs.
9.
Install primary and secondary return springs using suitable brake spring pliers.
10.
Using suitable brake drum to shoe gauge, Fig. 2, measure brake drum inside diameter. Adjust brake shoes to dimension obtained on outside
portion of gauge, Fig. 3.
11.
Install brake drum, tire and wheel assembly.
12.
If any hydraulic connections have been opened, bleed brake system.
13.
Adjust parking brake. Refer to individual car chapters for procedures.
14.
Inspect all hydraulic lines and connections for leakage, and repair as necessary.
15.
Check master cylinder fluid level, and replenish as necessary.
16.
Check brake pedal for proper feel and return.
17.
Lower vehicle and road test. Do not severely apply brakes immediately after installation of new brake linings or permanent damage may
occur to linings, and/or brake drums may become scored. Brakes must be used moderately during first several hundred miles of operation
to ensure proper burnishing of linings.