
DeVille V8-252 4.1L VIN 8 FI (1983)
Valve Cover Gasket: Technical Service Bulletins
Rocker Arm Cover Gasket - Revised
Bulletin No. T
83-26
File In Group
6A
Number
30
Date
Jan. '83
HT4100 ROCKER ARM COVER GASKET -
1982 AND 1983 HT4100 ENGINE EQUIPPED CADILLACS
A rocker arm cover gasket (PIN 1627340) has been released by Cadillac and is now available through GMWDD. This new design cork-hypalon gasket
can be used when servicing rocker arm cover oil leaks on 1982 and 1983 HT4100 engines. This new design gasket does not supersede the use of RTV,
but has been made available as an optional method for sealing rocker arm covers on HT4100 engine equipped Cadillacs.
Refer to the following procedure when installing these gaskets:
1.
Remove rocker arm cover(s) as outlined in the 1982 or 1983 Service Information Manual on pages 6A8-10 or 6D1-1 respectively.
2.
Remove and clean triangular end seals. Remove all traces of RTV from rocker arm cover(s) using a suitable sharp scraper. Remove RTV from
block and intake manifold using a dull scraper such as J-28410. Once the RTV bead is broken "strands" of RTV can be removed with your fingers.
Cured RTV is not affected by most parts cleaning solvents; therefore, soaking the parts will not help in removing RTV.
3.
Inspect sealing flange of cover(s) to ensure that flange is not distorted from removal. If damage exists, cover(s) should be carefully reformed using
a wooden block and plastic hammer so that flange is perpendicular to cover and flat all around.
4.
Apply RTV, such as 1052751 or equivalent, to two short edges of triangular seals and install seals in position. Do not allow RTV to contact rocker
cover gasket or sealing surfaces.
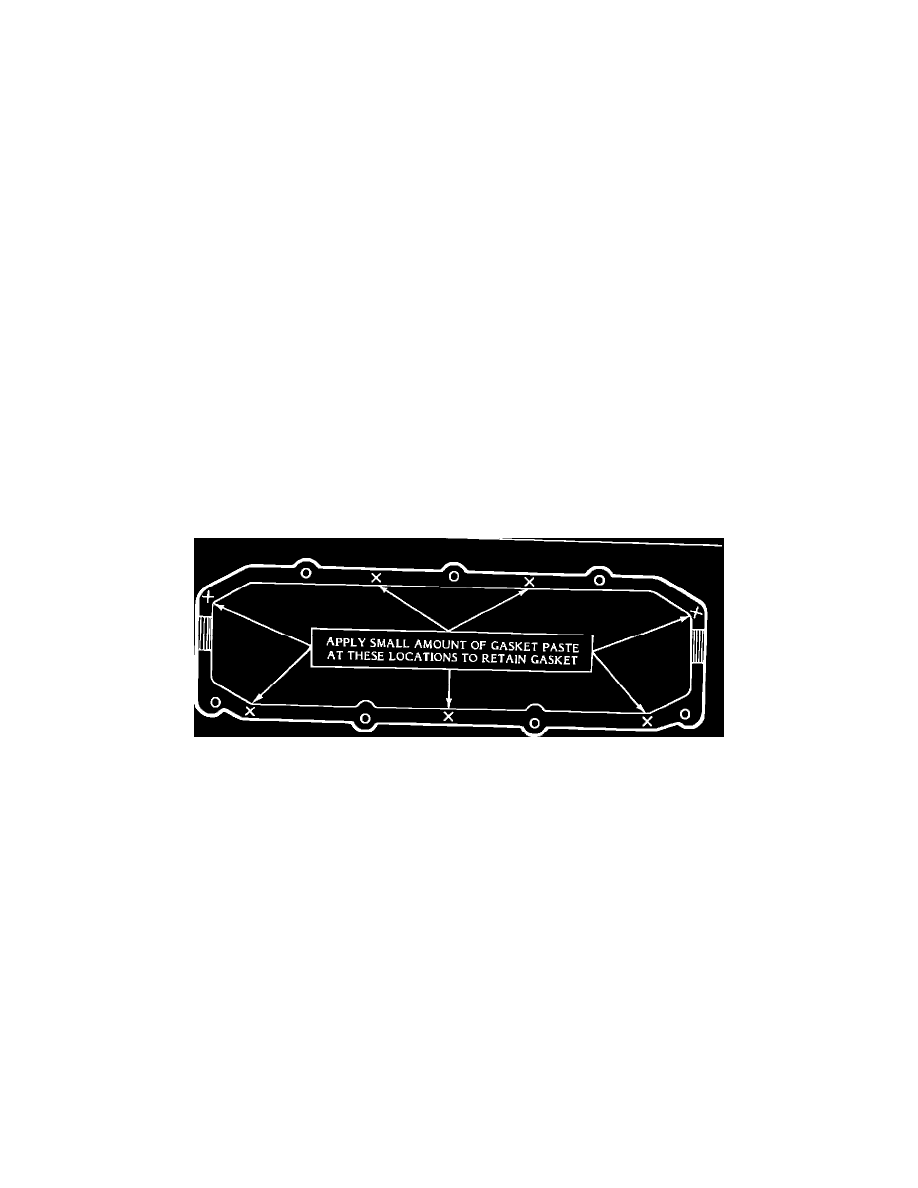
FIGURE 1 - INSTALLING A ROCKER ARM COVER GASKET
5.
Apply a small amount of gasket paste, such as 1050026, or equivalent to sealing surface of cylinder head and intake manifold at several locations
(refer to Figure 1). DO NOT use RTV for this purpose.
6.
Position gasket onto cylinder head and intake manifold. Gasket paste will hold gasket in place while installing cover.
7.
Position cover(s) and install screws. Torque screws evenly to a maximum of 4 N-m (35 in. lbs.). Do not overtorque screws as this could distort
cover and cause a poor seal.
8.
Complete reassembly as outlined in the 1982 or 1983 Service Information Manual on pages 6A8-10 or 6D1-3 respectively.
For warranty purposes, use the published time allowances for existing labor Operation Numbers J0300 (RH), J0301 (LH) and J0307 (Both).